Smart EMR — Clone & Setup in 3 Steps
1 Clone the App (Get Your Own Copy)
The first step is to get your own personal copy of Smart EMR. This is called "cloning" the app. This is the most important step — without cloning, you do not have the app.
- Open the CDA app on your computer browser: go to clinic.ai4docs.ai and sign in
- Click the Settings icon (gear icon)
- In the Settings panel, scroll down to the bottom. You will see a section called Smart EMR with a button that says "Clone Smart EMR" (only visible to subscribers)
- Click the "Clone Smart EMR" button
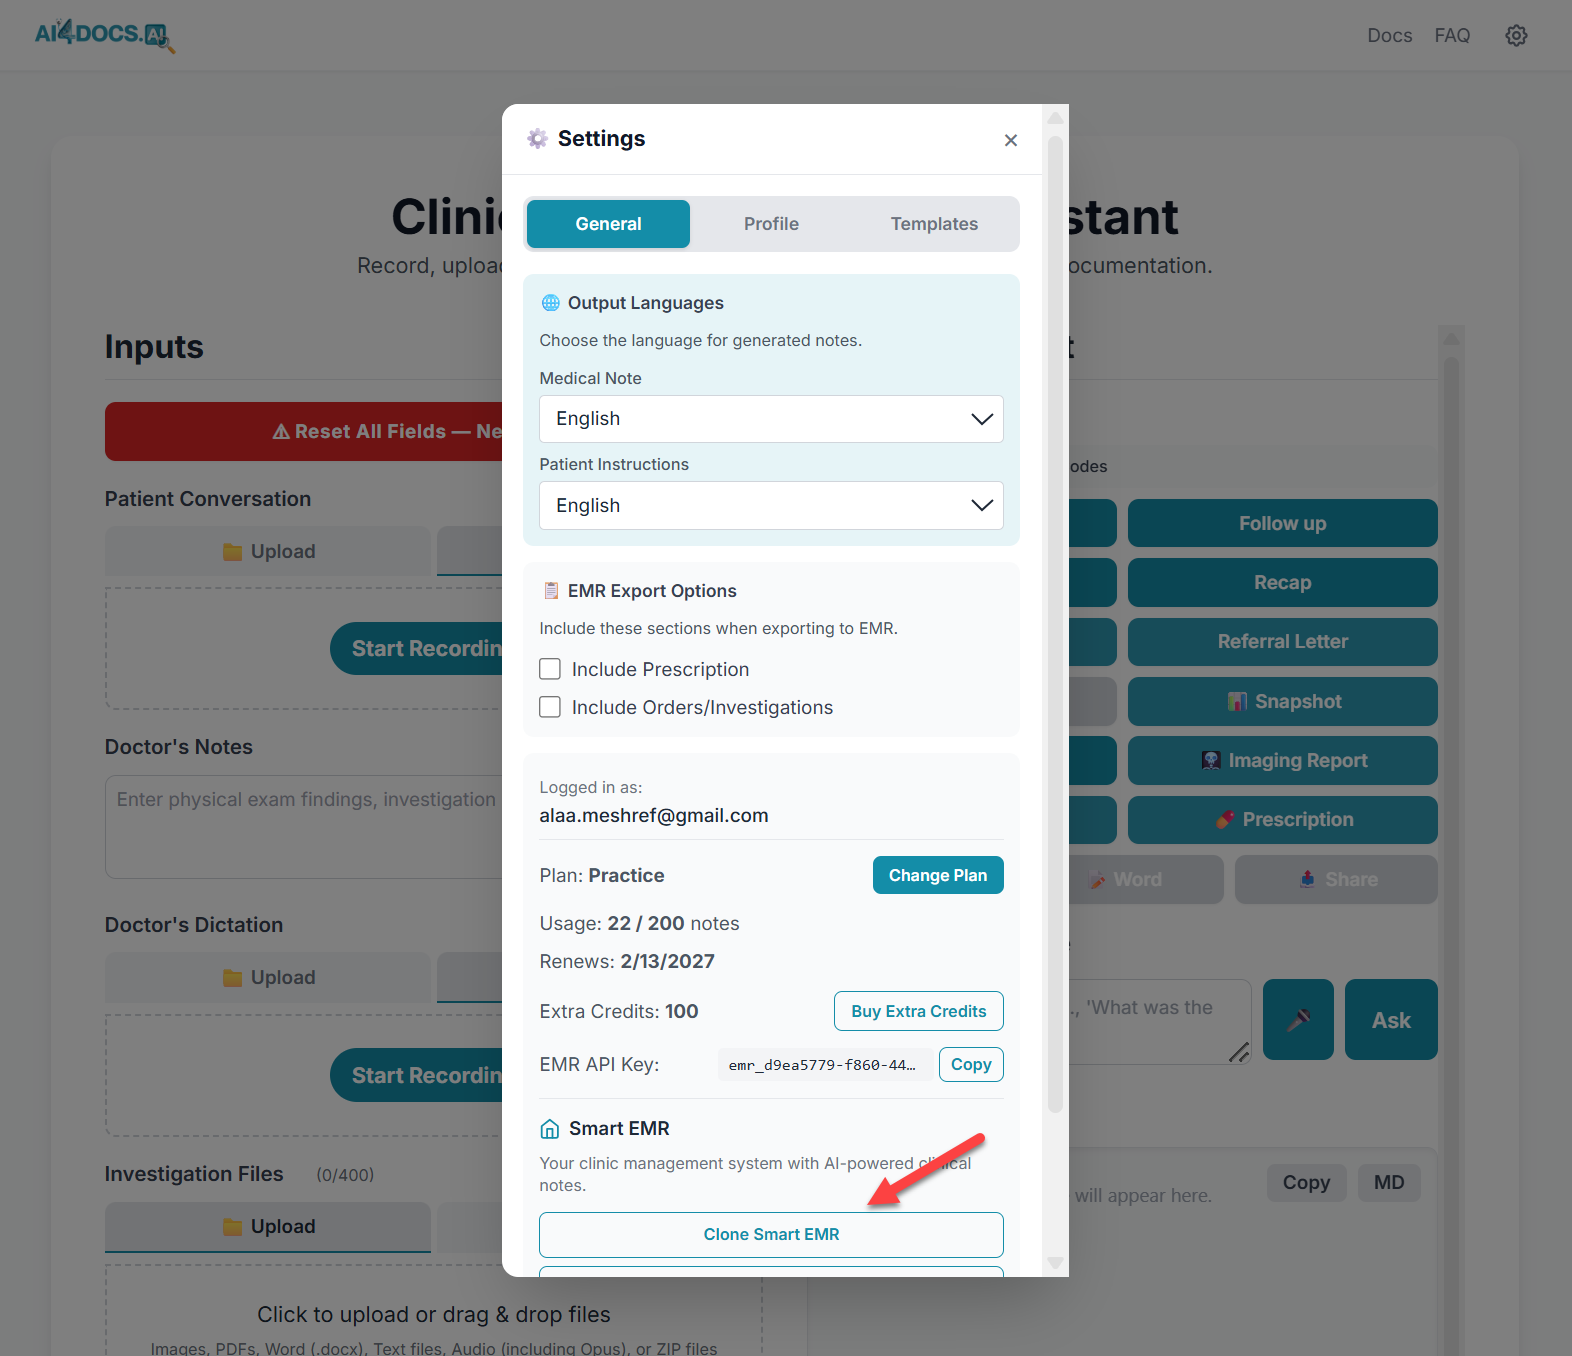
CDA Settings — scroll to the bottom and click "Clone Smart EMR"
- A new browser tab opens showing the AppSheet template. Click the "Copy" button to create your personal copy of the app
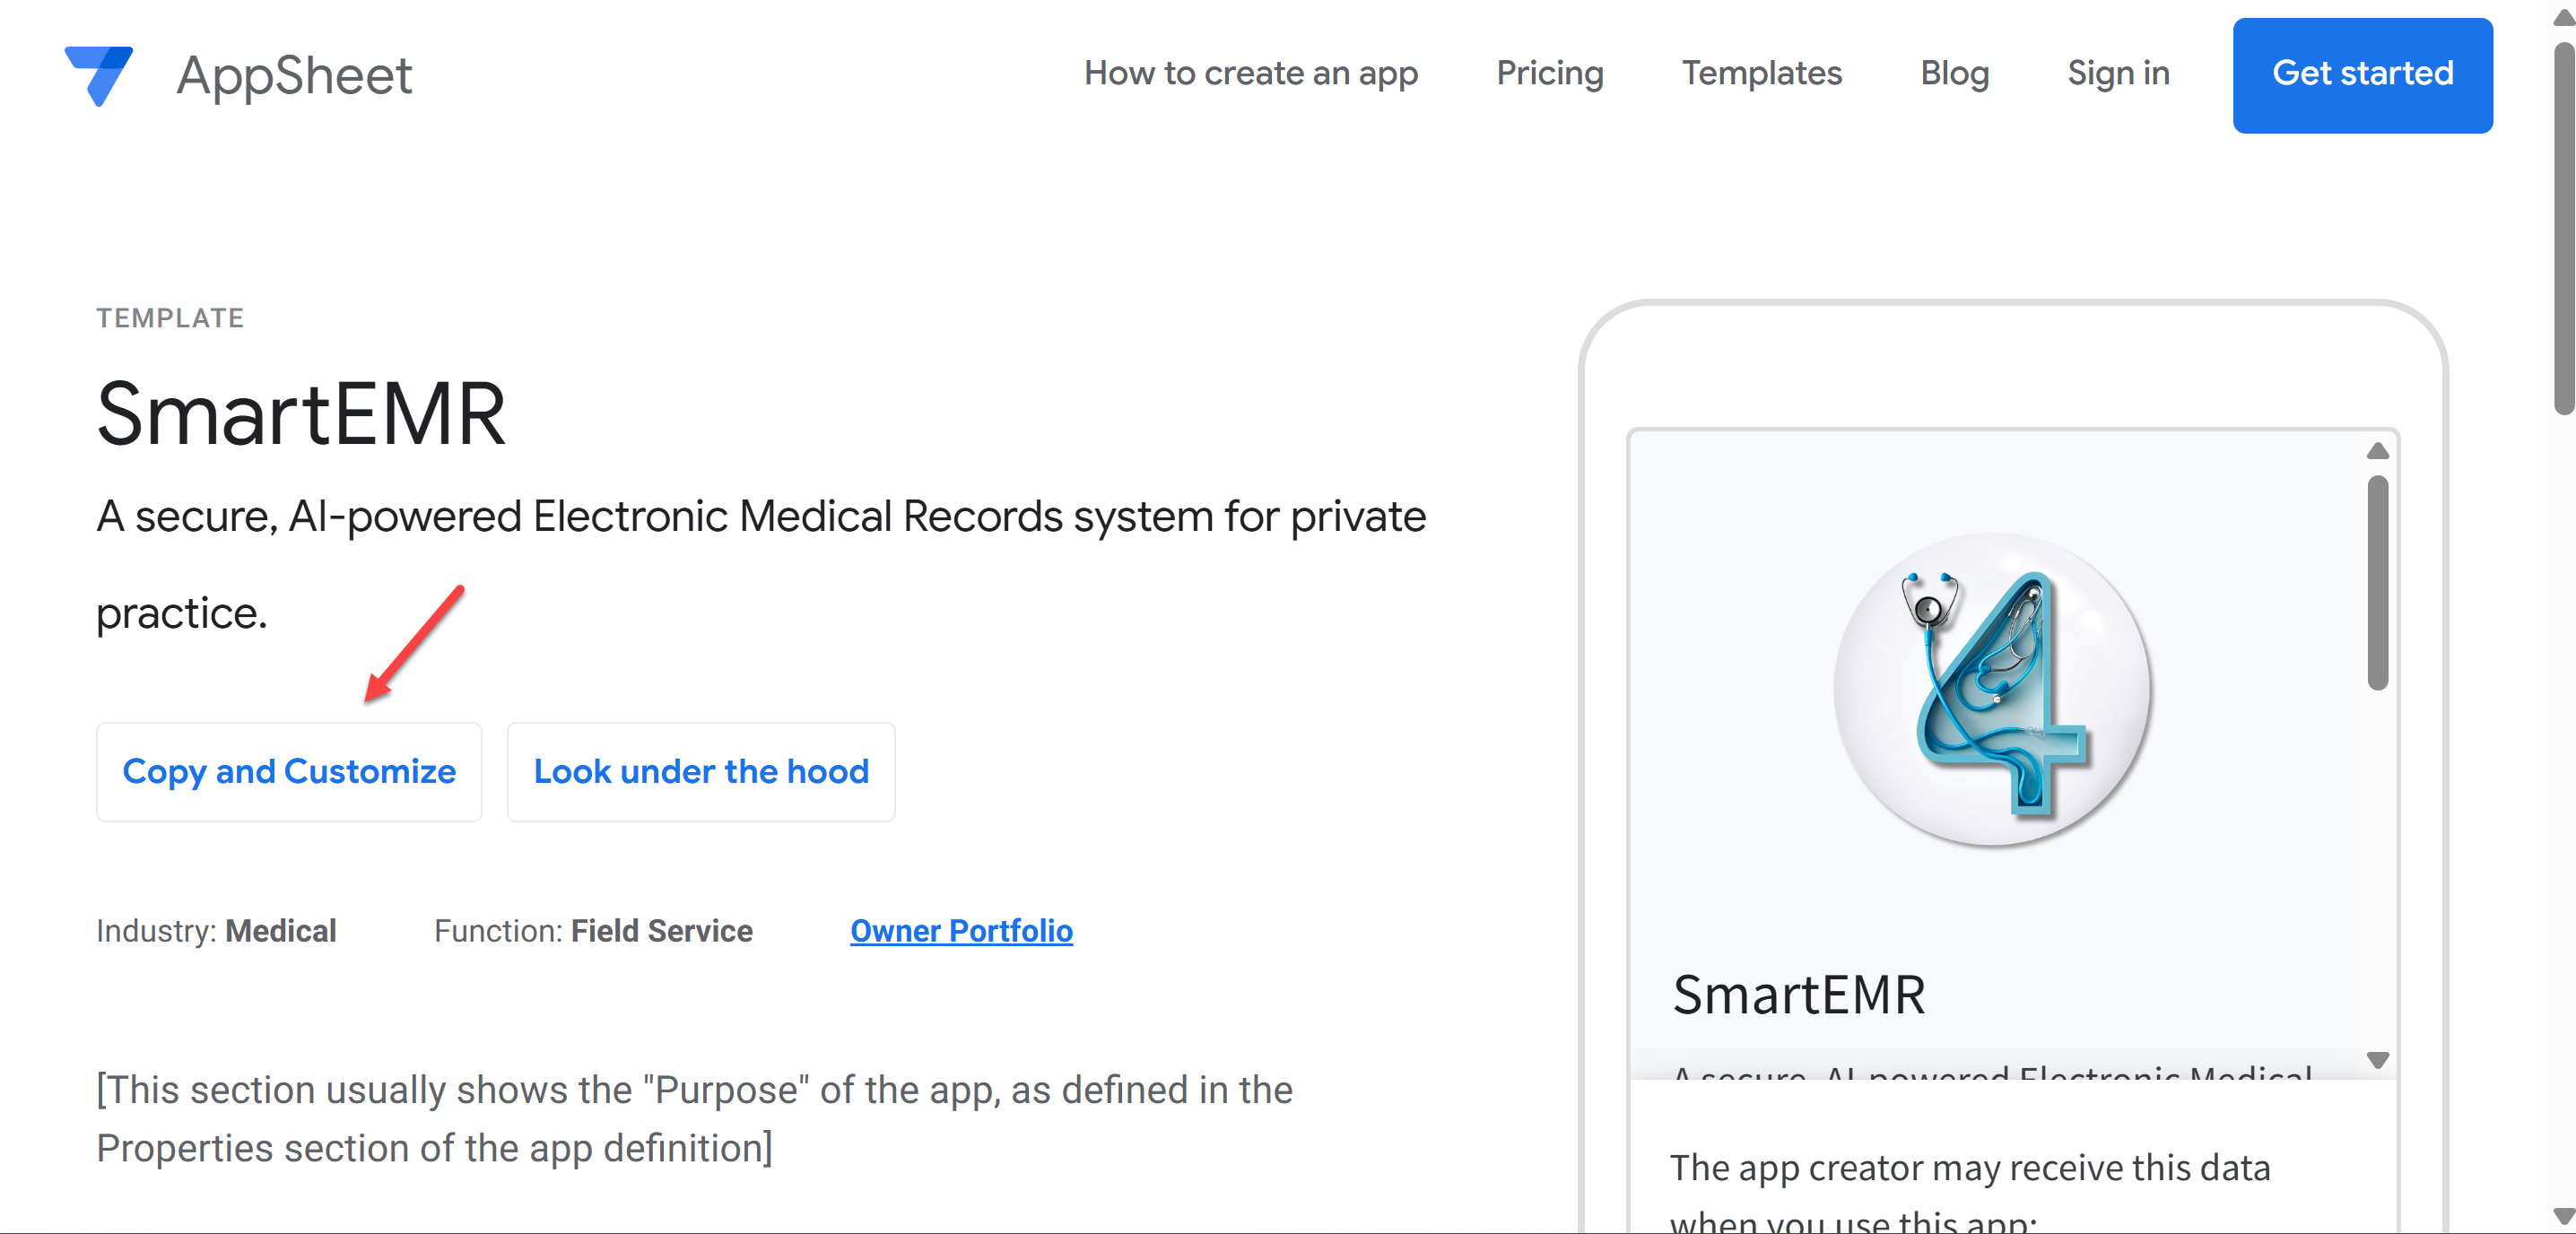
Click "Copy" to create your personal copy of Smart EMR
- Wait a few seconds while AppSheet creates your copy. When it is done, your brand new Smart EMR app opens in the AppSheet editor
- You now have your own Smart EMR! A Google Sheets file called "Visits" has been automatically created in your Google Drive (inside the
AppSheet/data/SmartEMR-XXXXXfolder)
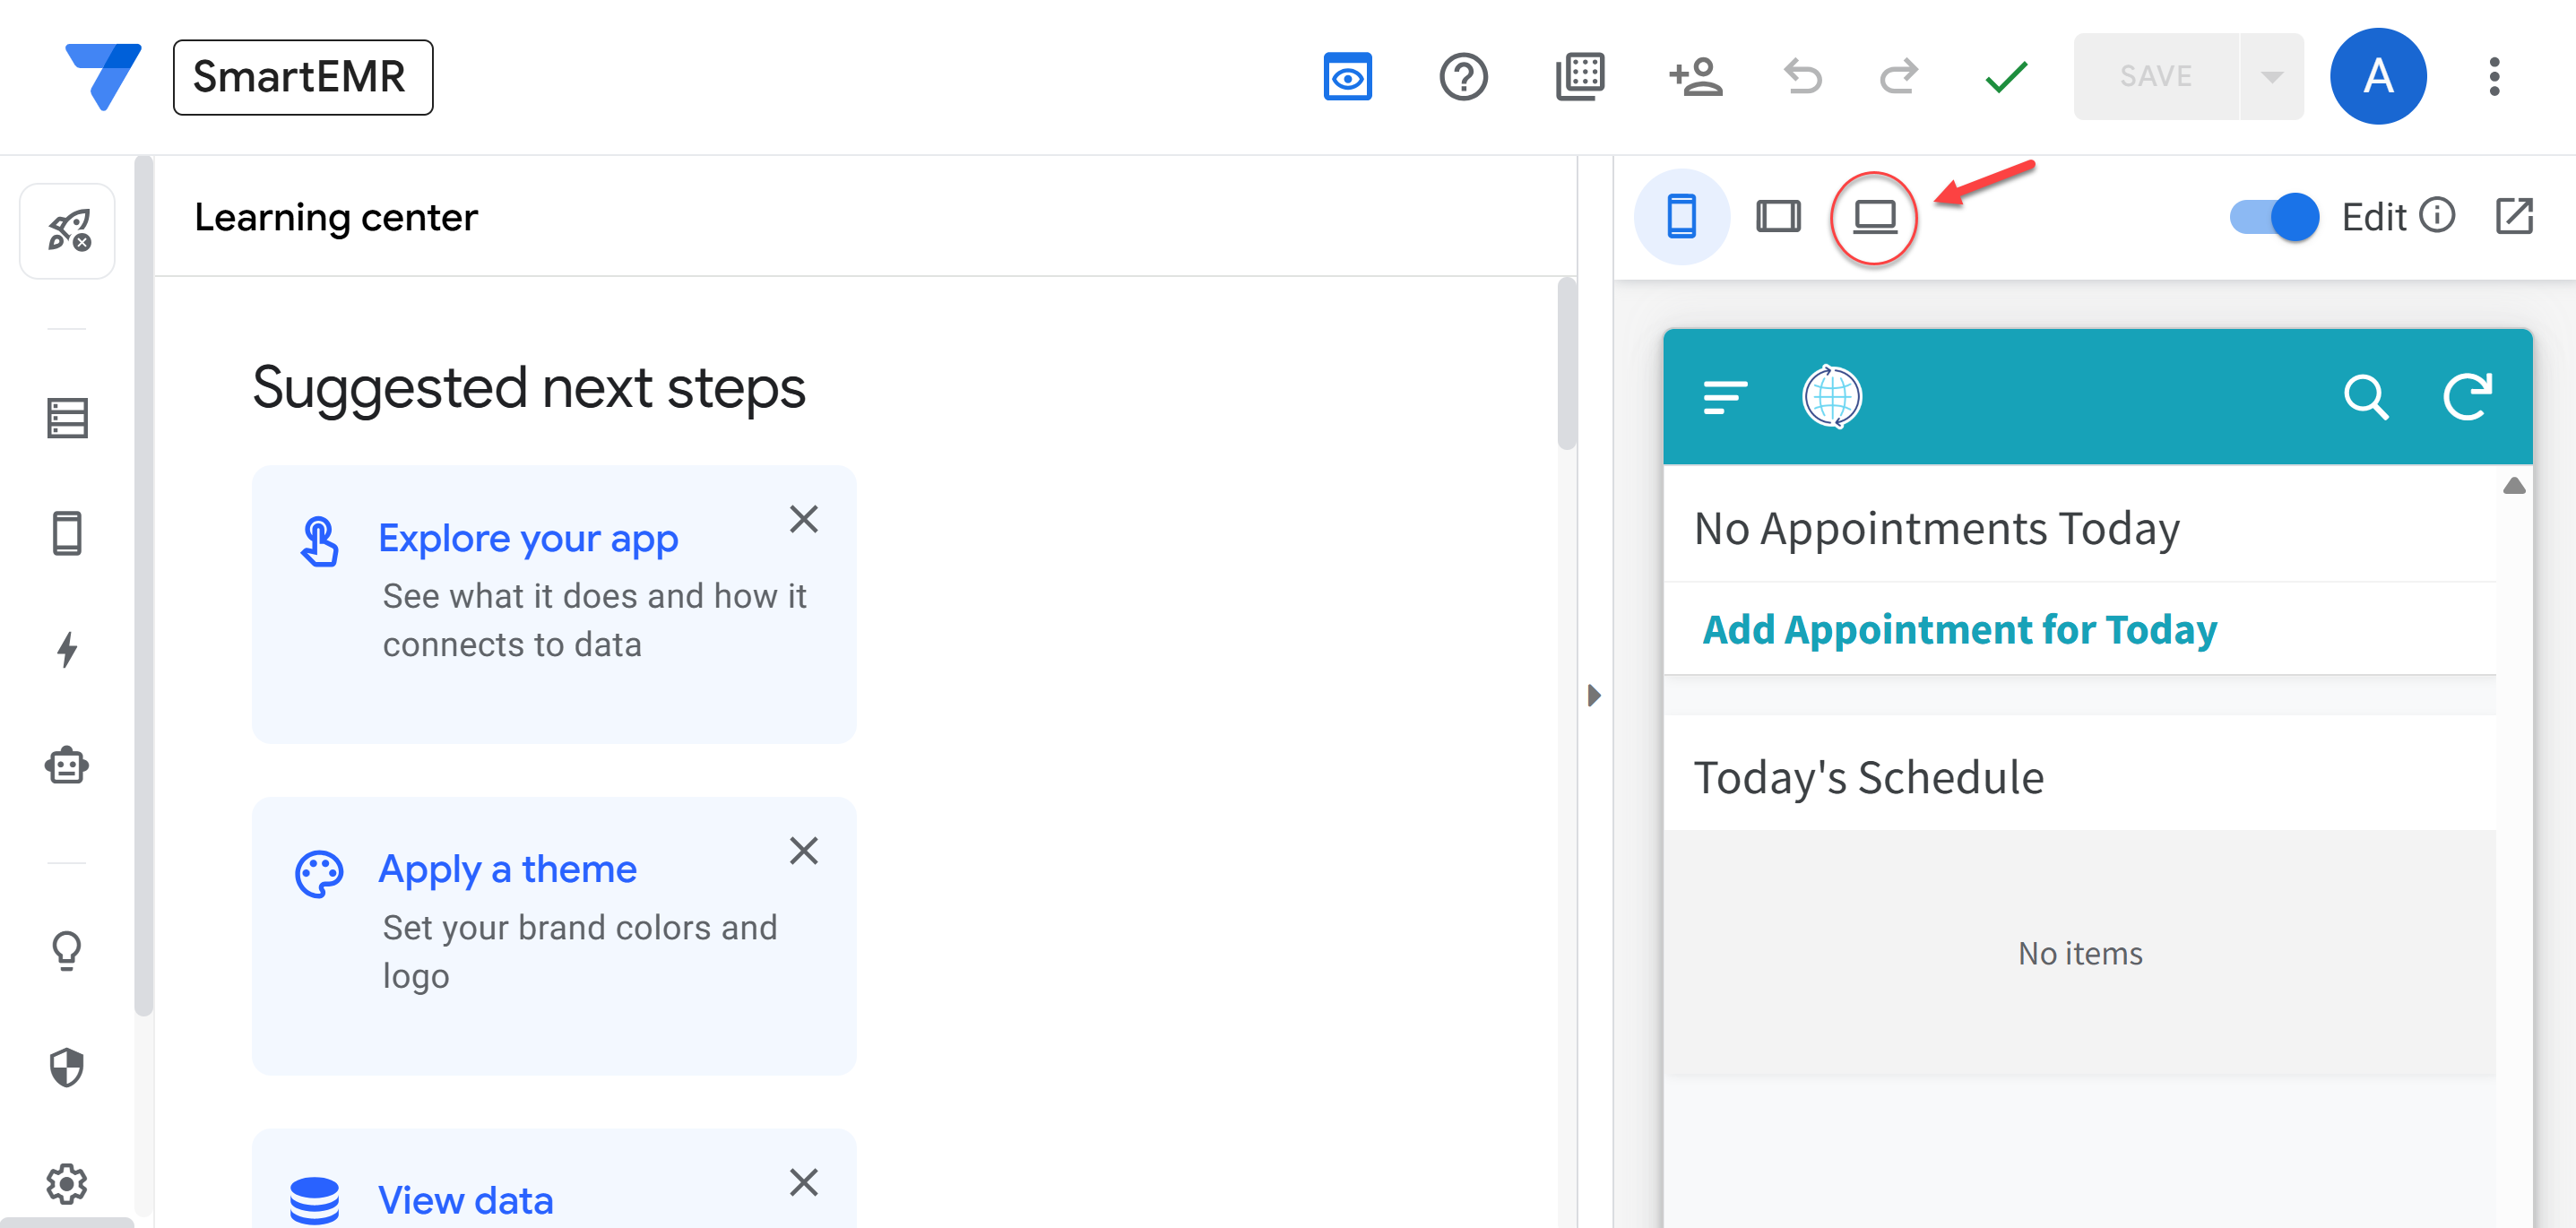
Smart EMR desktop view — your app is ready for setup
Installing AppSheet on Your Devices
Smart EMR runs on a platform called AppSheet (made by Google). You need to install it on every device where you (or your staff) will use Smart EMR.
On iPhone or iPad
- Open the App Store
- Search for AppSheet
- Install the app by Google (purple/blue icon)
- Open AppSheet and sign in with your Gmail address — the same one you used for AI4Docs.AI CDA
On Android Phone or Tablet
- Open the Google Play Store
- Search for AppSheet
- Install the app by Google
- Open AppSheet and sign in with your Gmail address — the same one you used for AI4Docs.AI CDA
On a Computer (Windows or Mac)
No installation needed. Smart EMR runs in your web browser. After cloning, go to www.appsheet.com, sign in, and your Smart EMR app will be listed. Bookmark it for easy access.
2 Add Your Admin Account
When you first open Smart EMR after cloning, it has a placeholder user (SETUP_REQUIRED@clinic.com). You need to add yourself as the real administrator, then remove the placeholder.
SETUP_REQUIRED@clinic.com). If you delete the placeholder first, you will be locked out and must re-clone the app and delete the locked one.
Part A: Open Setup
- Open Smart EMR on your computer
- Tap the hamburger menu (three horizontal lines at the top left corner)
- Tap Setup (gear icon)
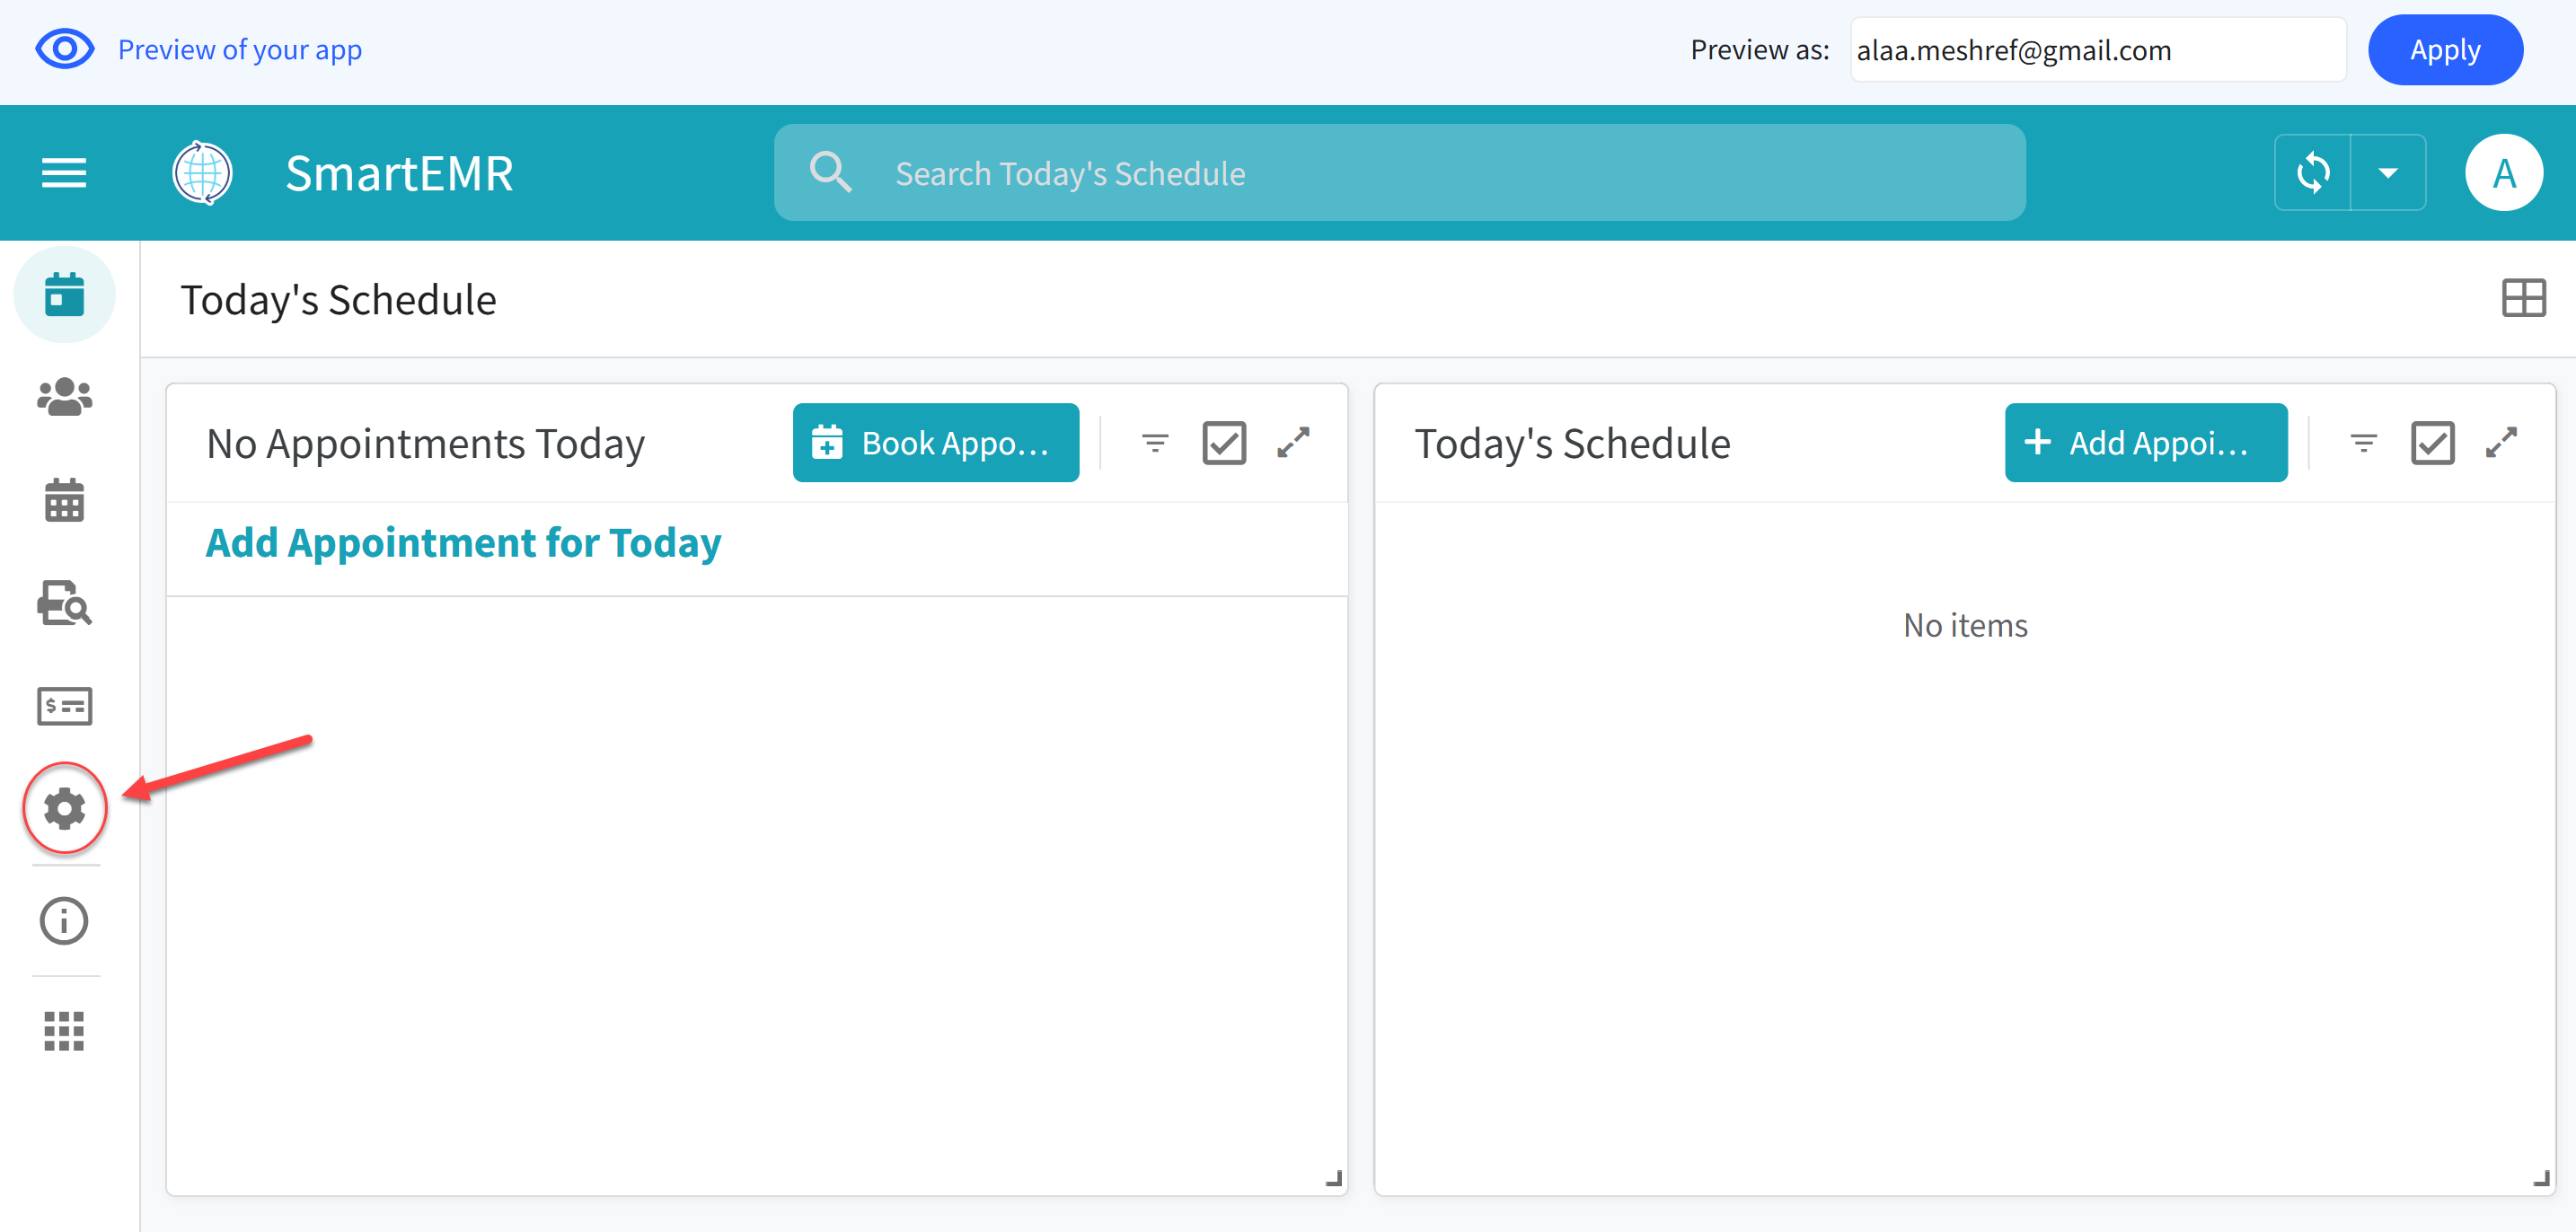
Tap the hamburger menu, then tap Setup to access configuration
Part B: Add Your Admin Account
- Tap the USERS tab at the top of the Setup screen
- Tap the Add button (+ icon) to create a new user
- Fill in:
- Email: Your real Gmail address (must be the same as your CDA and AppSheet account)
- Name: Your full name (e.g., "Dr. Ahmed Mohamed")
- Roles: Check the box next to Admin
- Active: Set to Yes
- Tap Save

Add yourself as Admin — enter your Gmail, name, and check the Admin role
Part C: Delete the Placeholder User
- Go back to the USERS tab
- Tap on the entry with the email
SETUP_REQUIRED@clinic.com - Tap Delete to remove this placeholder user
- Confirm the deletion
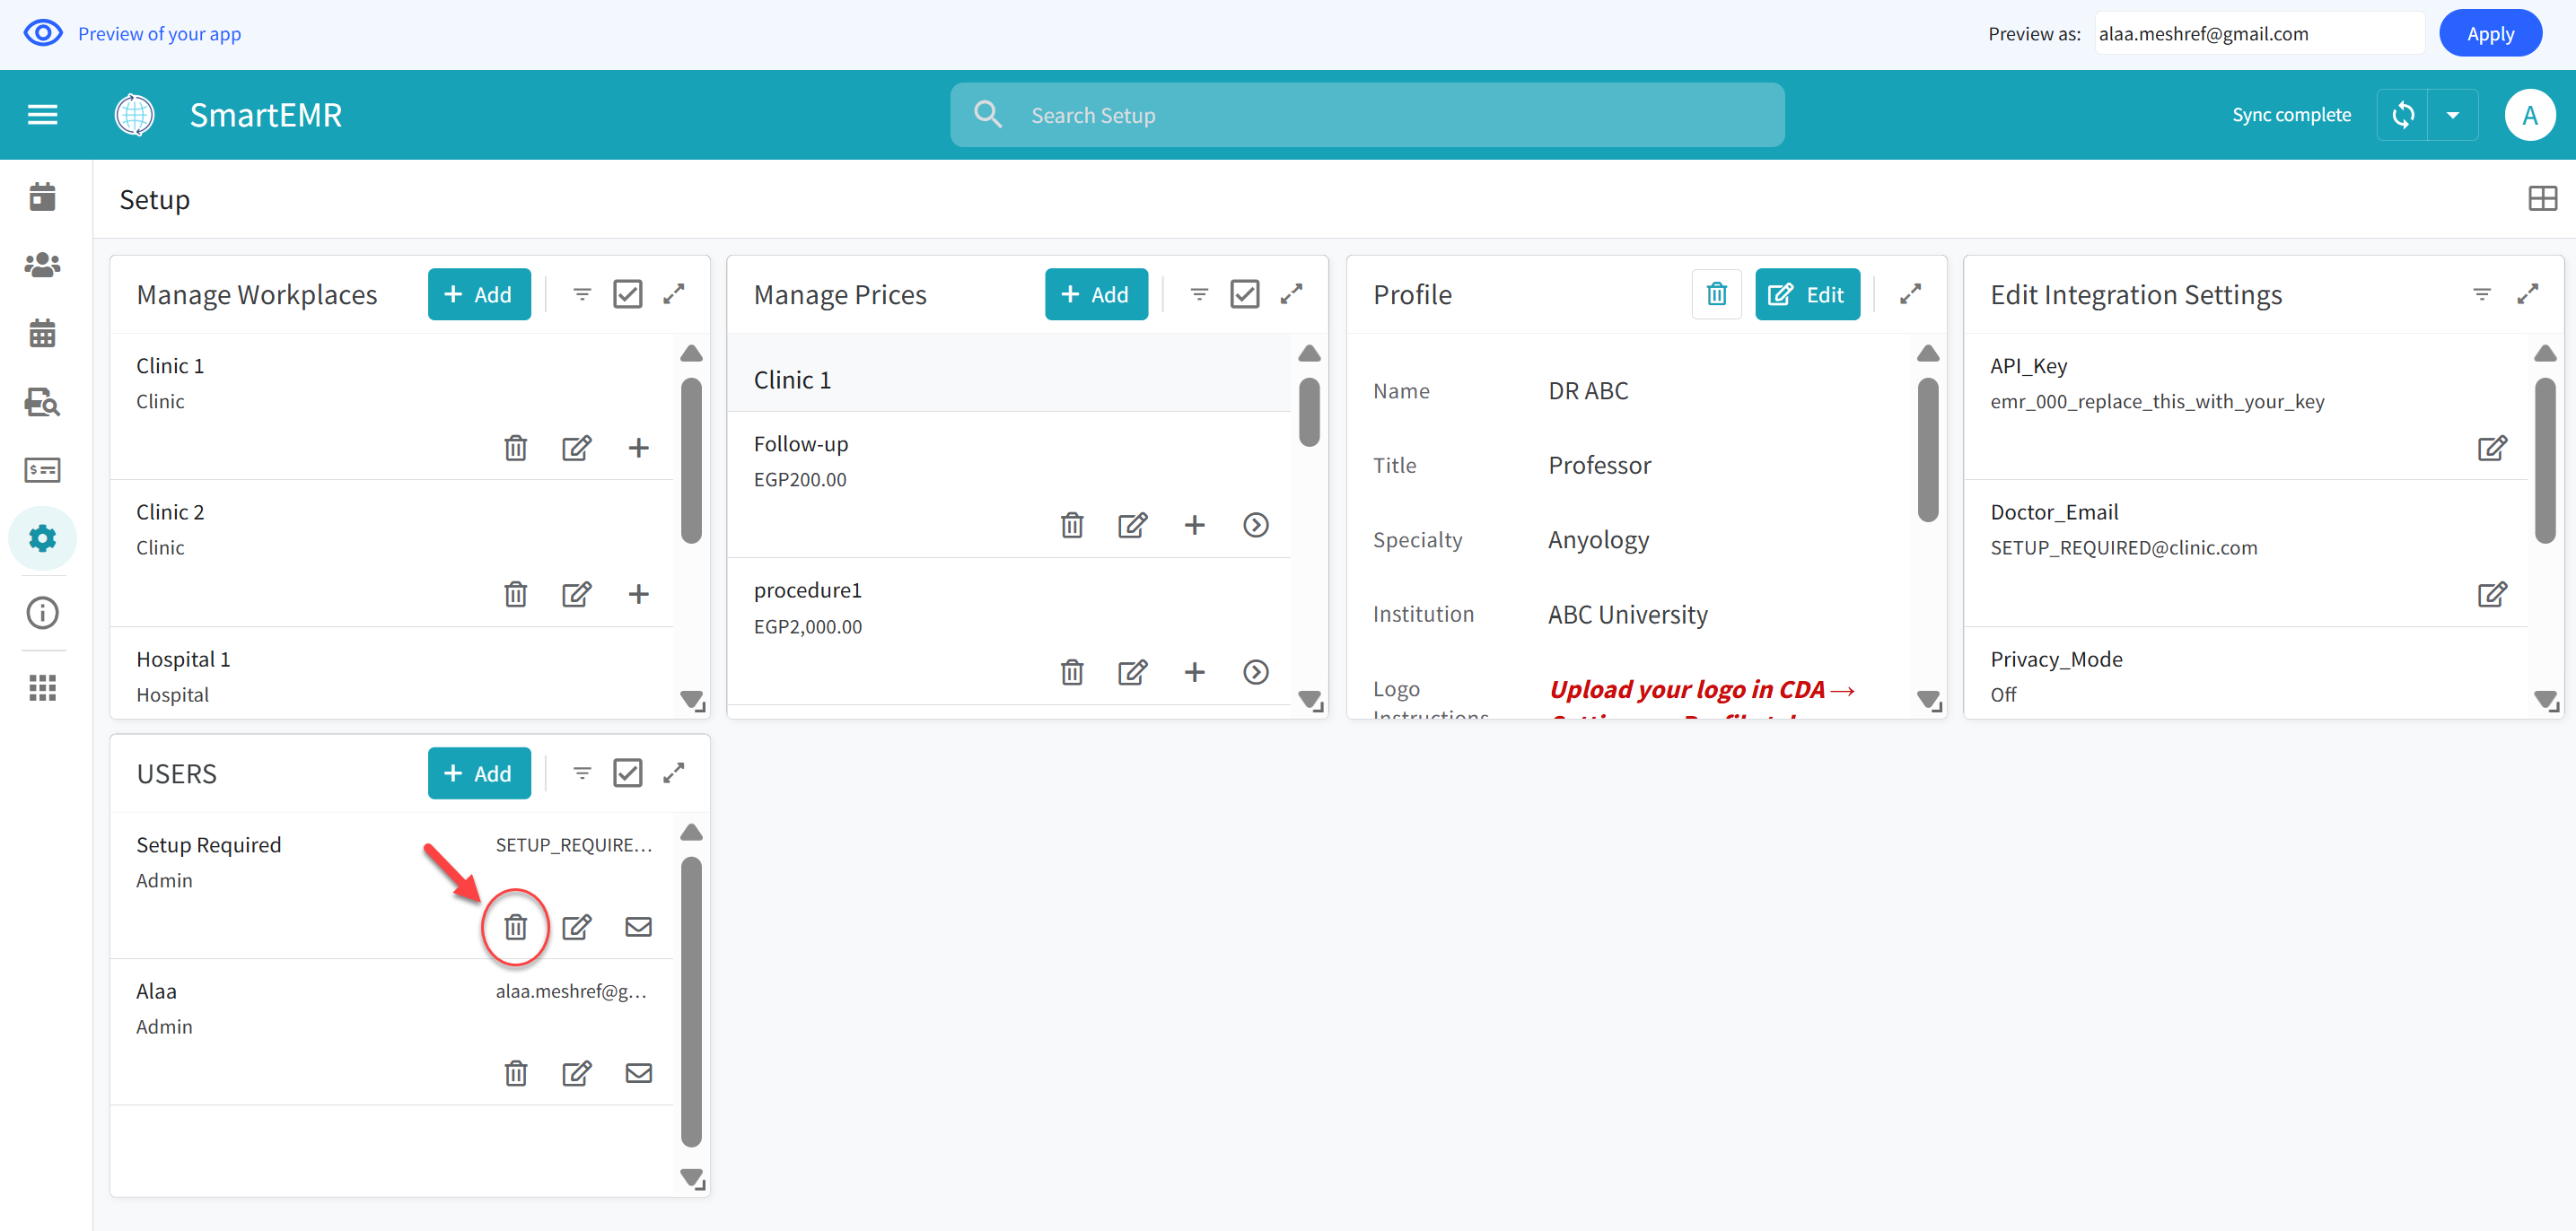
Delete the SETUP_REQUIRED placeholder — only after your admin row is saved
- On phone/tablet: Pull down from the top of the screen (like pulling a curtain)
- On computer: Click the circular refresh icon at the top right
- This is called "Sync." You will need to do this frequently. The app does NOT refresh automatically — always sync manually after any action
3 Connect AI & Share Your Spreadsheet
This step connects your Smart EMR to the AI4Docs.AI Clinical Documentation Assistant (CDA) and gives the backend service access to your data. You need three things: your API Key, your CDA email address, and your Google Sheet ID.
Part A: Copy Your API Key from the CDA App
- On your computer browser, go to clinic.ai4docs.ai and sign in
- Click the Settings icon (gear)
- In the General tab, scroll down to find your EMR API Key. It looks like:
emr_a1b2c3-d4e5f6-7890a-bcdef1 - Click the Copy button next to the key to copy it to your clipboard
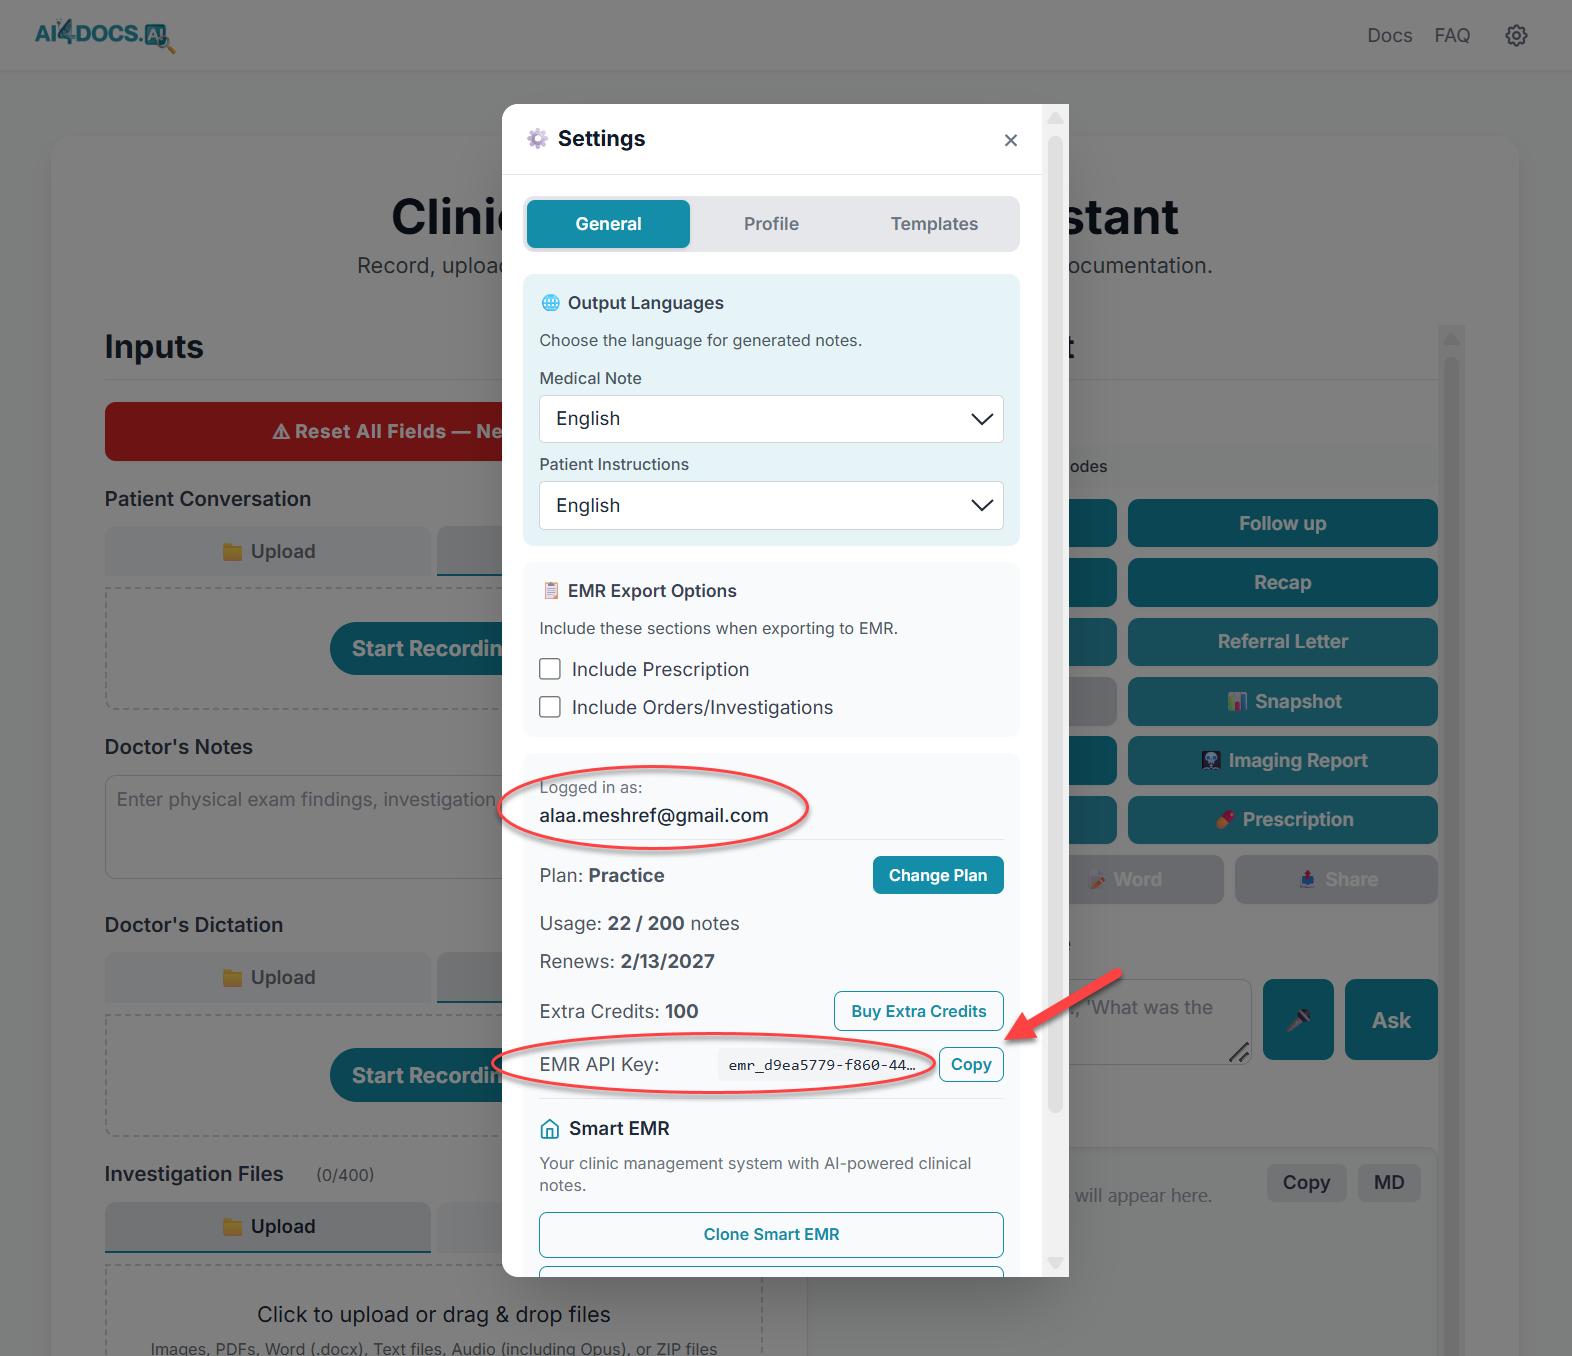
CDA Settings — copy your EMR API Key by clicking the Copy button
Part B: Enter API Key, Email, and Sheet ID in Smart EMR
- Go back to Smart EMR > hamburger menu > Setup > SETTINGS tab
- Tap the Edit button (pencil icon)
- In the API_Key field: paste the API key you copied. Replace the entire placeholder text
emr_000_replace_this_with_your_keywith your real key
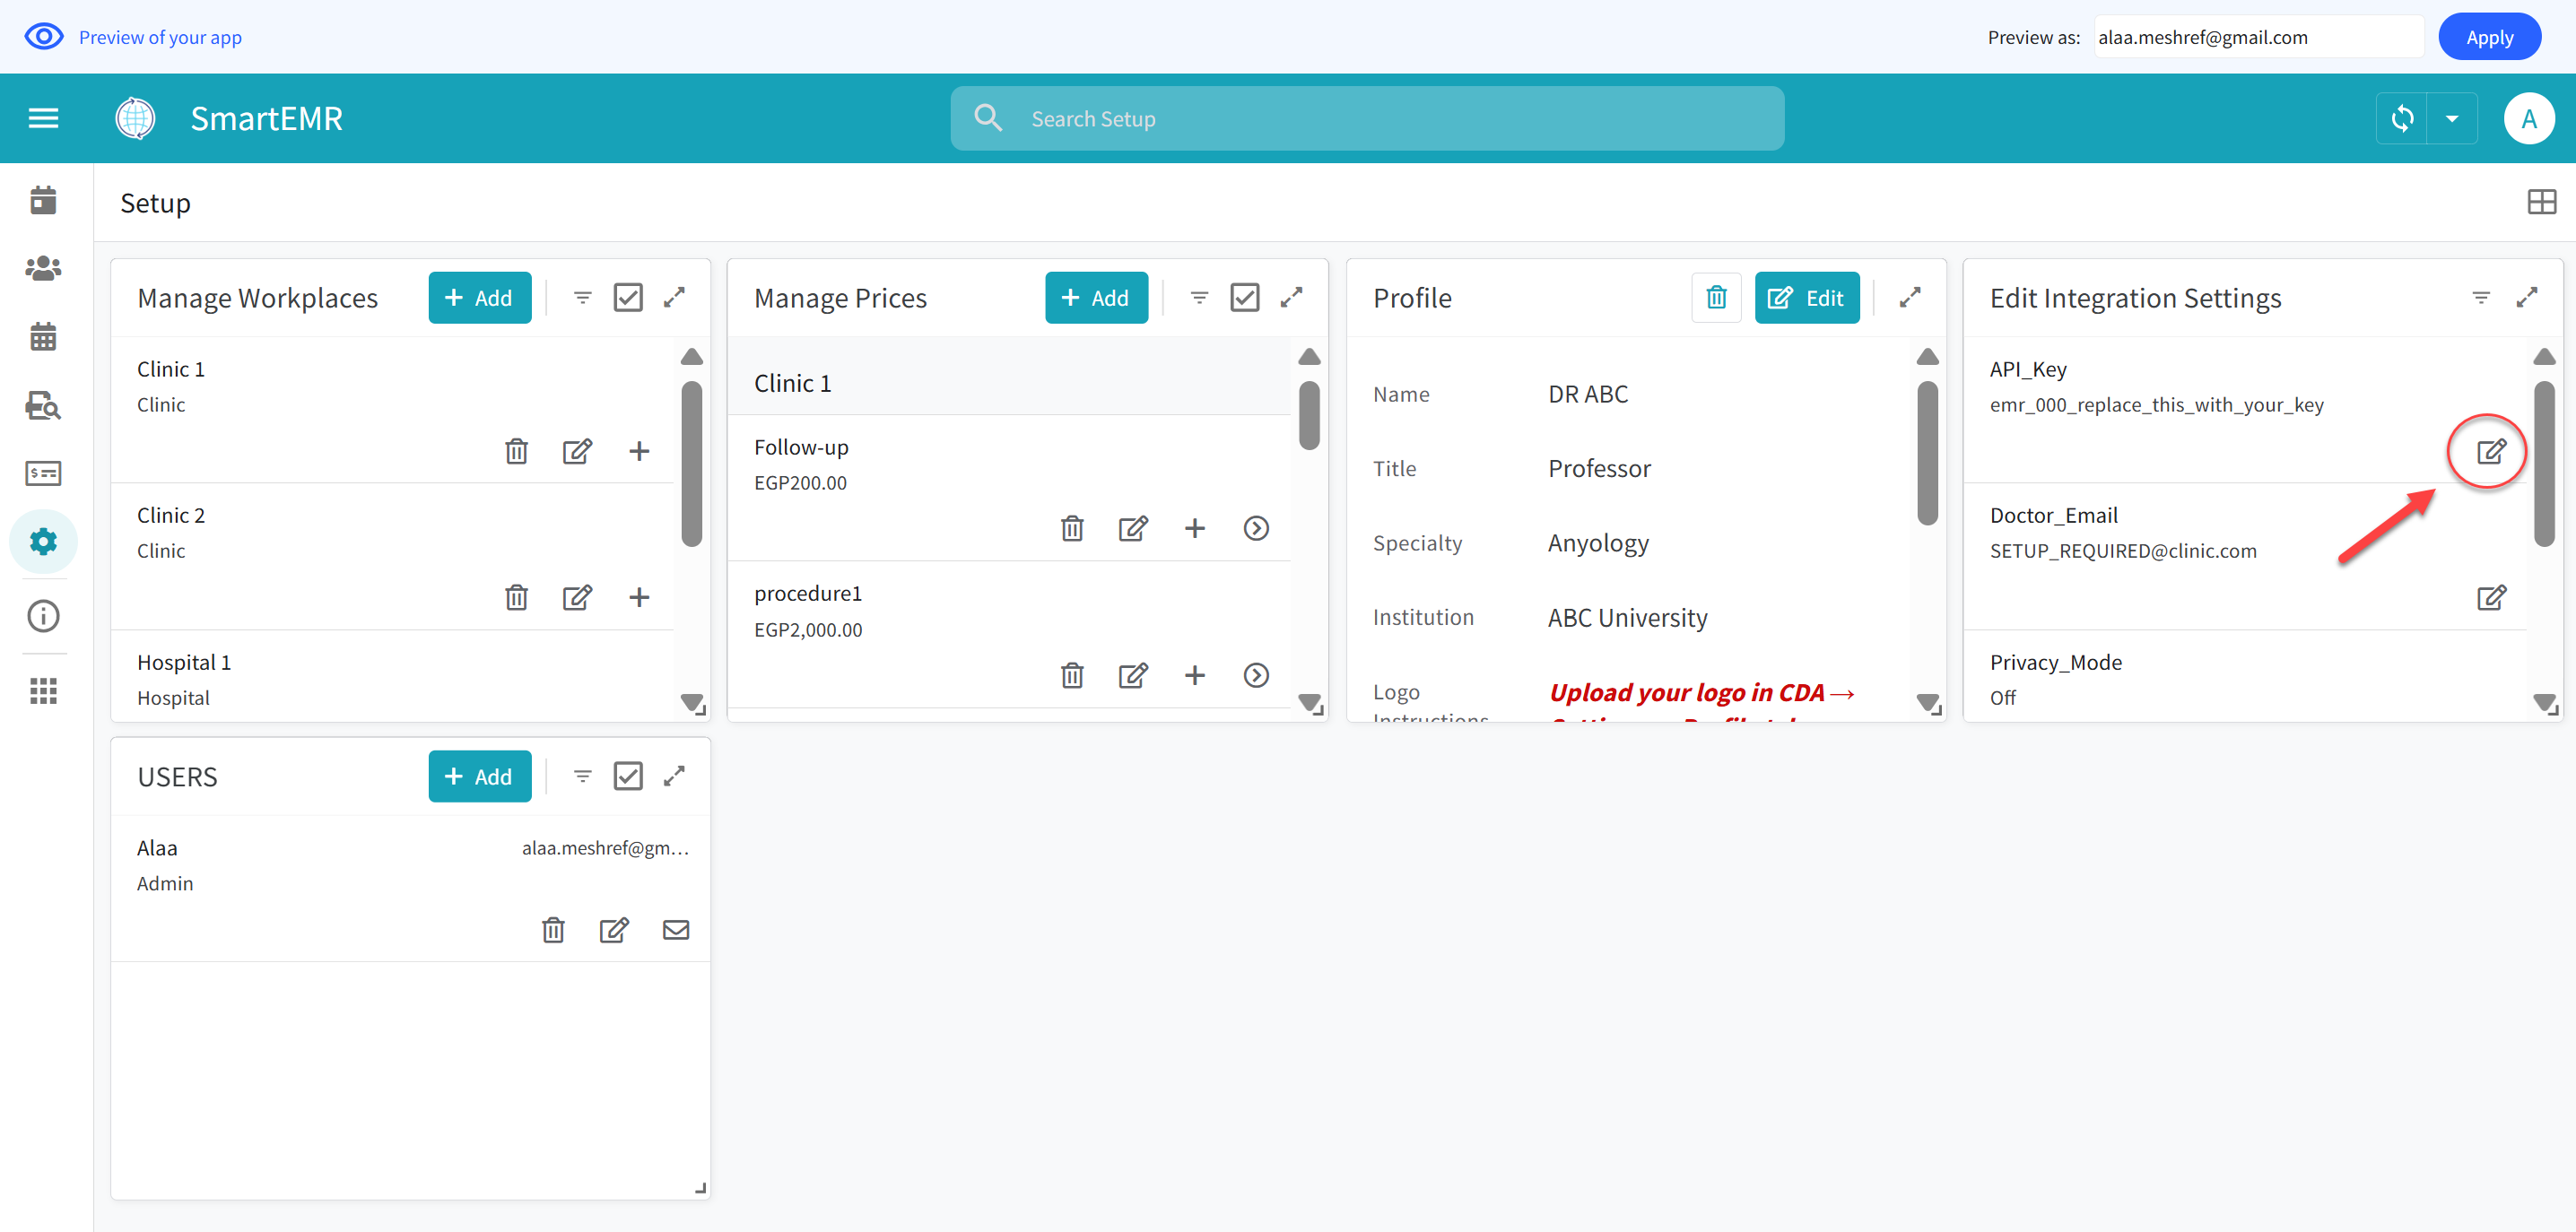
Replace the placeholder API key with your real key from CDA
- In the Doctor_Email field: type the exact same email address you use to sign into the CDA app at clinic.ai4docs.ai. This must match exactly. Replace the placeholder text
SETUP_REQUIRED@clinic.com
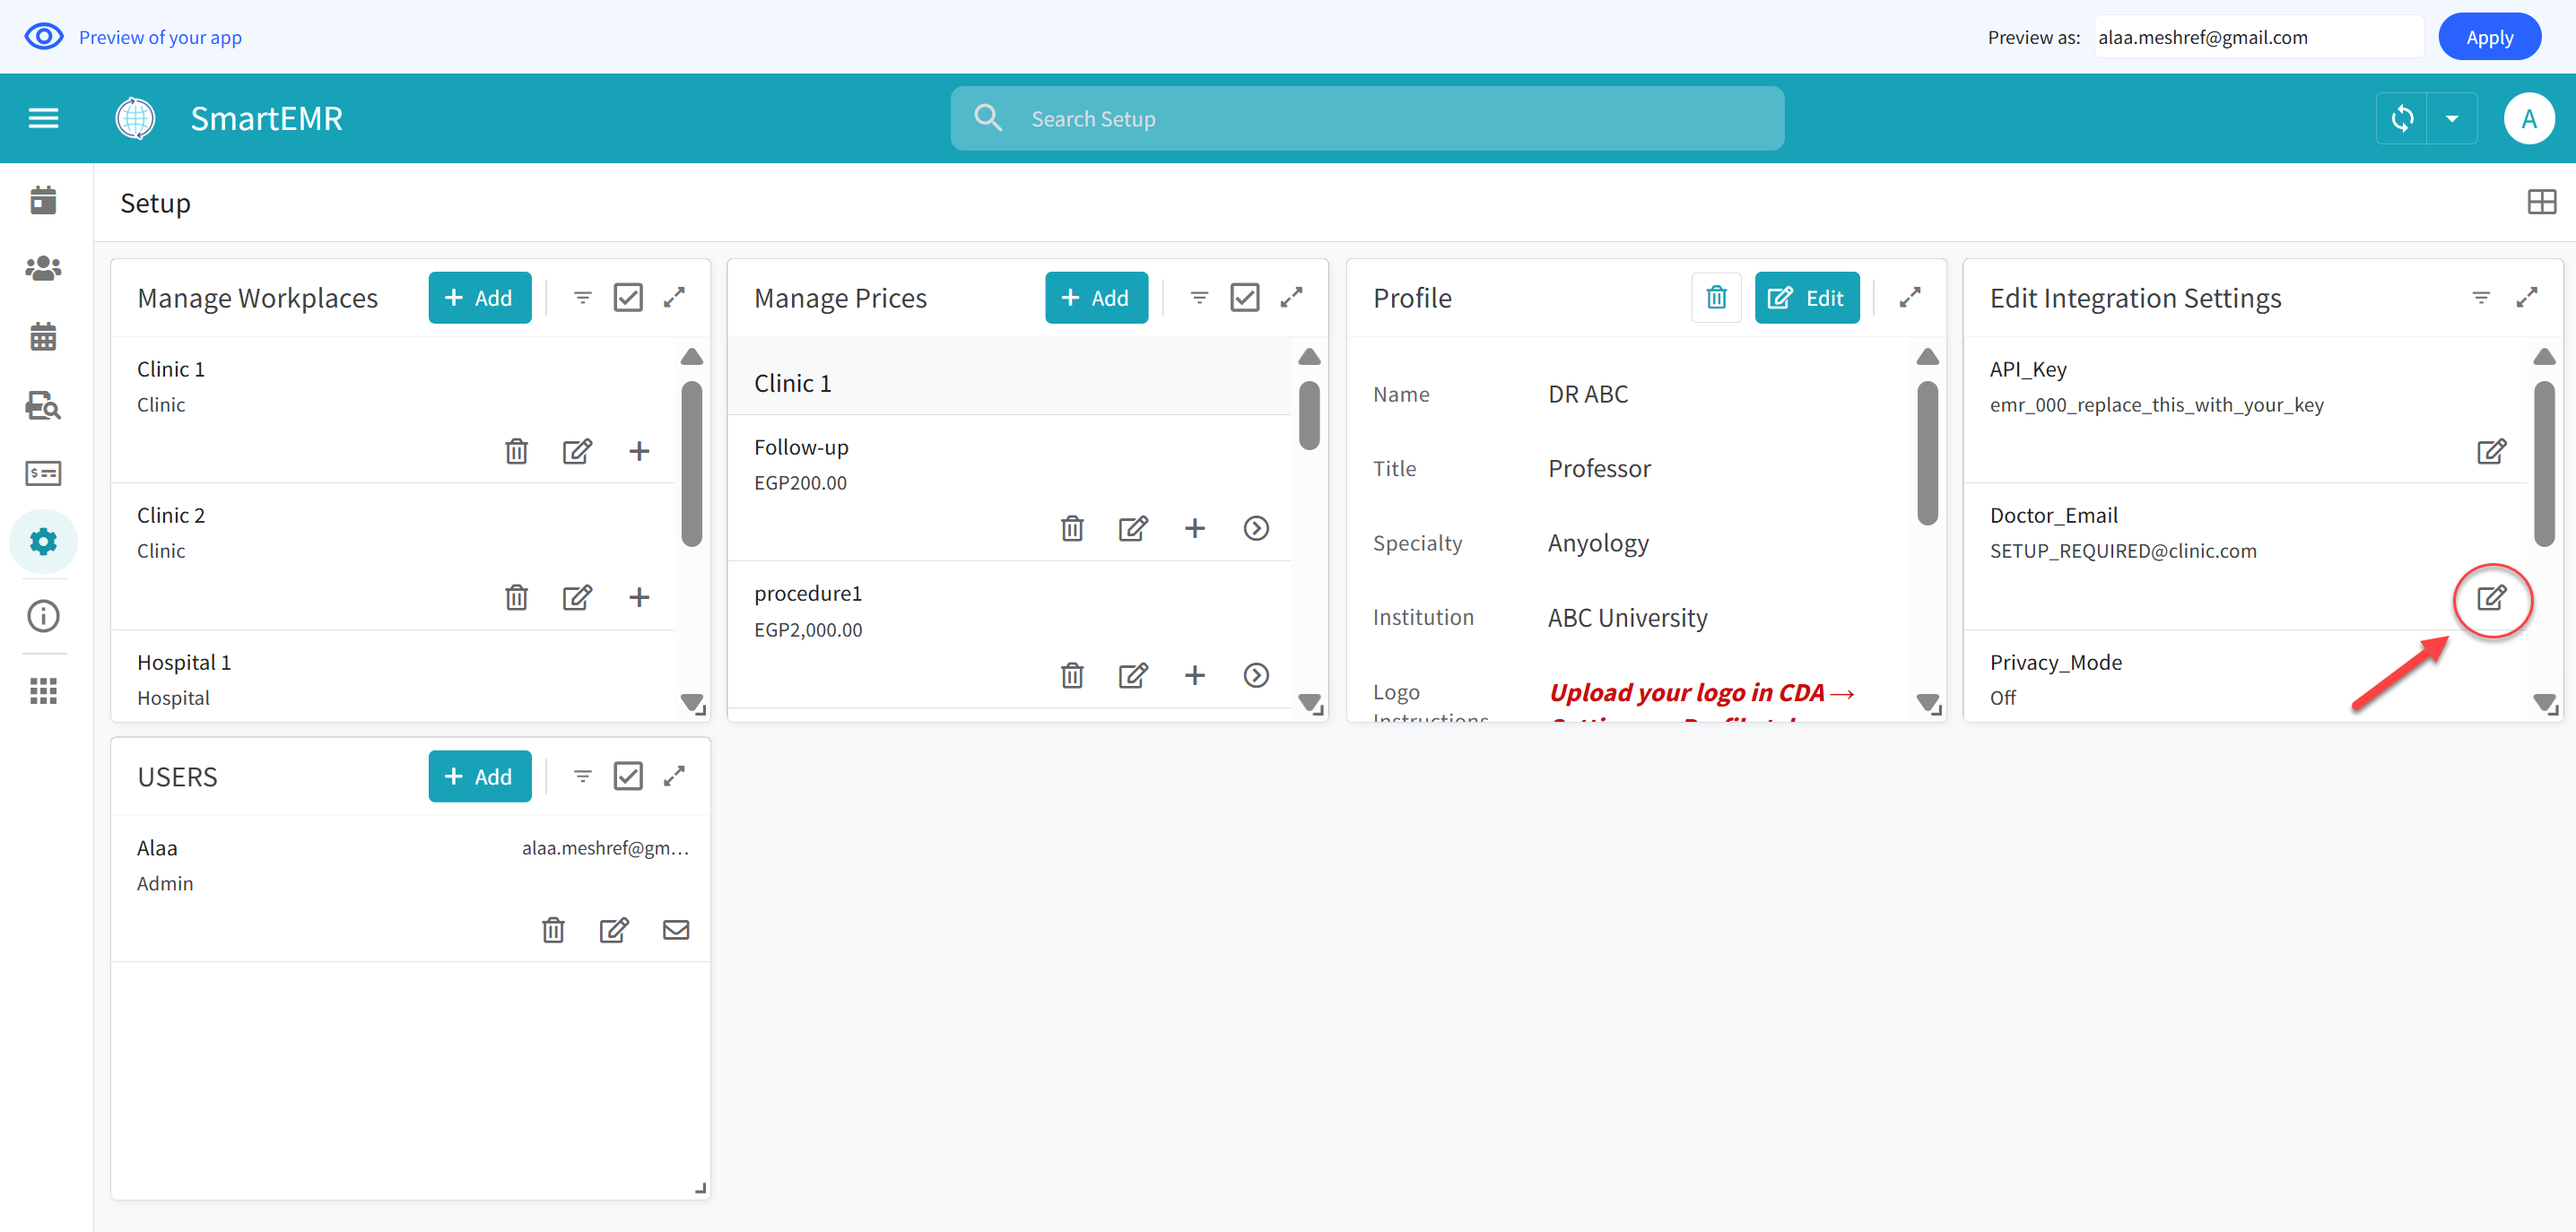
Replace the placeholder email with your real CDA email address
- In the Sheet_ID field: enter your Google Sheet ID. This is critical — without the Sheet ID, printing and AI note fetching will not work.
/d/ and /edit. For example:https://docs.google.com/spreadsheets/d/1aBcDeFgHiJkLmNoPqRsTuVwXyZ/editThe bold part is your Sheet ID. Copy it and paste it into the Sheet_ID field.

Find and copy the Sheet ID from your Google Sheets URL bar
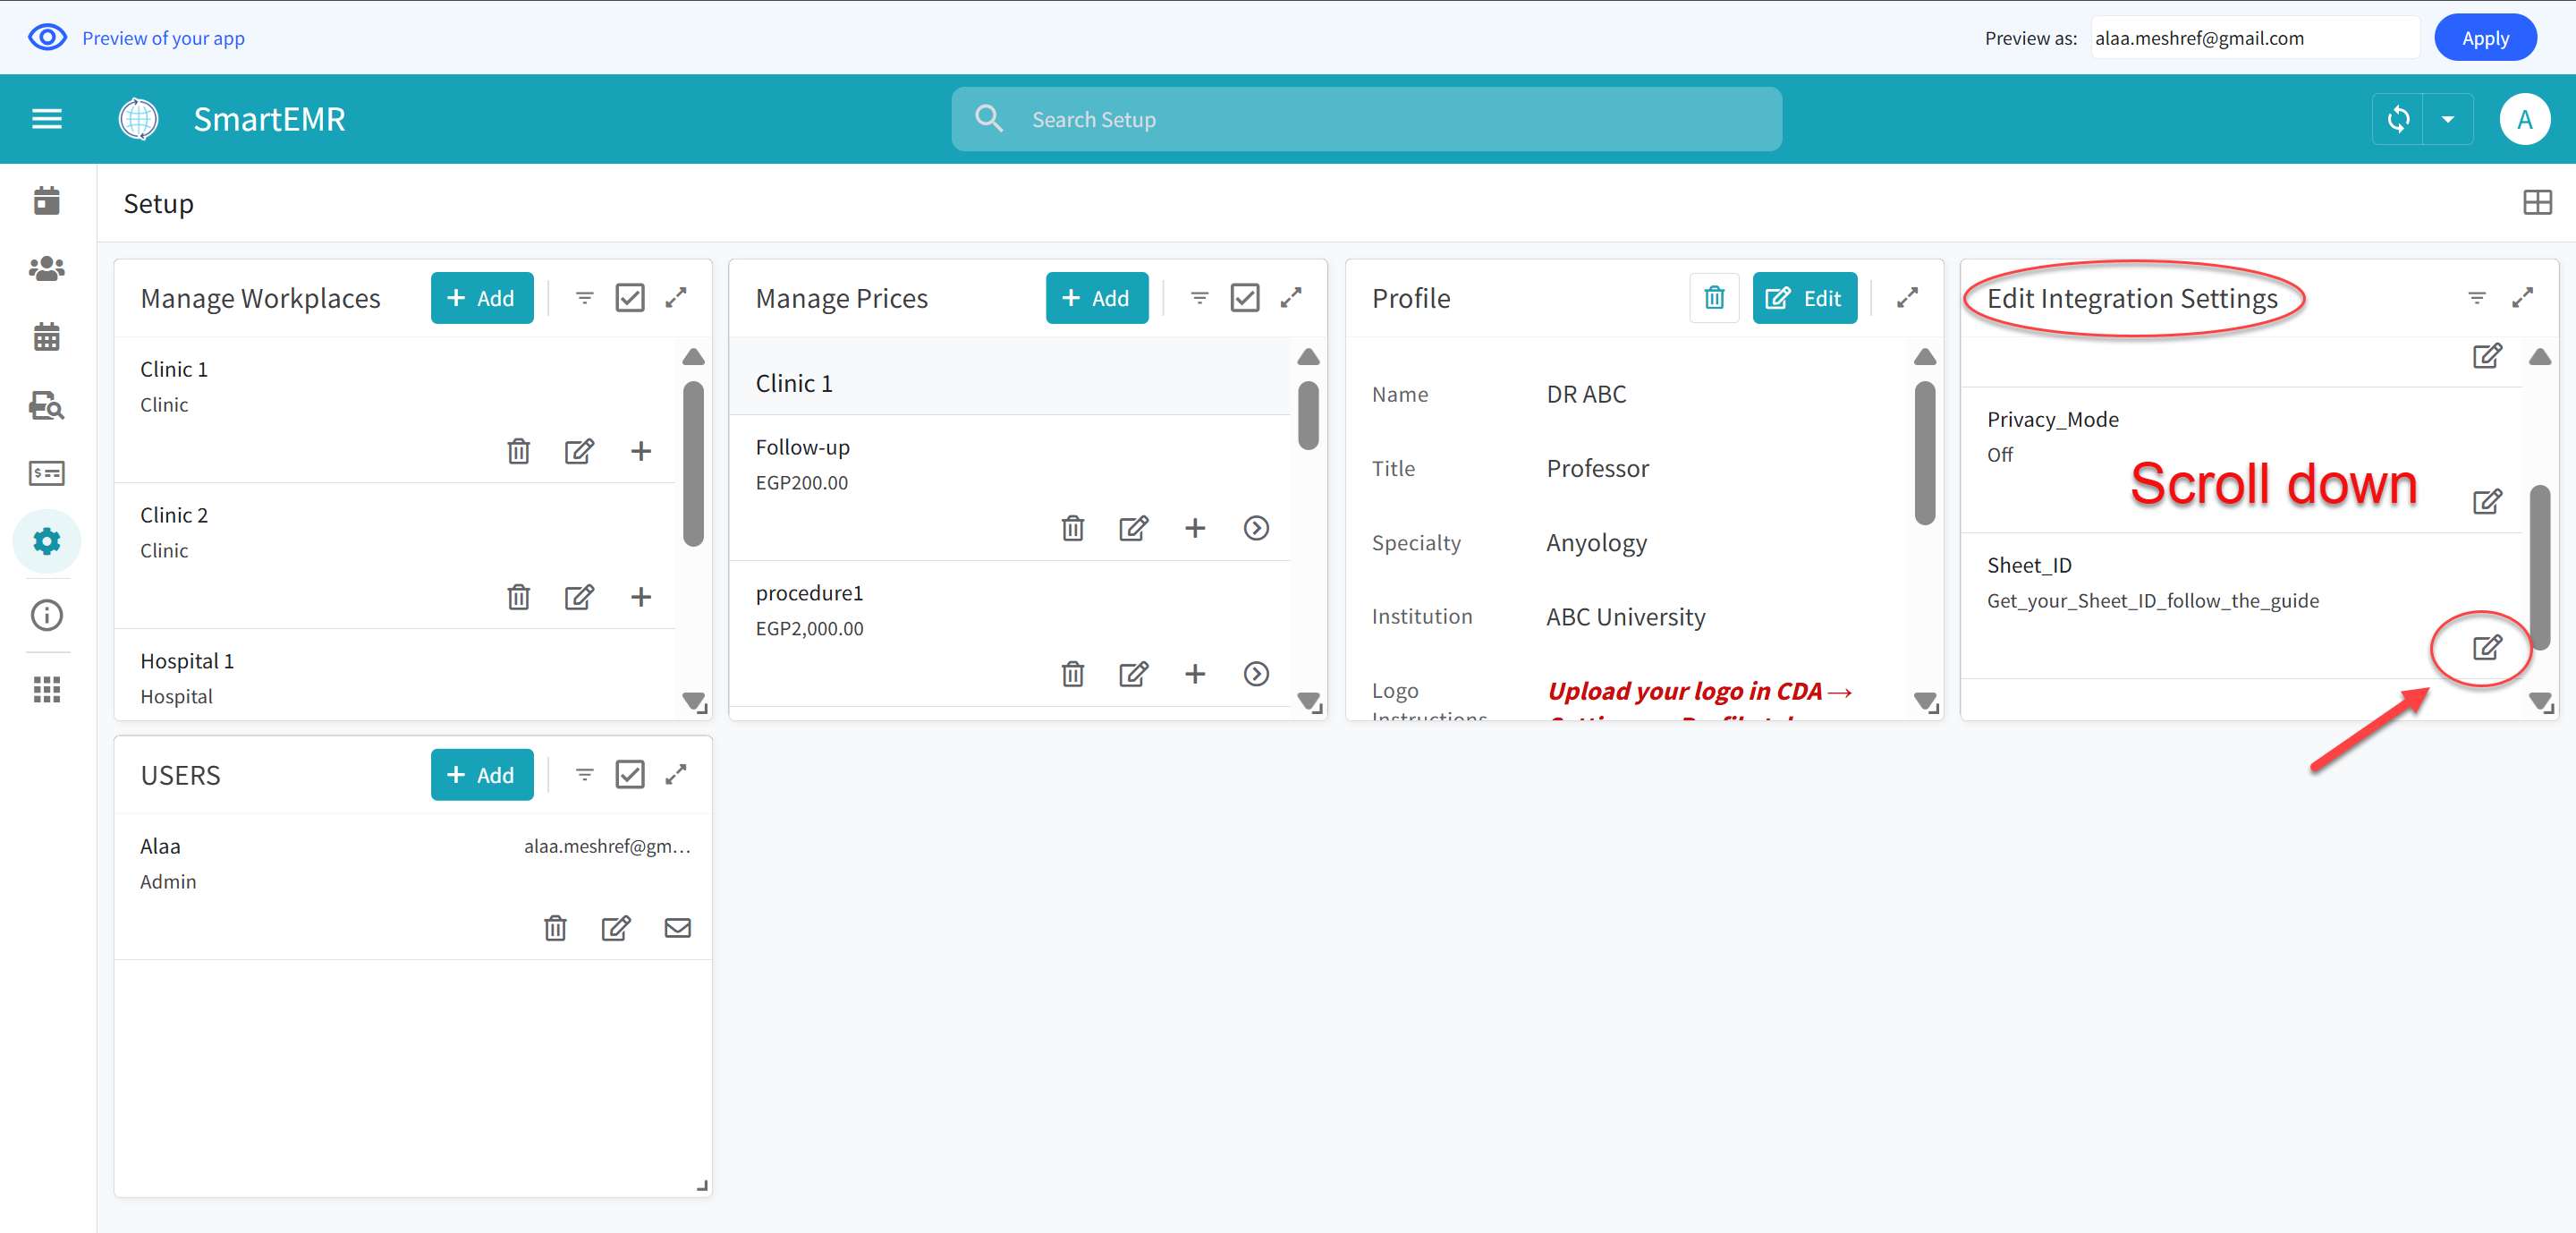
Edit the Sheet_ID field in Smart EMR Settings
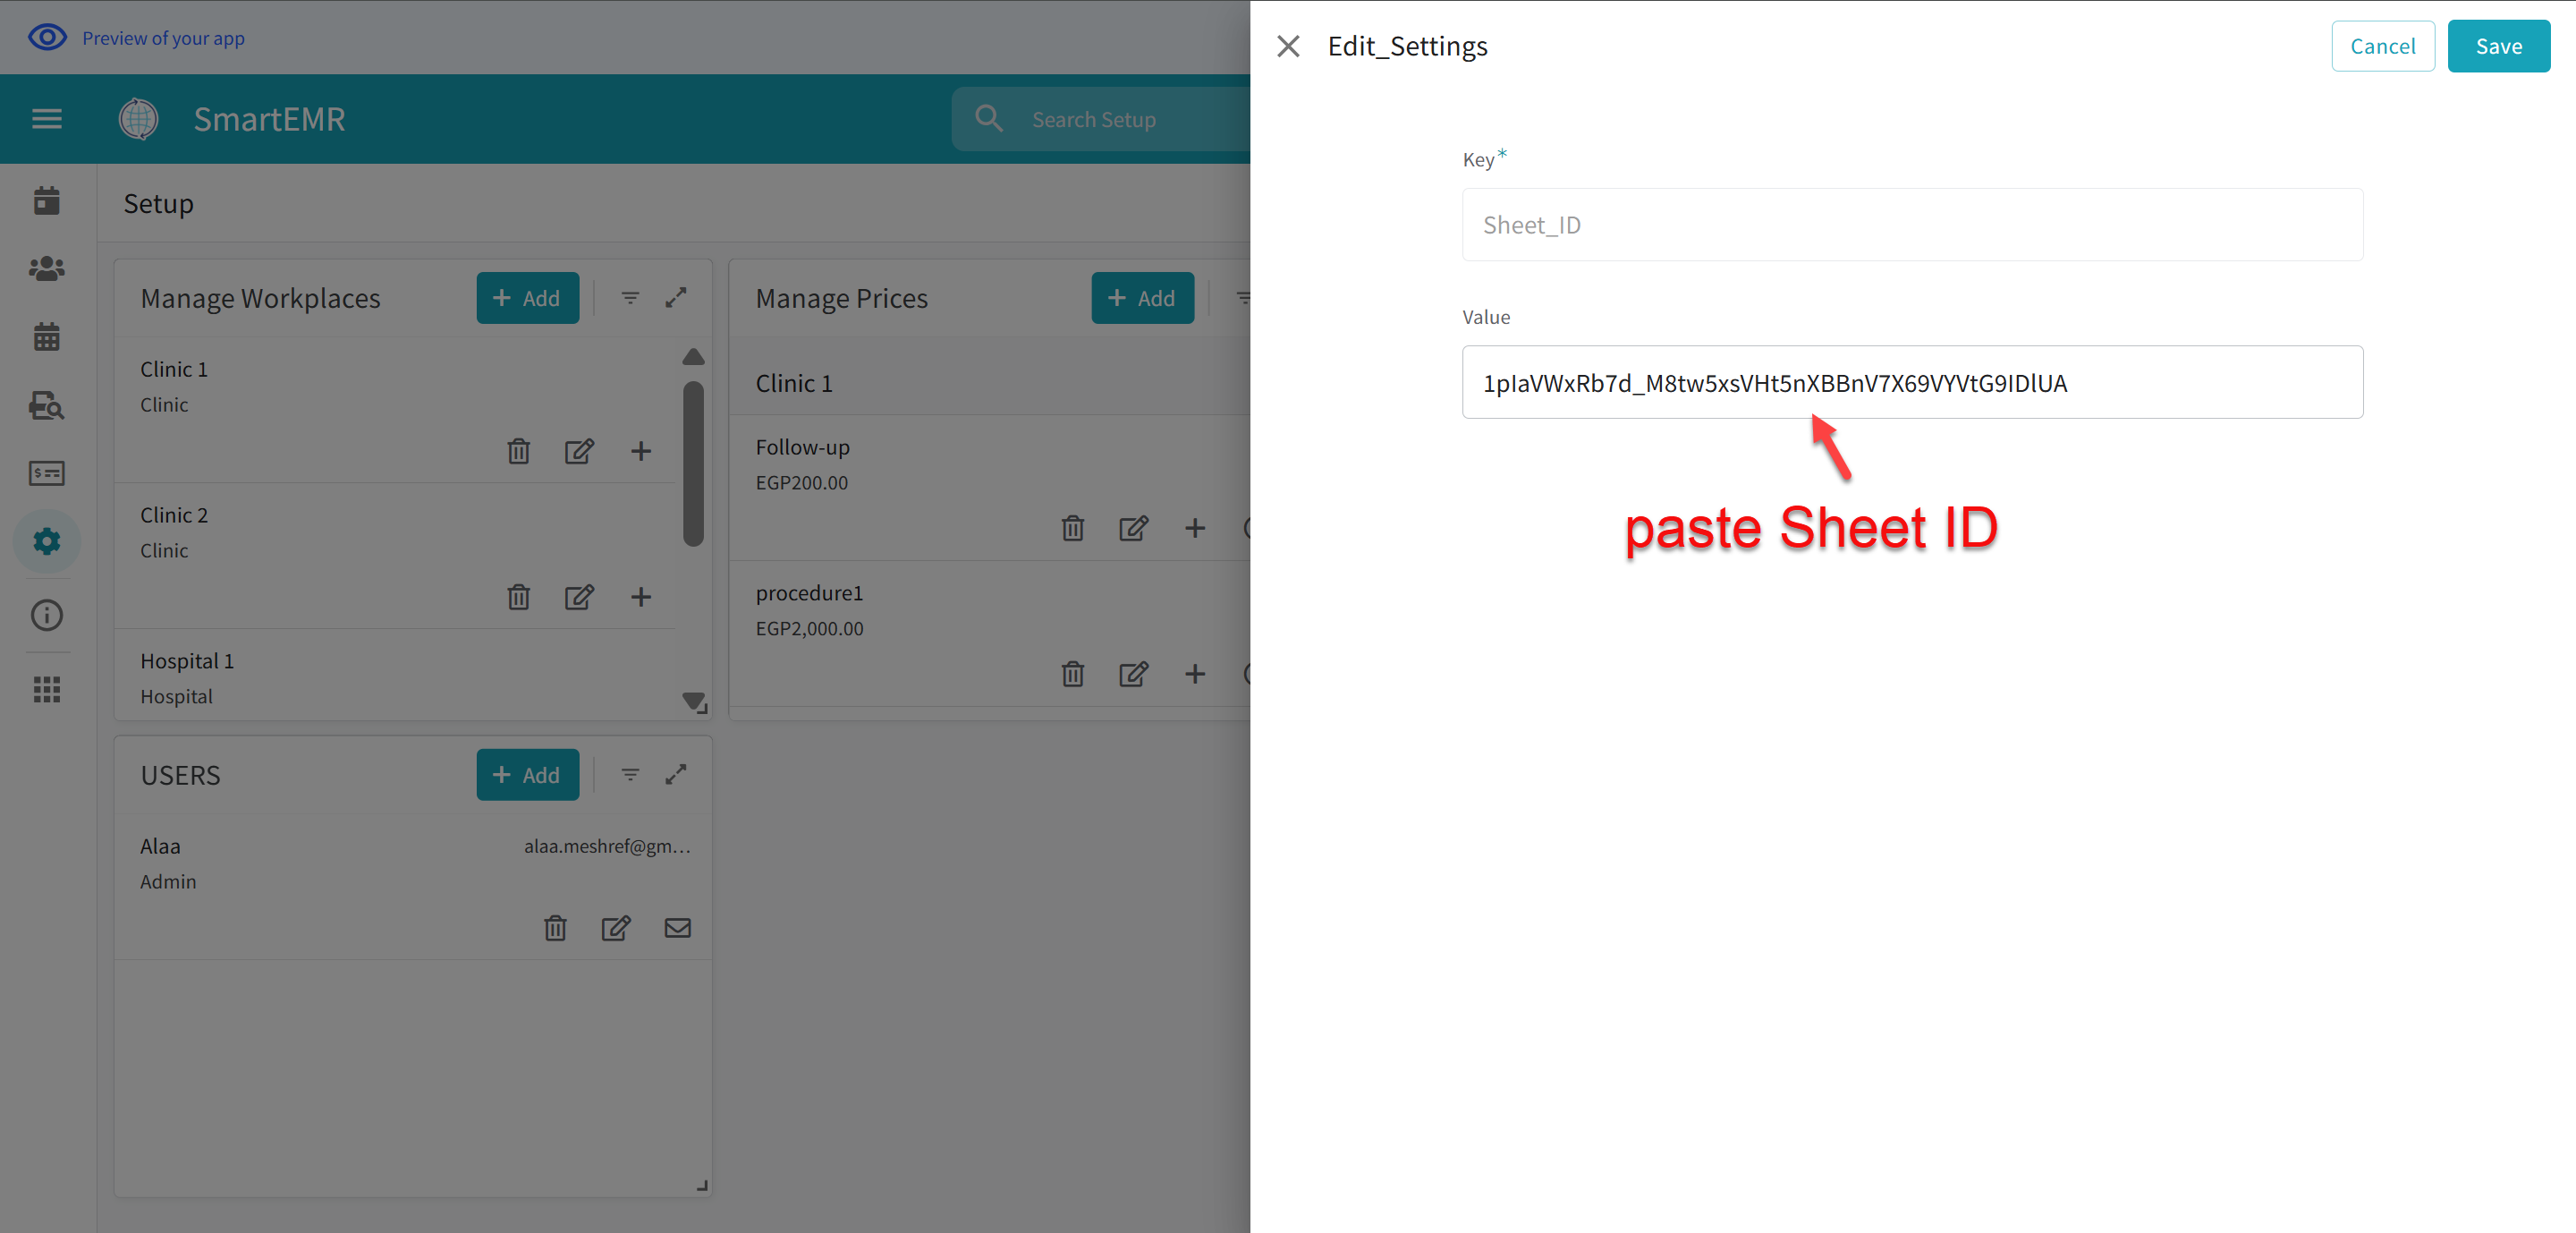
Paste your Sheet ID into the Sheet_ID field and save
- Tap Save
Part C: Find Your Visits Spreadsheet in Google Drive
- Open Google Drive in your browser: go to drive.google.com

Open Google Drive in your browser
- Navigate to the appsheet folder in your Drive
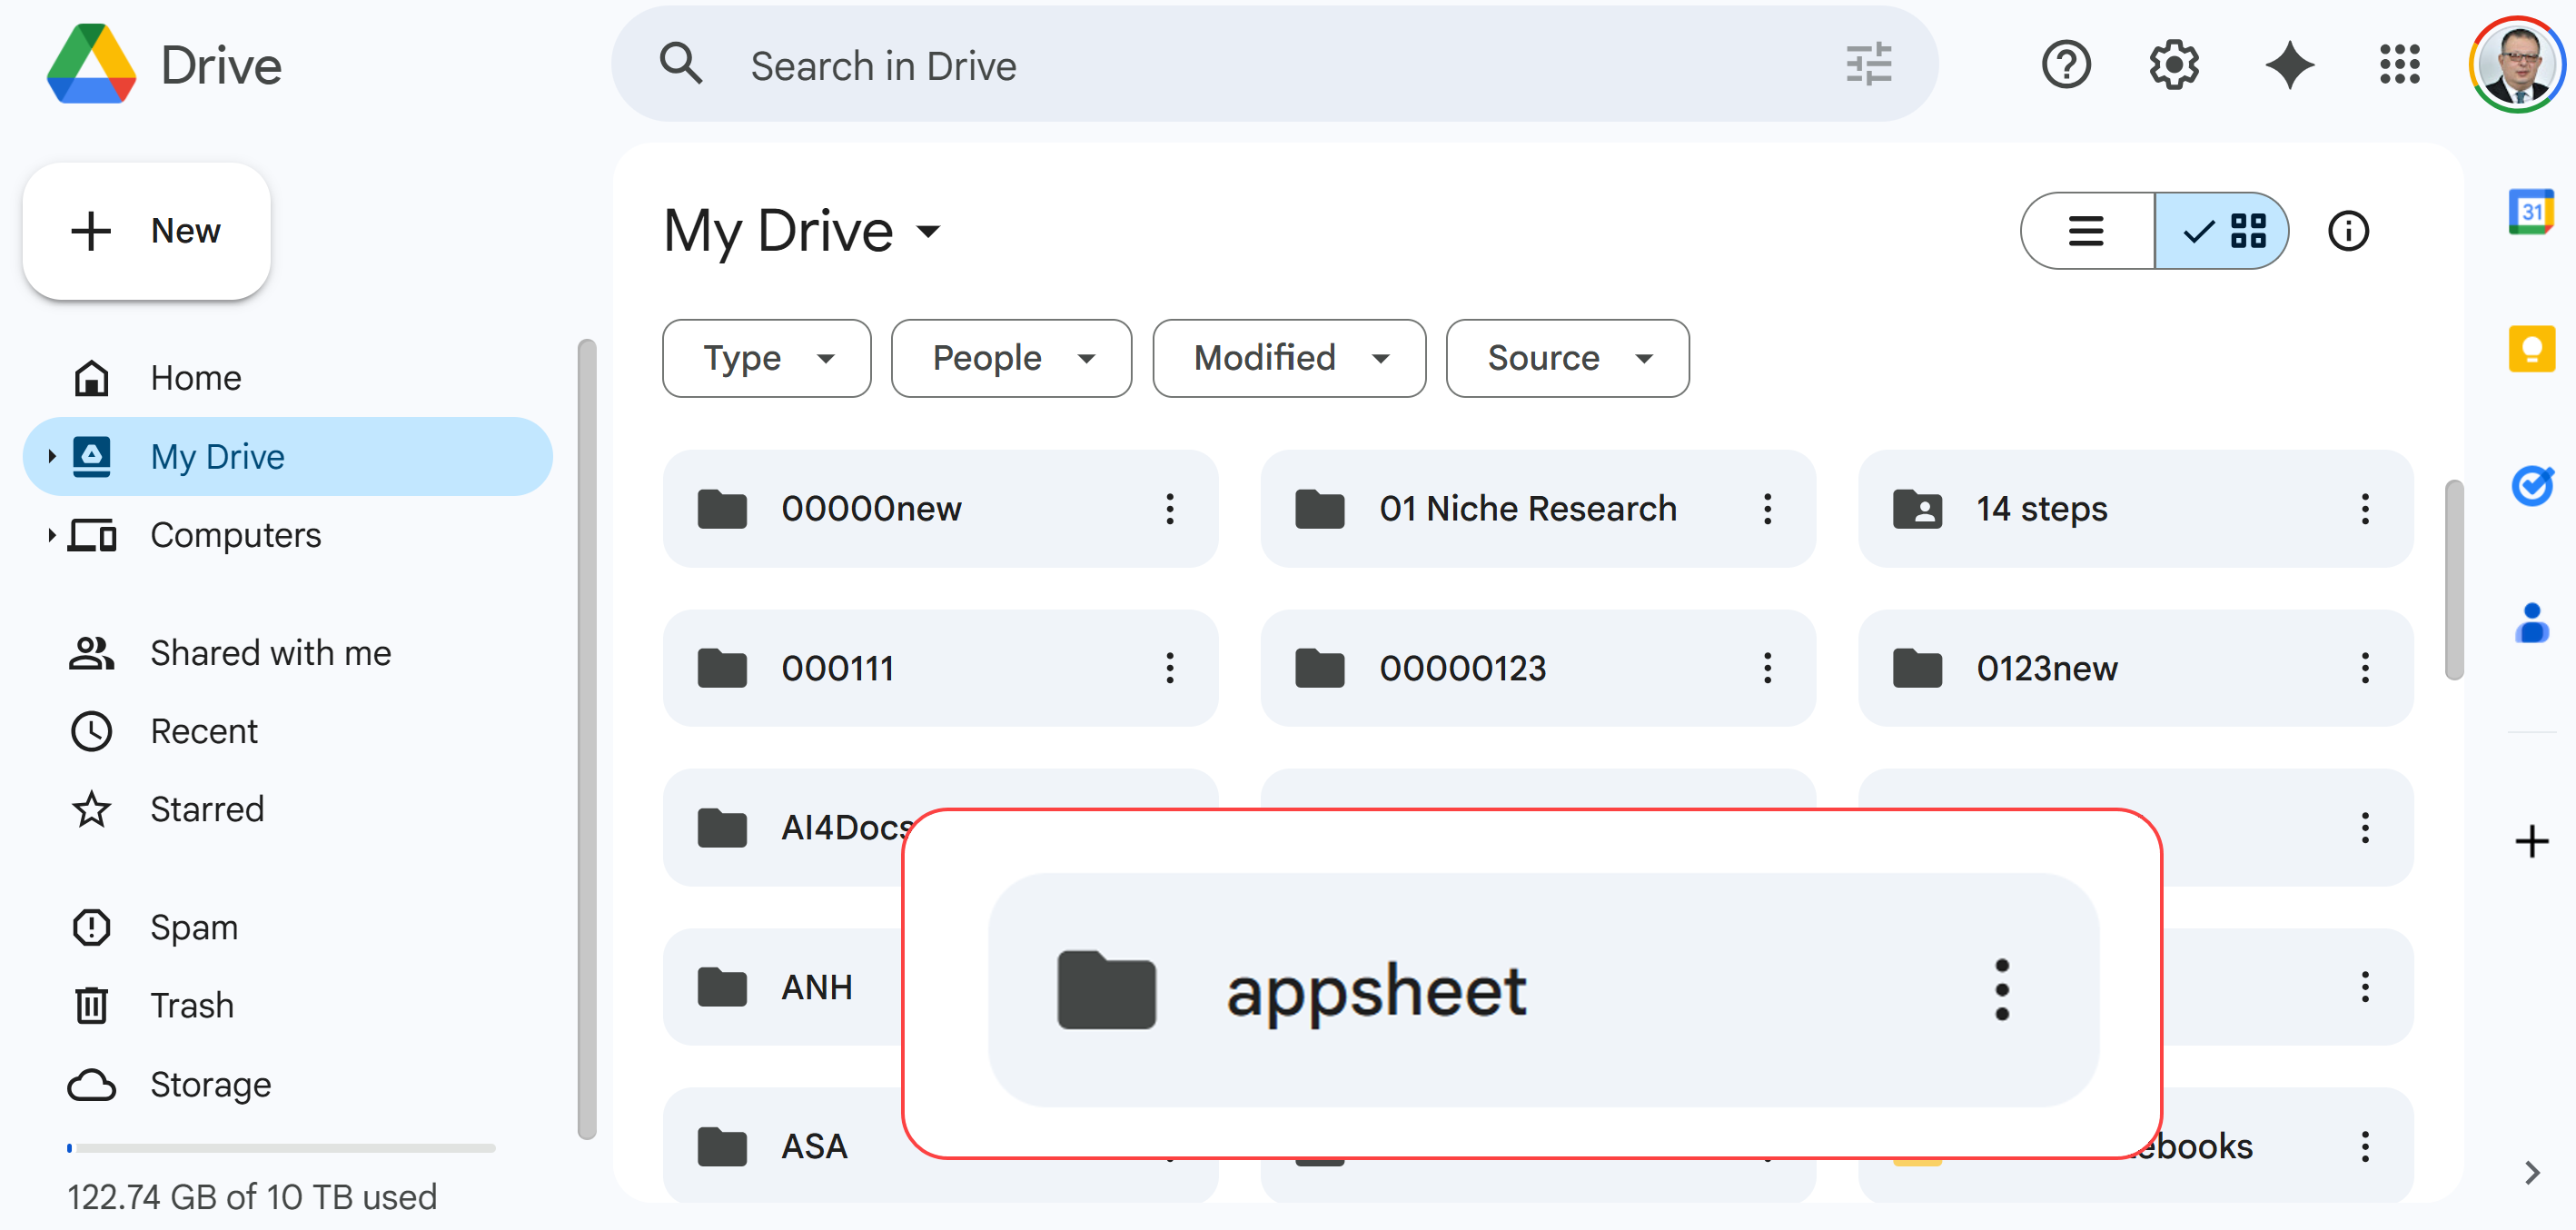
Find and open the "appsheet" folder in your Google Drive
- Open the data subfolder
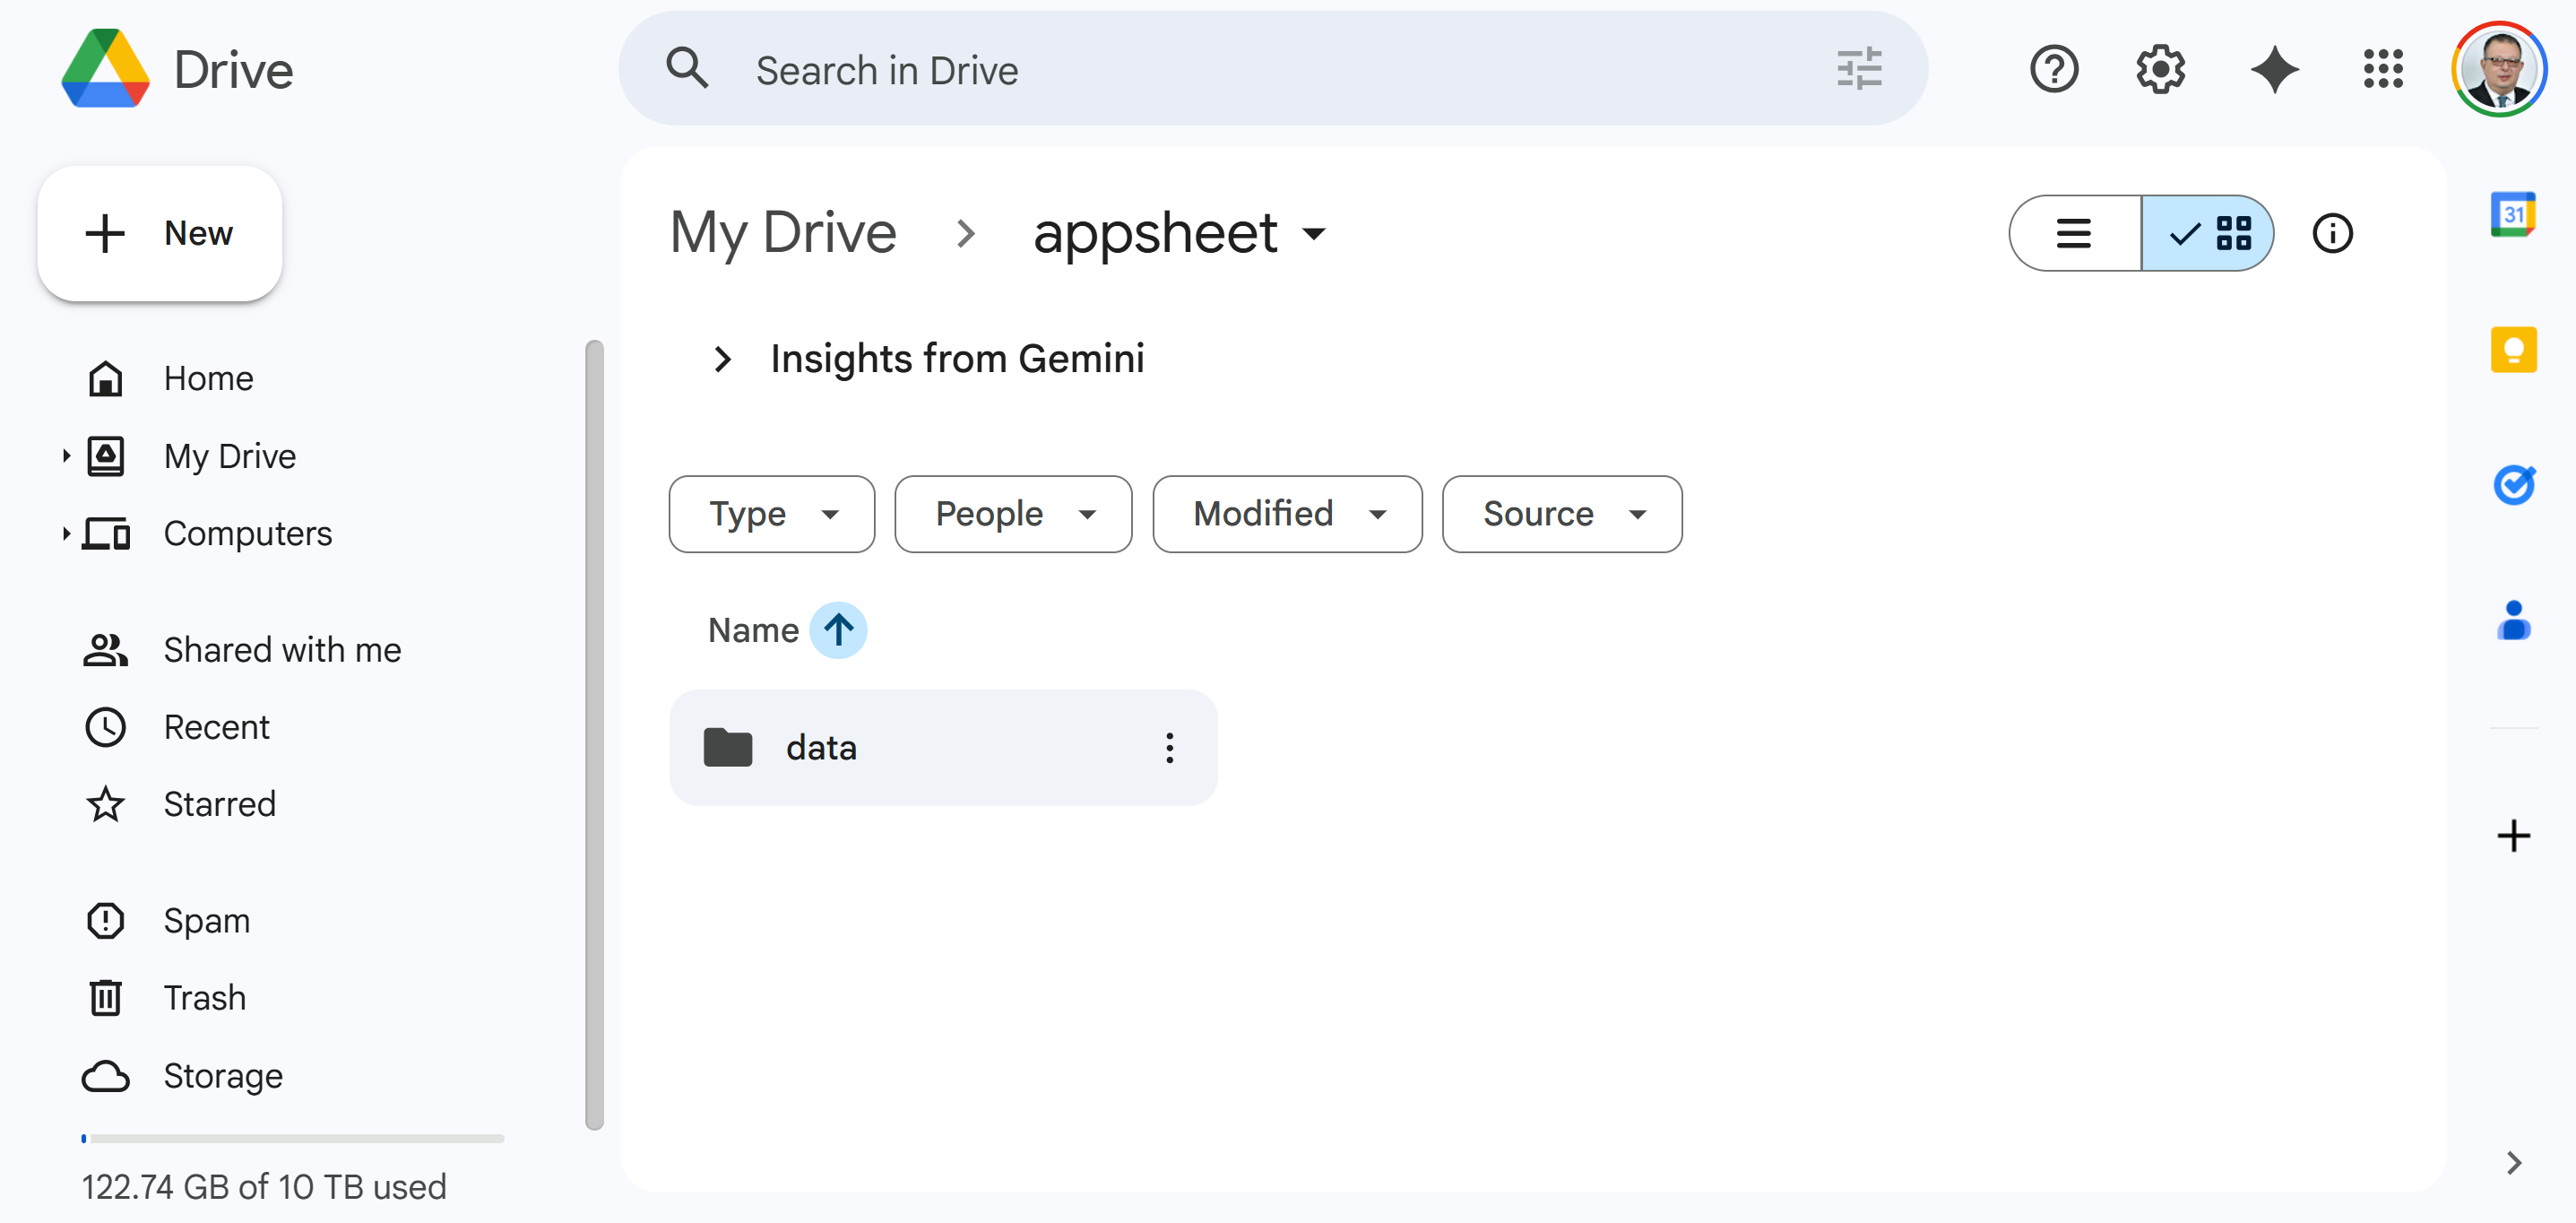
Open the "data" subfolder
- Find and open the SmartEMR-XXXXX folder (the folder name starts with "SmartEMR" followed by numbers)
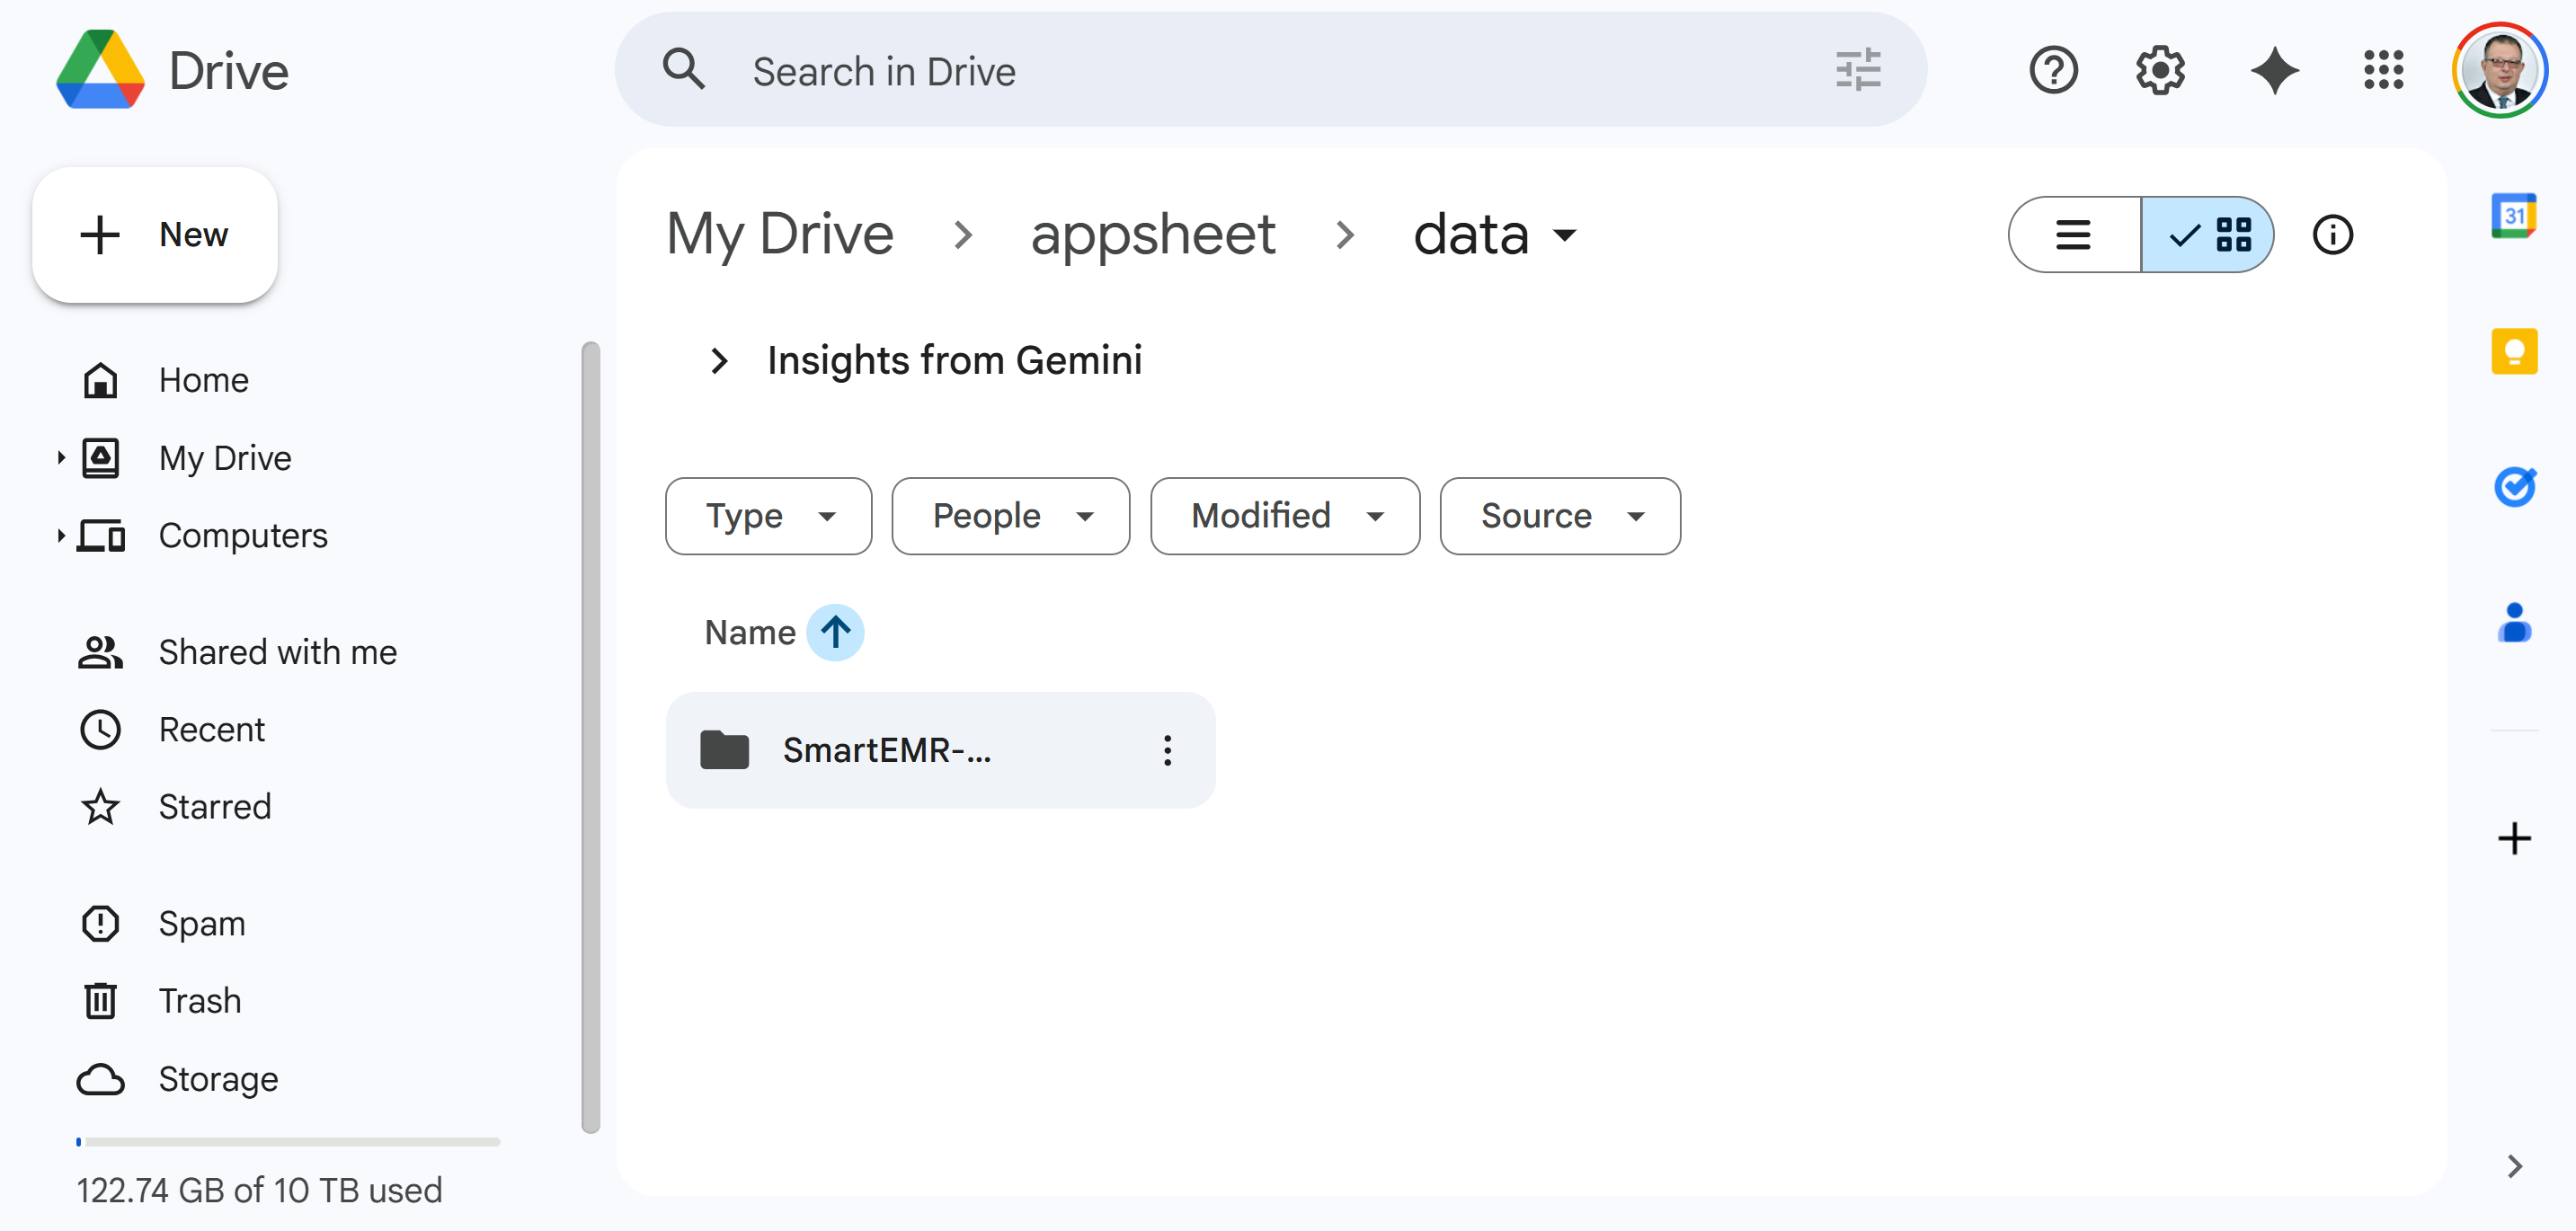
Find your SmartEMR folder (the name includes numbers unique to your app)
- Inside that folder, you will see the Visits Google Sheet (green spreadsheet icon). Double-click on it to open it
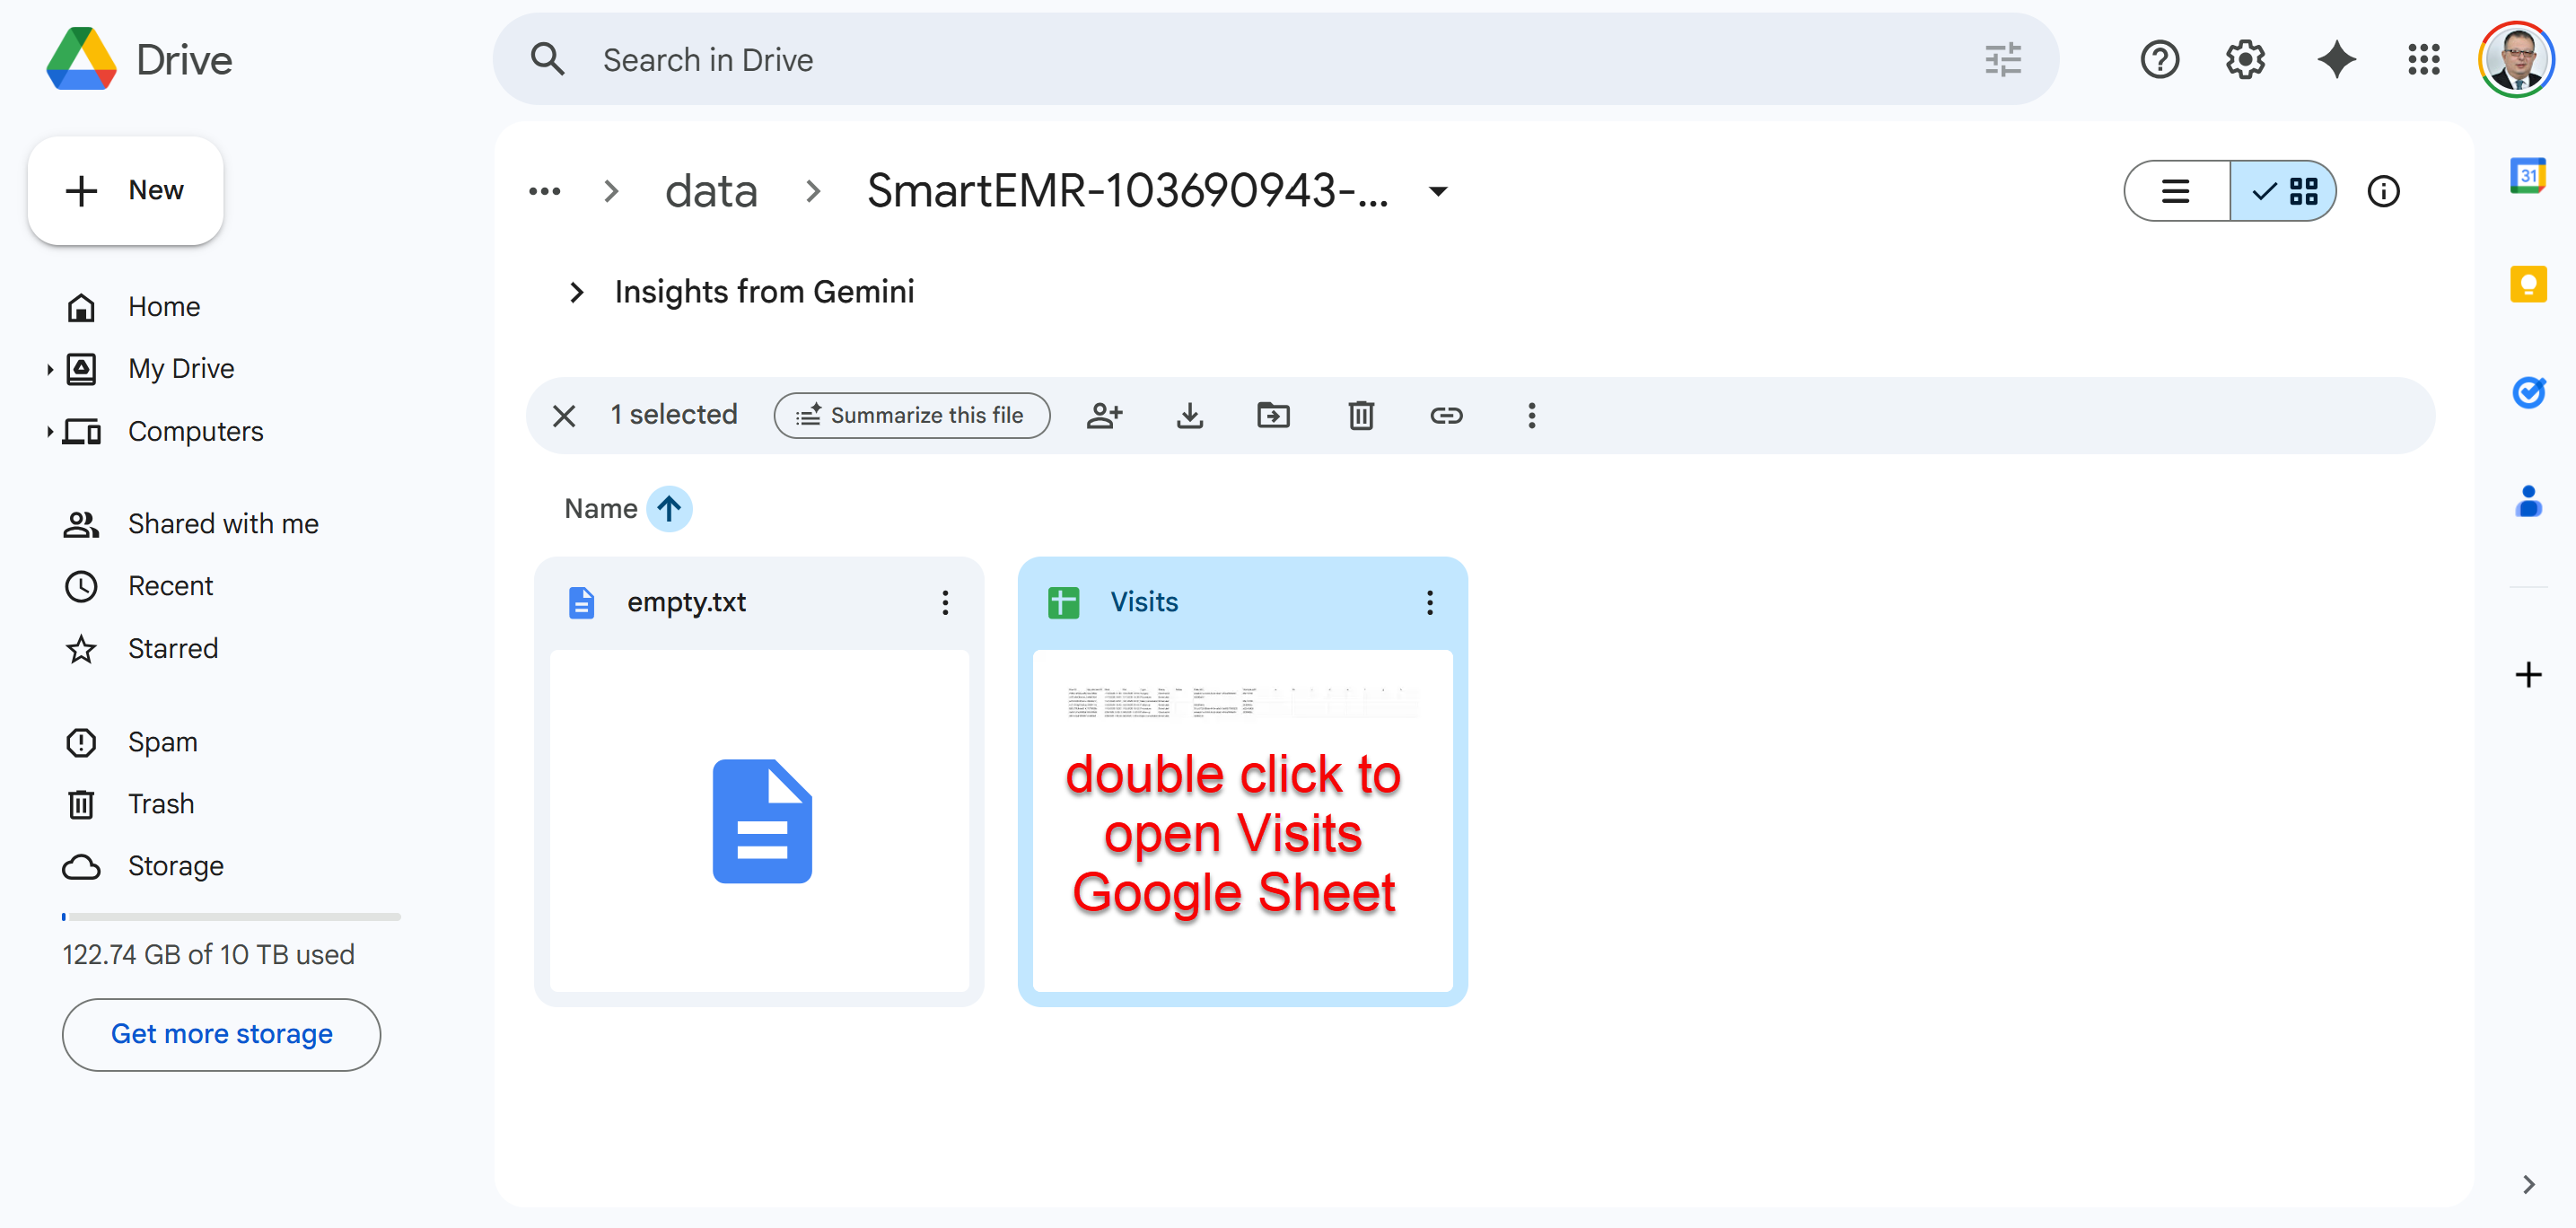
Open the "Visits" Google Sheet — this is where all your data lives
/d/ and /edit.
Part D: Share the Spreadsheet with the Backend Service
Smart EMR uses a backend service to handle printing and AI note fetching. For this to work, you need to share your Visits spreadsheet with our service account. This is a one-time step.
- With the Visits spreadsheet open, click the Share button at the top right corner (green button)
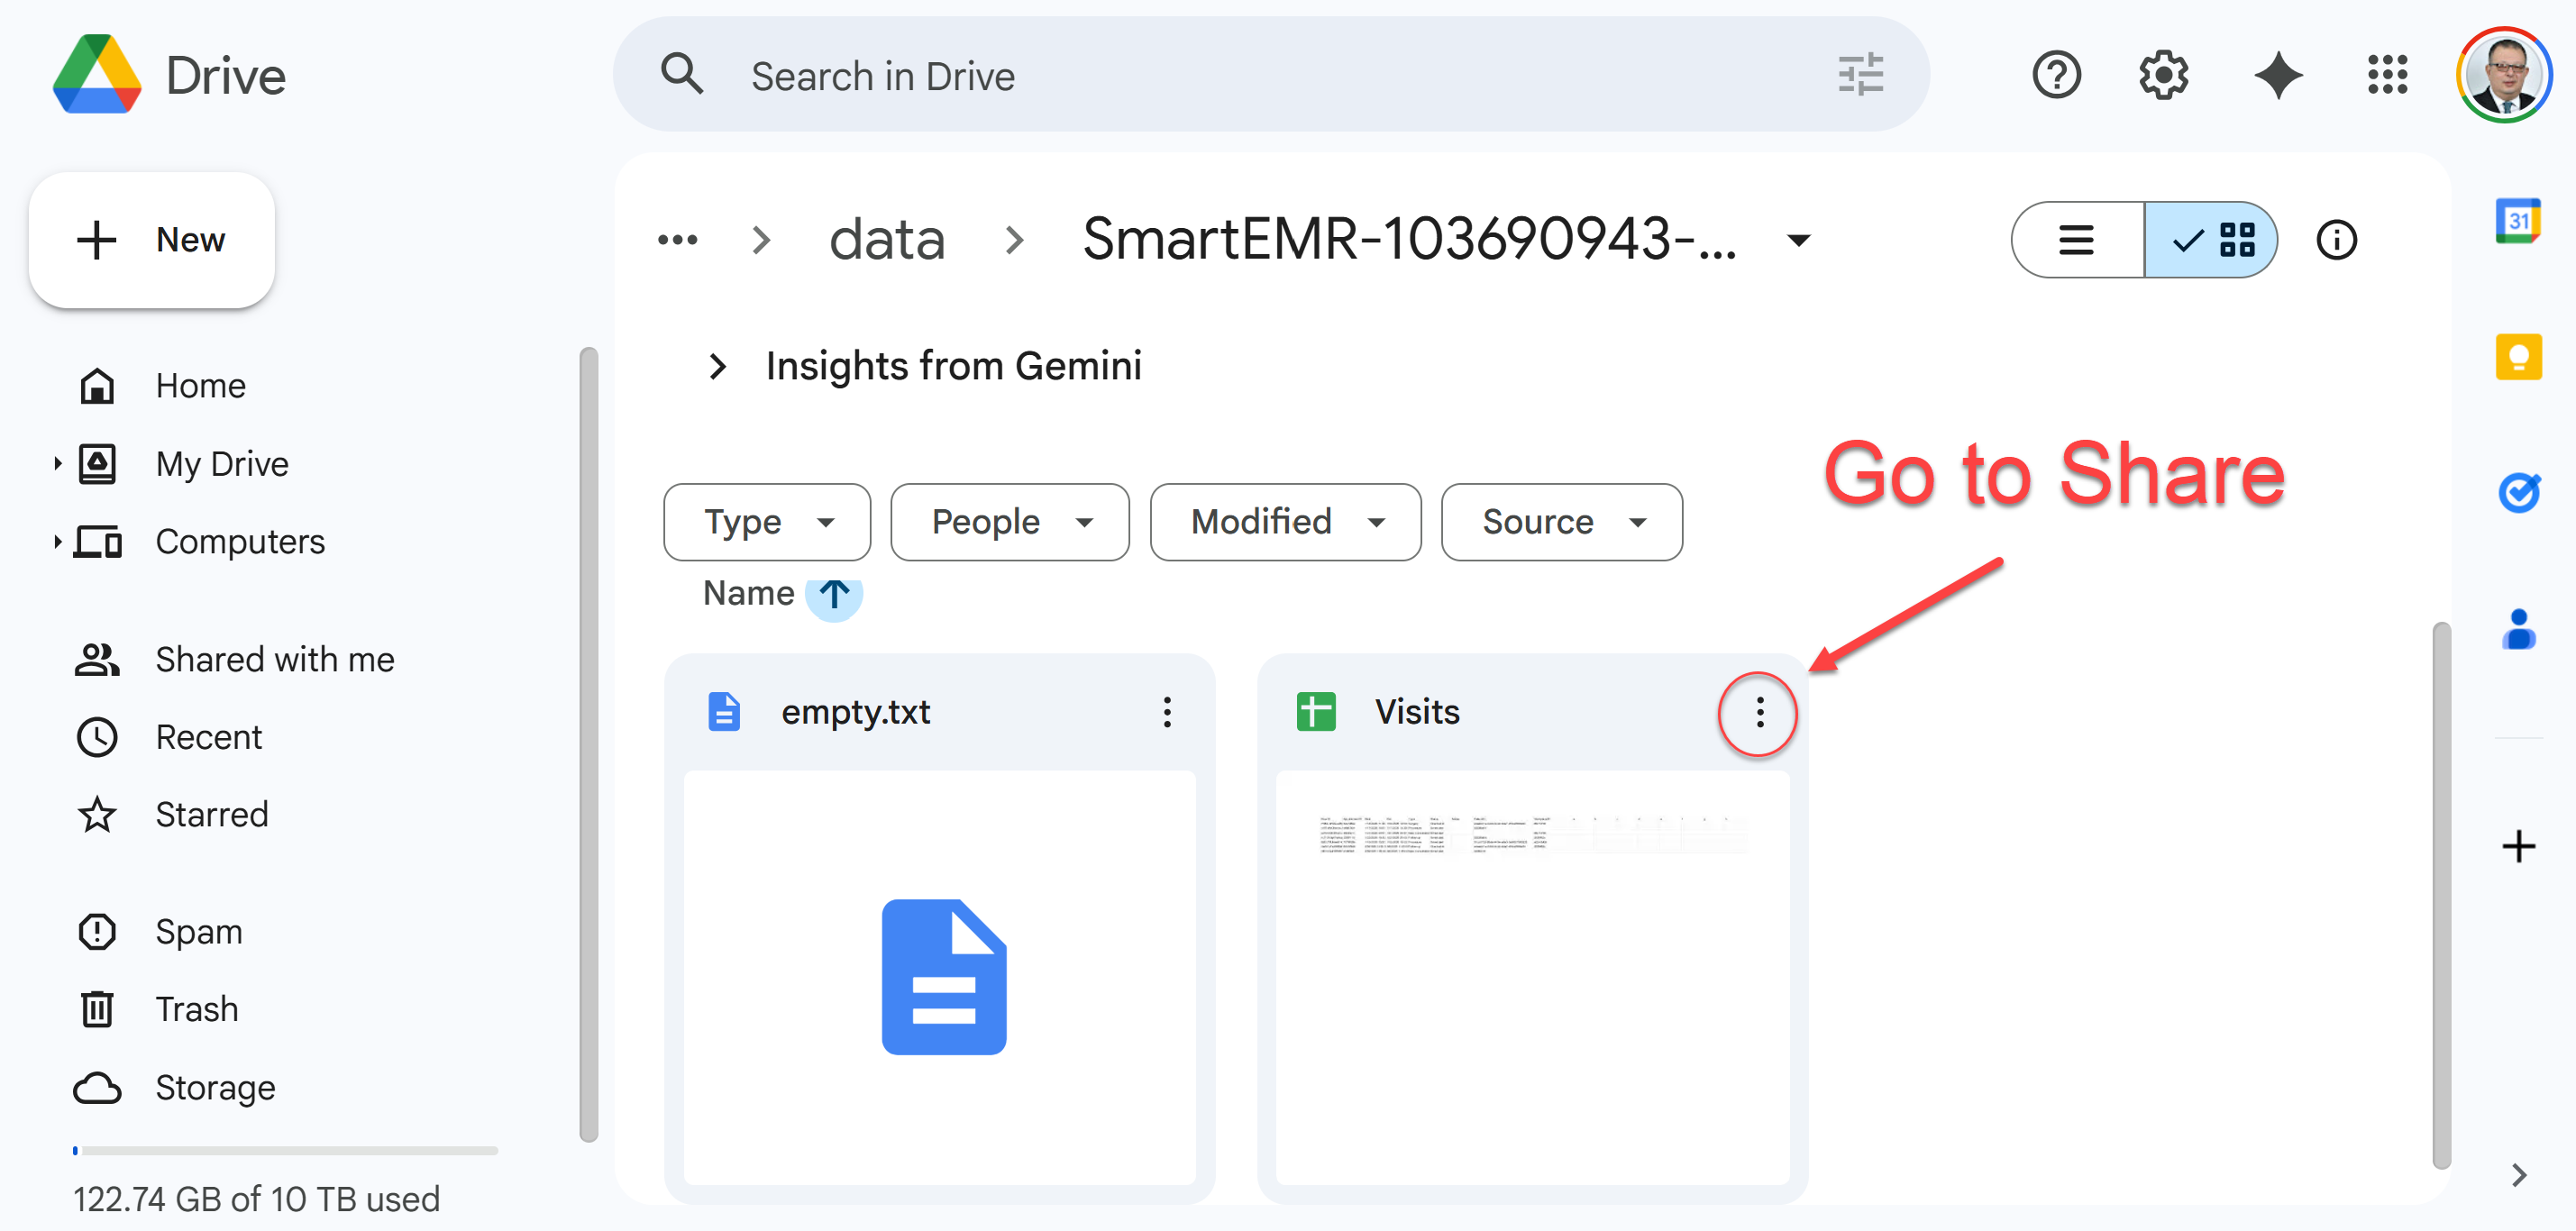
Click the "Share" button at the top right of the Visits spreadsheet
- In the "Add people and groups" field, paste the following email address exactly:
smartemr@ai4docs.iam.gserviceaccount.com
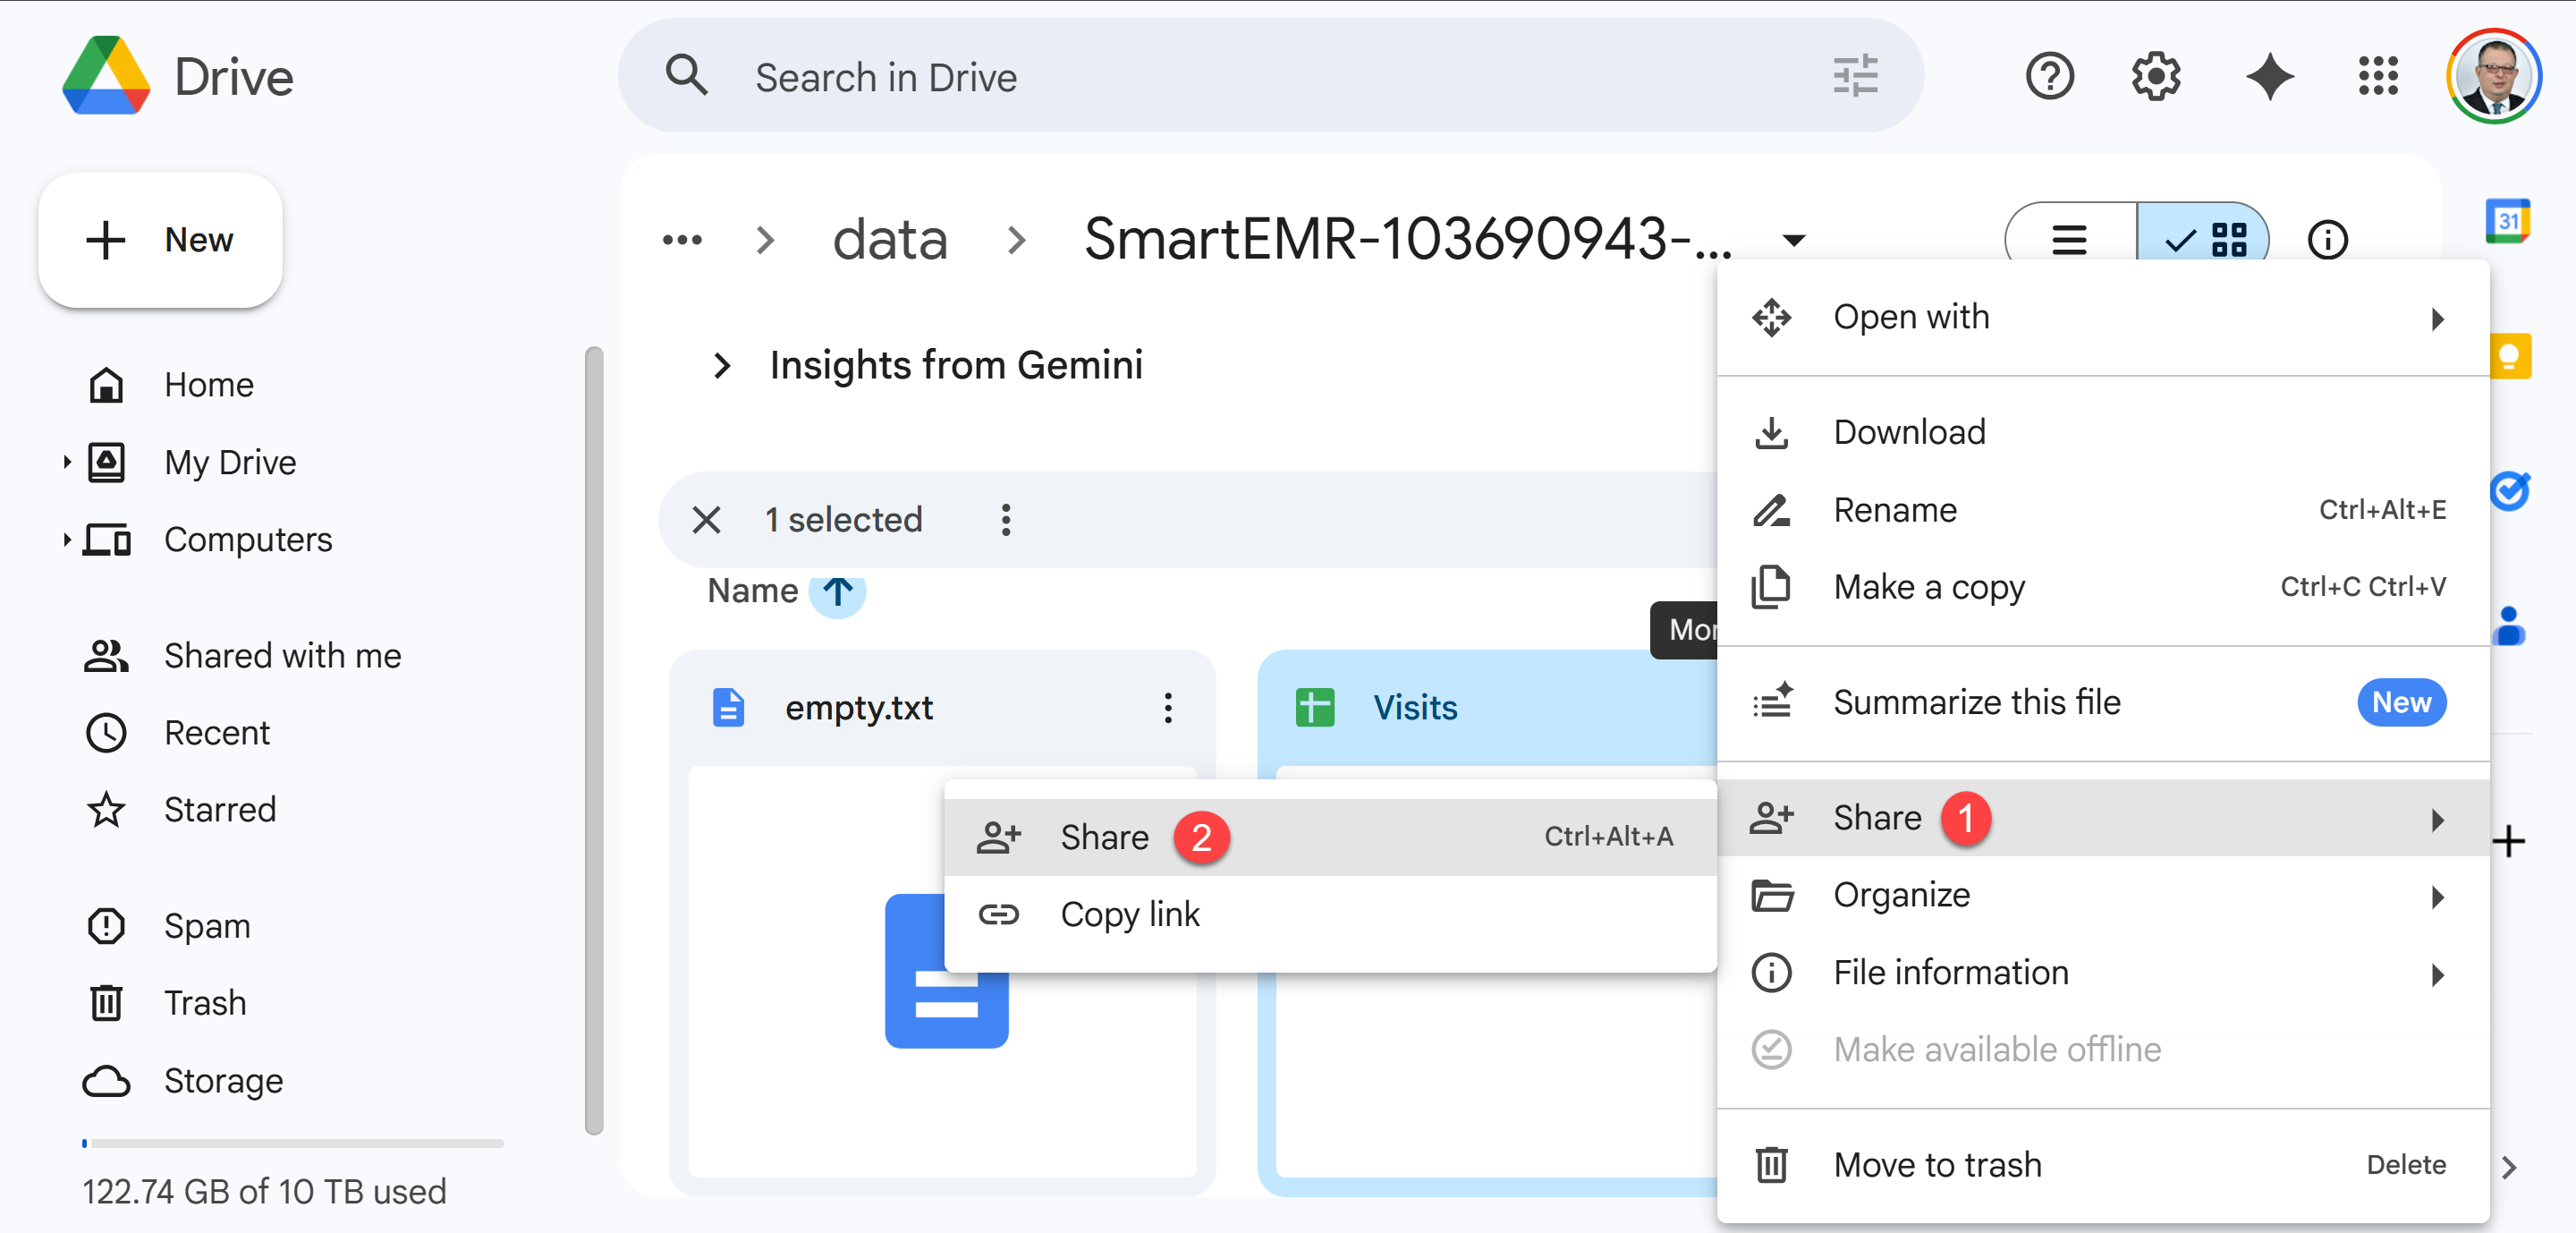
Paste the service account email address into the sharing field
- Make sure the permission is set to Editor (this allows the backend to read data for printing and write notes when you fetch from CDA)
- Click Send (you can uncheck "Notify people" since this is a service account, not a real person)
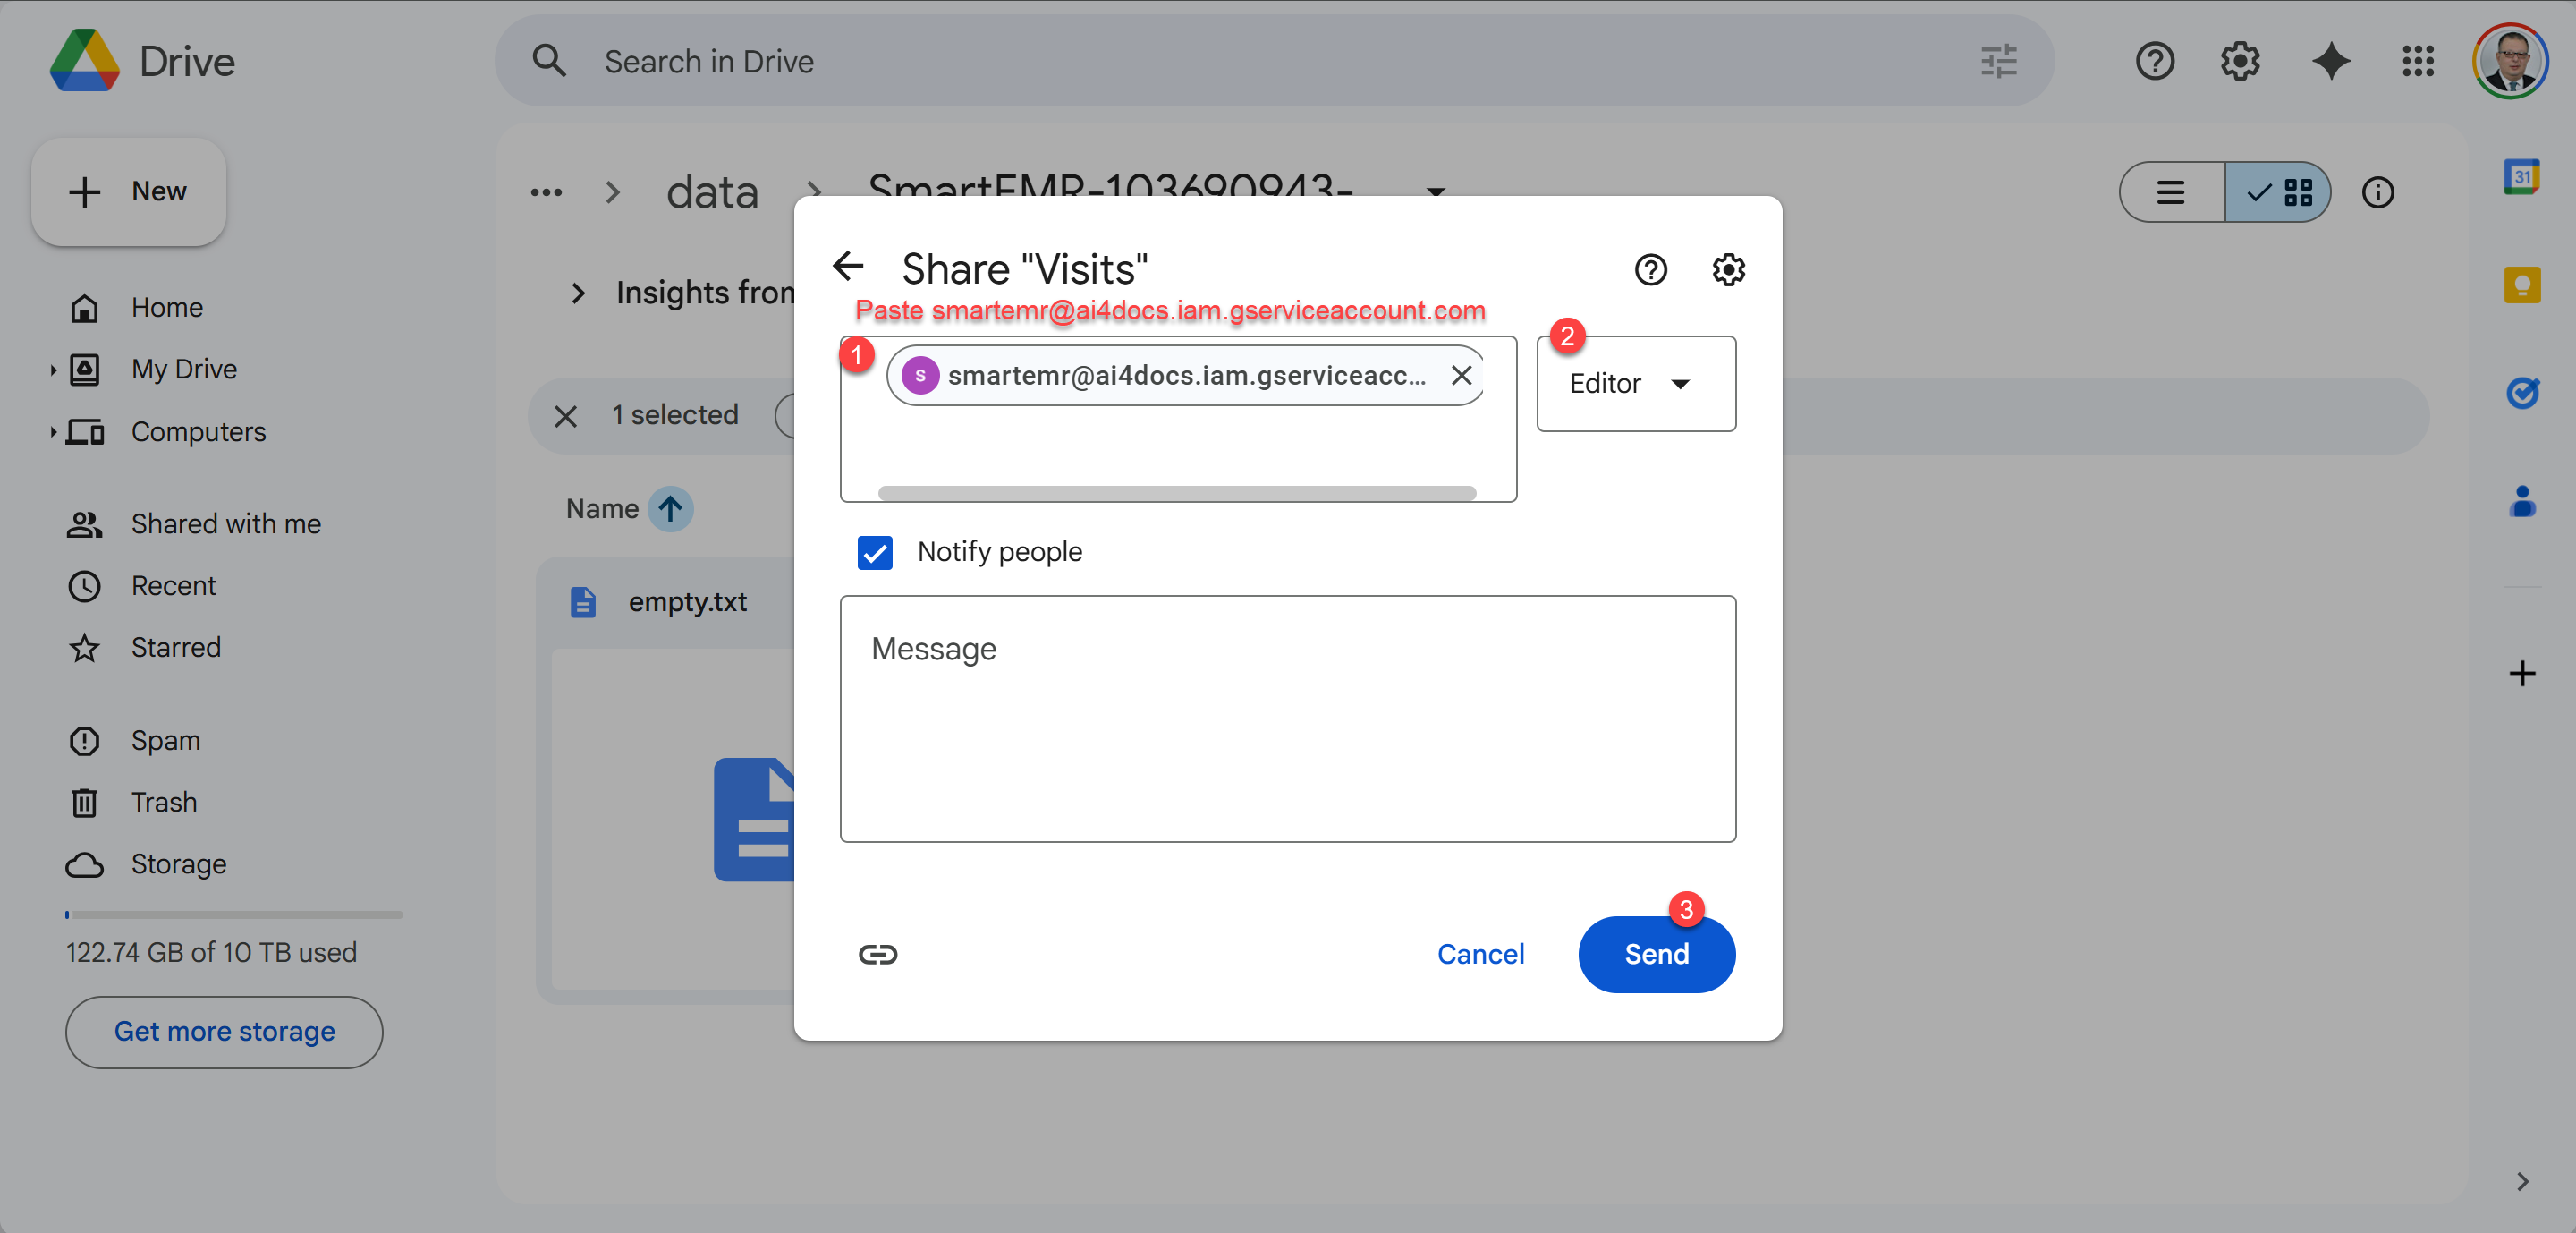
Set permission to "Editor" and click Send to complete sharing
You're Done!
What's Next?
There are a few more things you can set up to get the most out of Smart EMR — like your doctor profile, clinic logo, workplace locations, service prices, and staff accounts. These are all covered in the complete documentation:
Complete Documentation
Set up your doctor profile, clinic locations, service prices, staff members, and learn the daily workflow.
Frequently Asked Questions
Common questions about Smart EMR, troubleshooting, and tips for getting the most out of the system.
Smart EMR by AI4Docs.AI — Your data, your control, your clinic.
AI4Docs.AI Ltd. (UK Company #16893518) | ai4docs.ai
Version 5.0 | March 2026