Smart EMR - Complete Documentation
Welcome to Smart EMR
Smart EMR is a simple, secure Electronic Medical Records system built specifically for private practice clinics. It helps you:
- Manage patient files and demographics
- Schedule and track appointments
- Write clinical notes automatically using AI (the AI4Docs.AI Clinical Documentation Assistant)
- Print prescriptions, medical reports, referral letters, and lab/imaging orders
- Track your clinic's income and generate financial reports
- Control exactly what each staff member can see and do
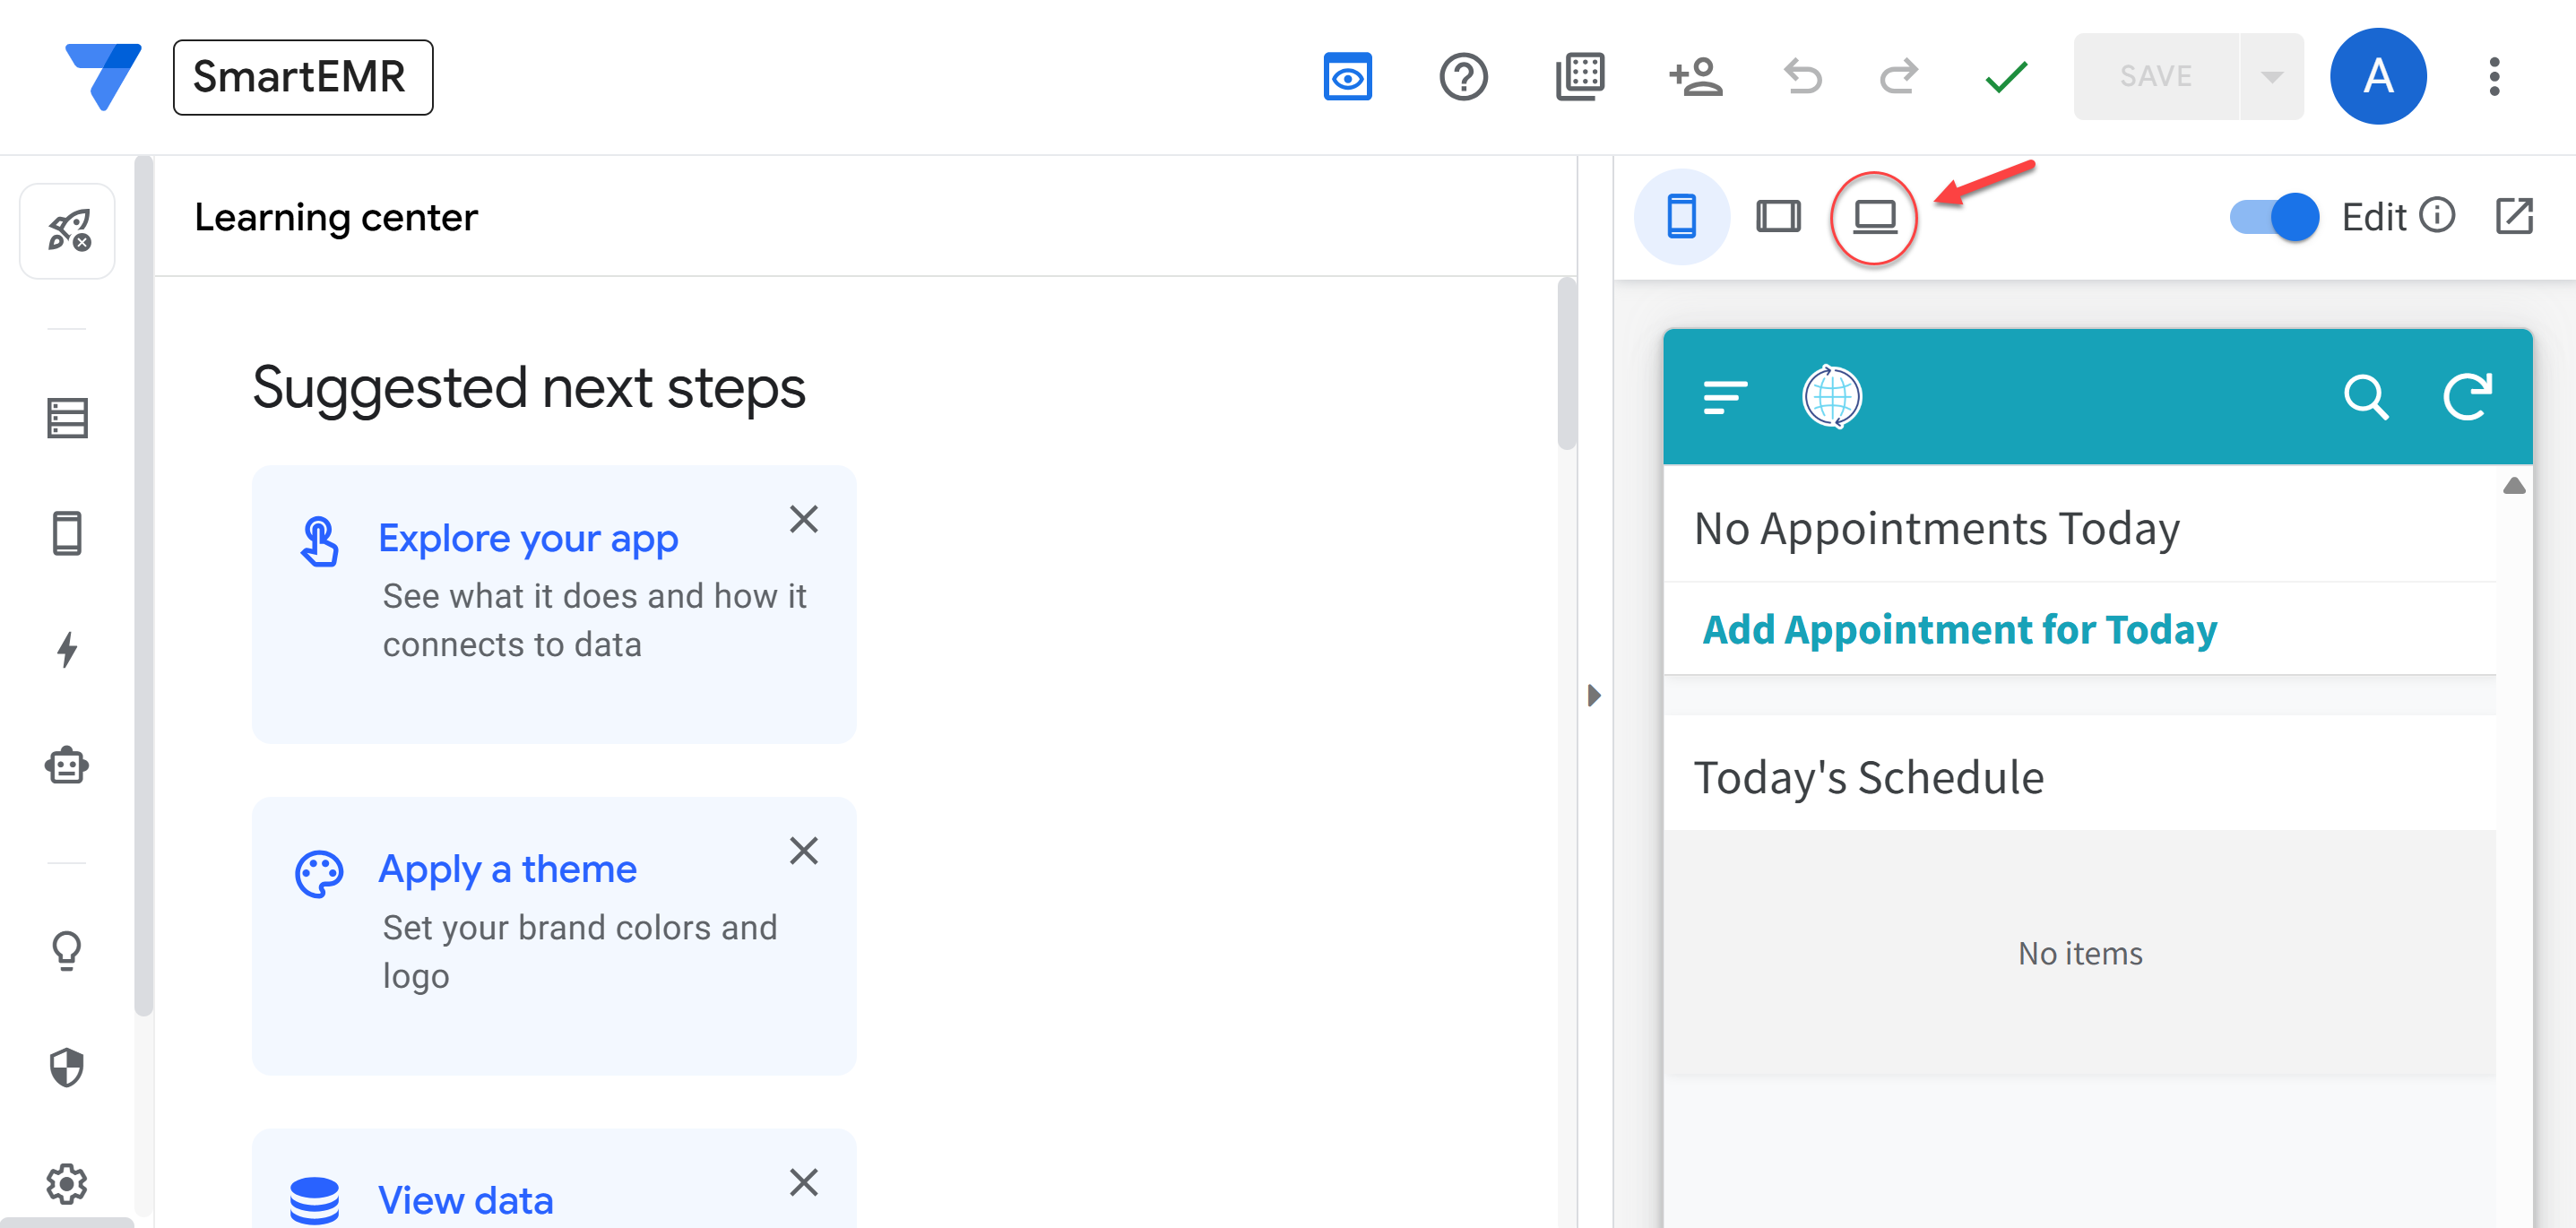
Smart EMR desktop view — your complete clinic management system
Clone the App (Get Your Own Copy)
The first step is to get your own personal copy of Smart EMR. This is called "cloning" the app. This is the most important step — without cloning, you do not have the app.
- Open the CDA app on your computer browser: go to clinic.ai4docs.ai and sign in
- Click the Settings icon (gear icon)
- In the Settings panel, scroll down to the bottom. You will see a section called Smart EMR with a button that says "Clone Smart EMR" (only visible to subscribers)
- Click the "Clone Smart EMR" button
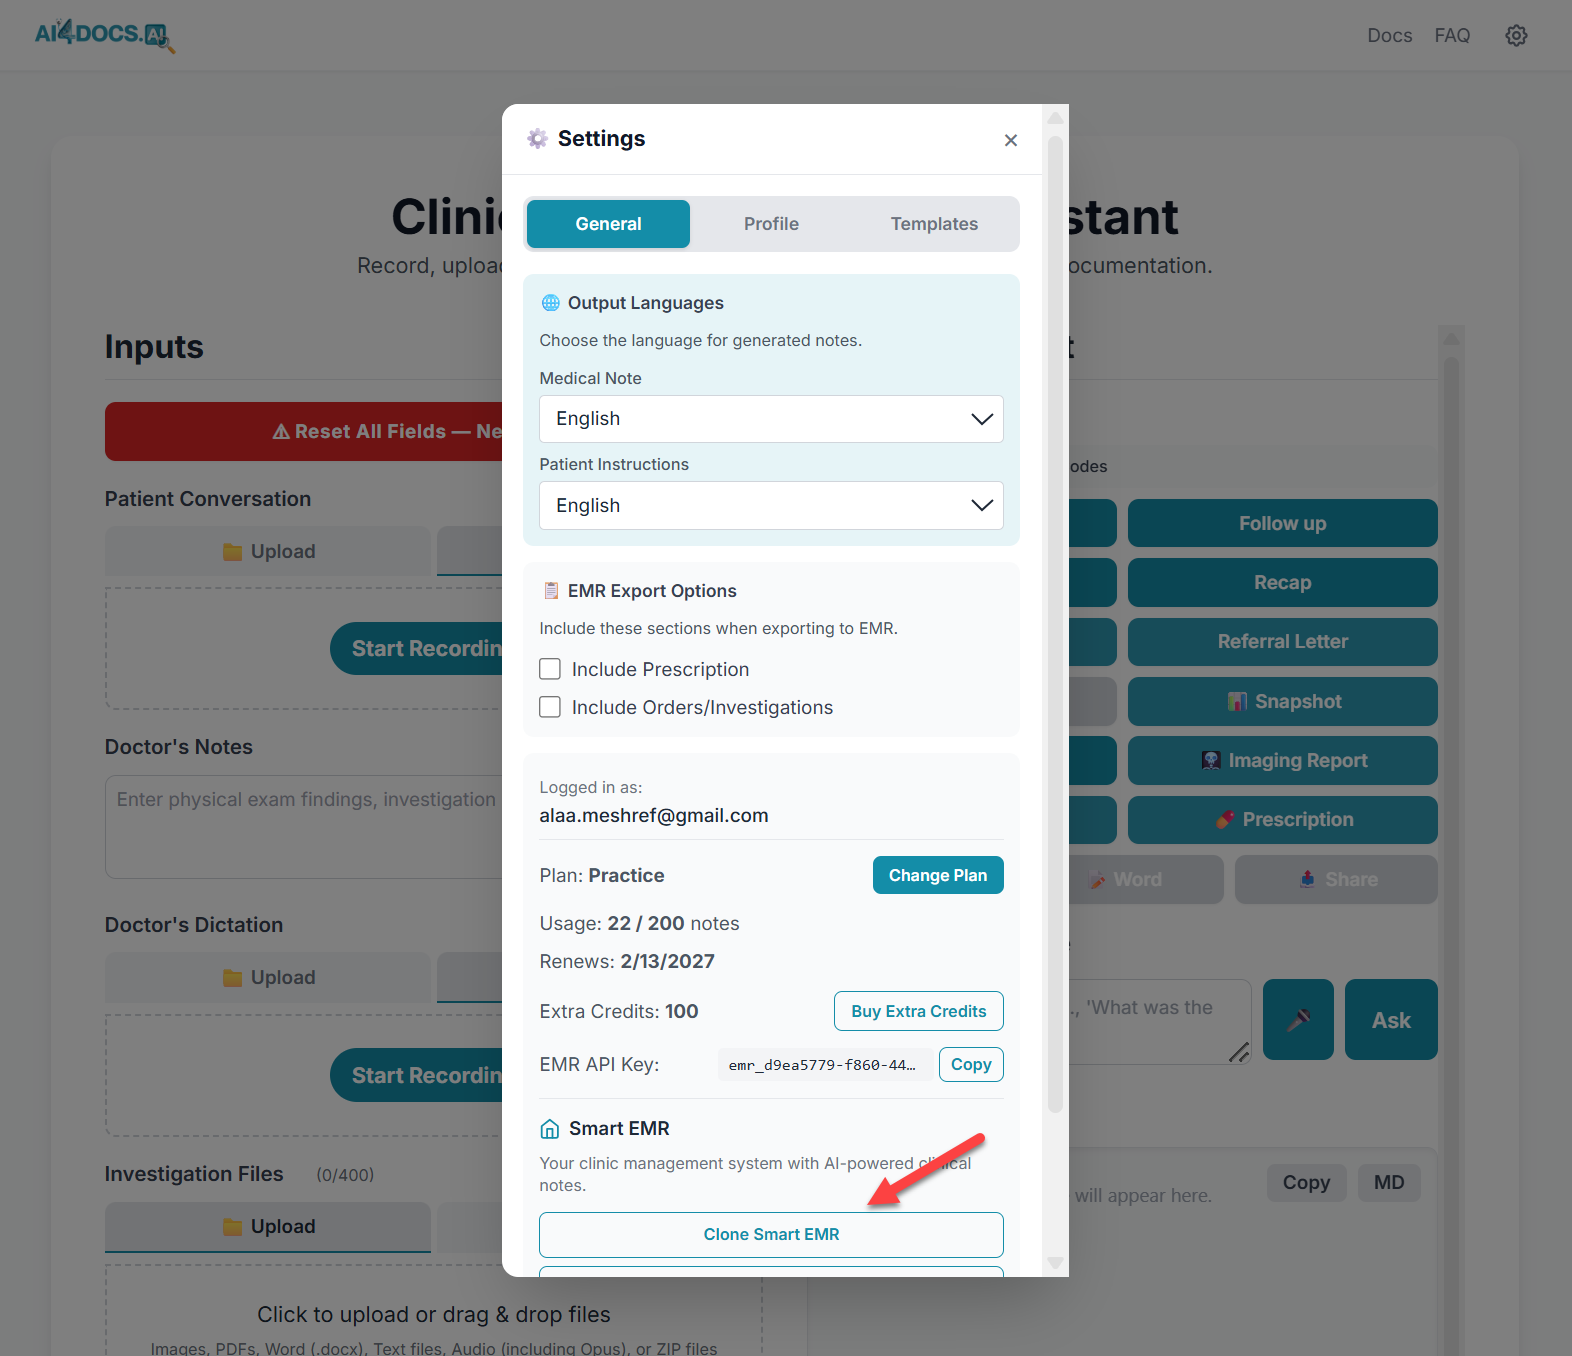
CDA Settings — scroll to the bottom and click "Clone Smart EMR"
- A new browser tab opens showing the AppSheet template. Click the "Copy" button to create your personal copy of the app
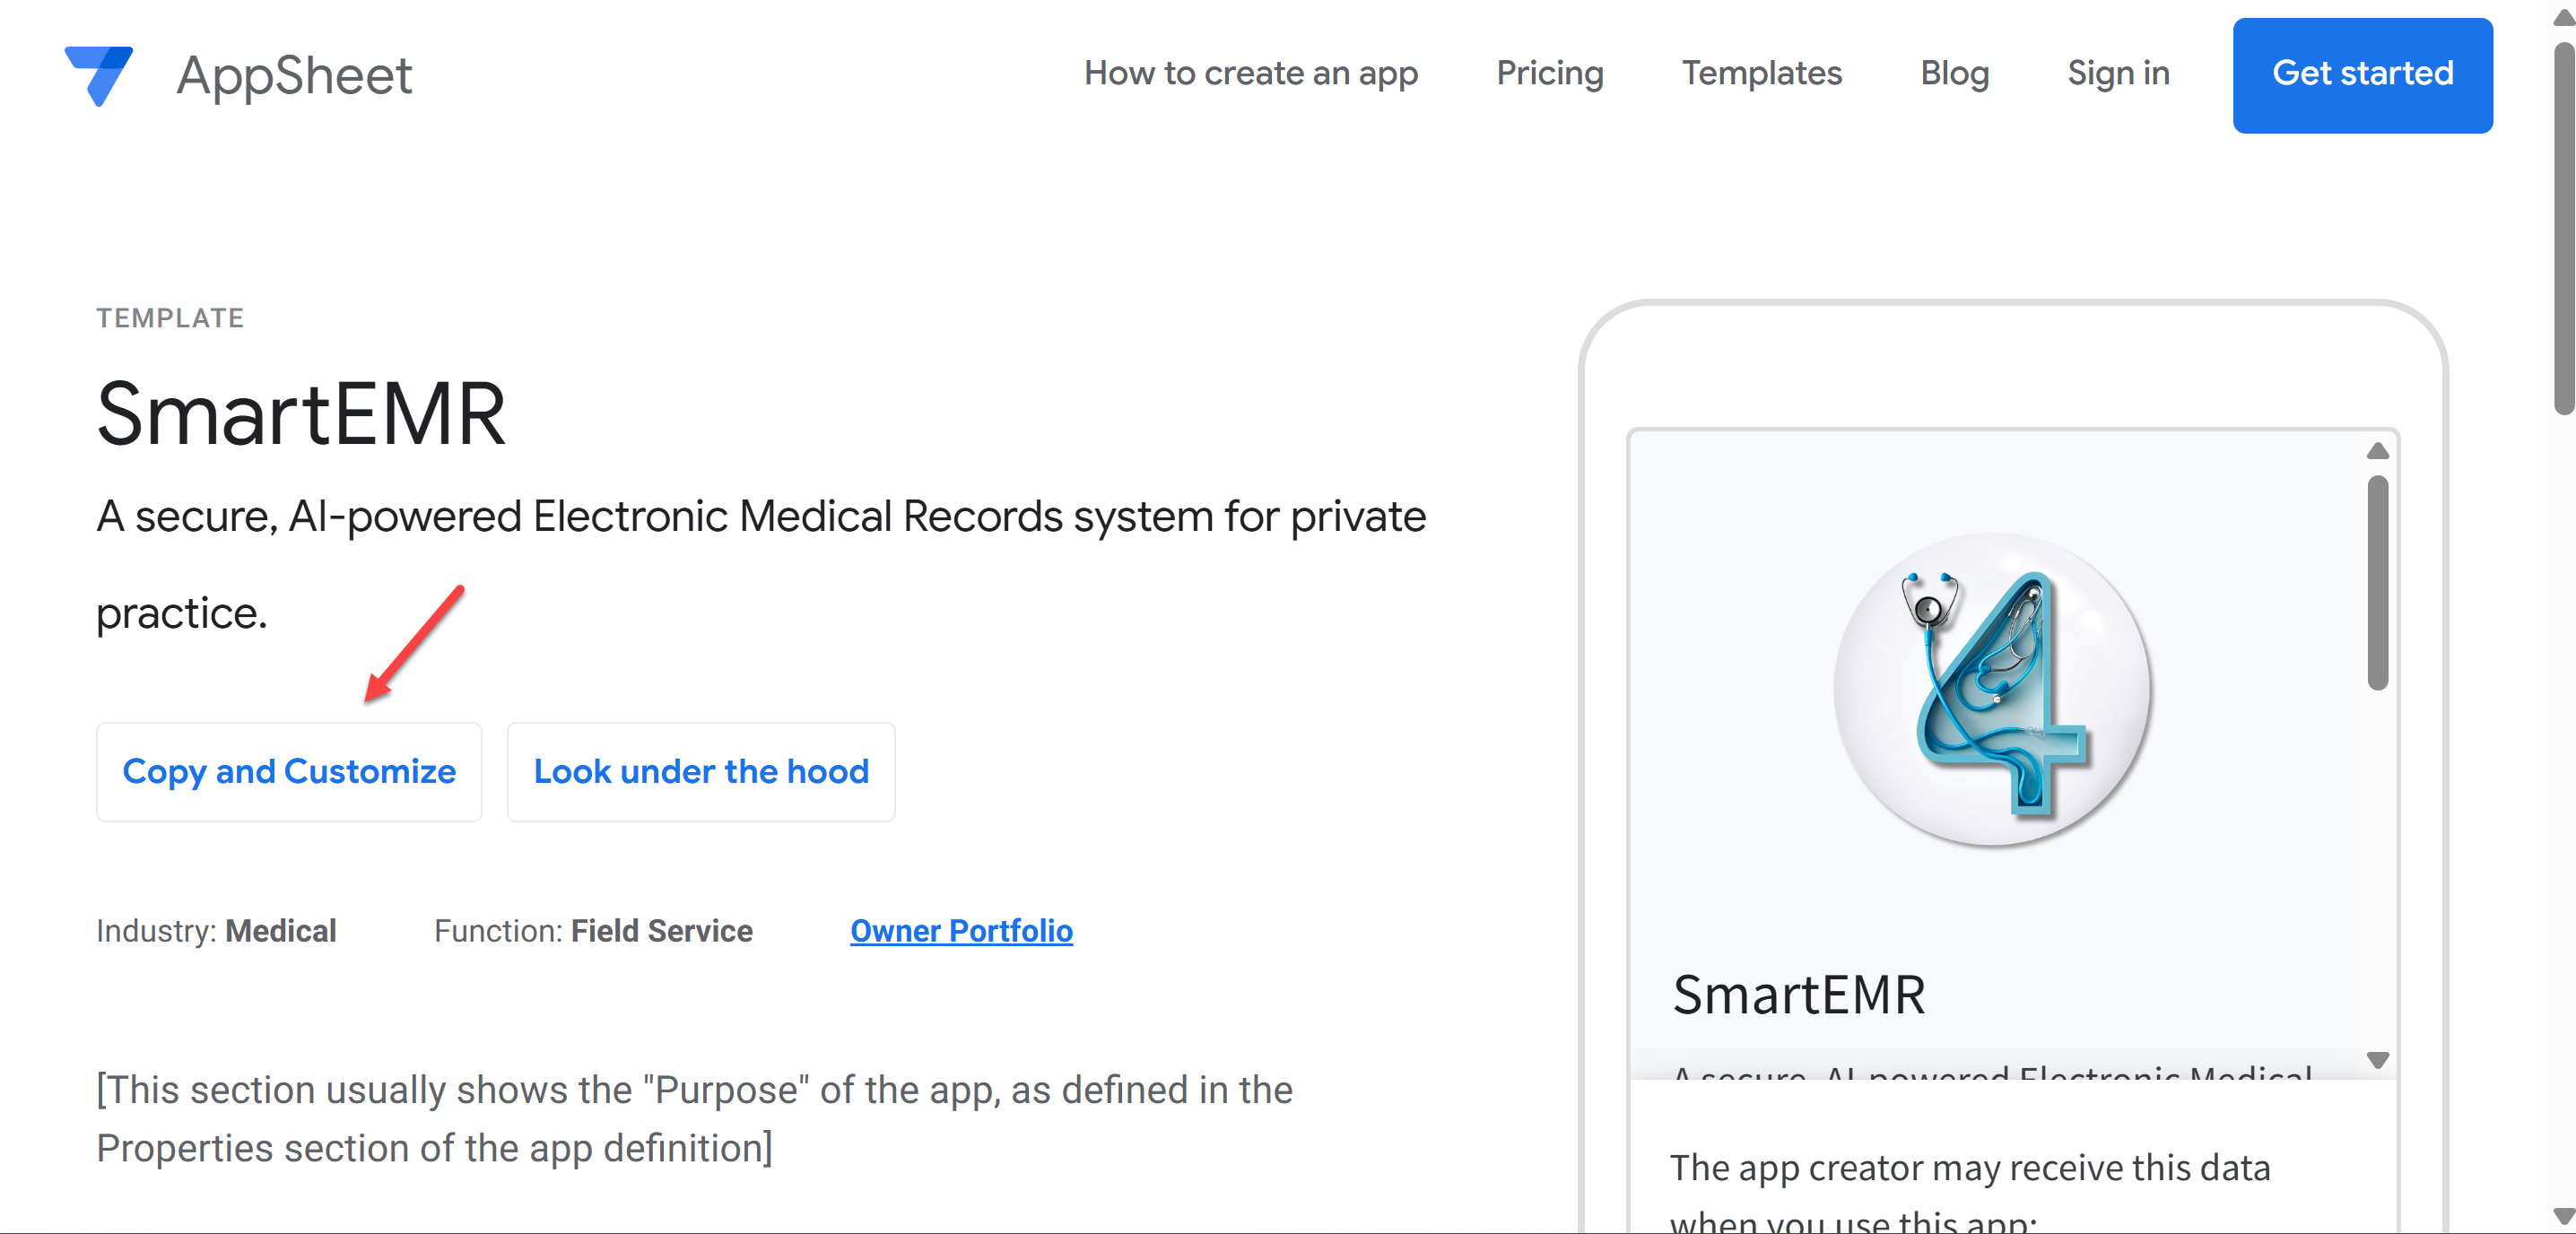
Click "Copy" to create your personal copy of Smart EMR
- Wait a few seconds while AppSheet creates your copy. When it is done, your brand new Smart EMR app opens in the AppSheet editor
- You now have your own Smart EMR! A Google Sheets file called "Visits" has been automatically created in your Google Drive (inside the
AppSheet/data/SmartEMR-XXXXXfolder)
Installing AppSheet on Your Devices
Smart EMR runs on a platform called AppSheet (made by Google). Think of AppSheet as the "container" that runs your EMR. You need to install it on every device where you (or your staff) will use Smart EMR.
On iPhone or iPad
- Open the App Store
- Search for AppSheet
- Install the app by Google (purple/blue icon)
- Open AppSheet and sign in with your Gmail address — the same one you used for AI4Docs.AI CDA
On Android Phone or Tablet
- Open the Google Play Store
- Search for AppSheet
- Install the app by Google
- Open AppSheet and sign in with your Gmail address — the same one you used for AI4Docs.AI CDA
On a Computer (Windows or Mac)
No installation needed. Smart EMR runs in your web browser. After cloning, go to www.appsheet.com, sign in, and your Smart EMR app will be listed. Bookmark it for easy access.
Step 1: Add Yourself as Administrator
When you first open Smart EMR after cloning, it has a placeholder user (SETUP_REQUIRED@clinic.com). You need to add yourself as the real administrator, then remove the placeholder.
Part A: Open Setup
- Open Smart EMR on your computer
- Tap the hamburger menu (three horizontal lines at the top left corner)
- Tap Setup (gear icon)
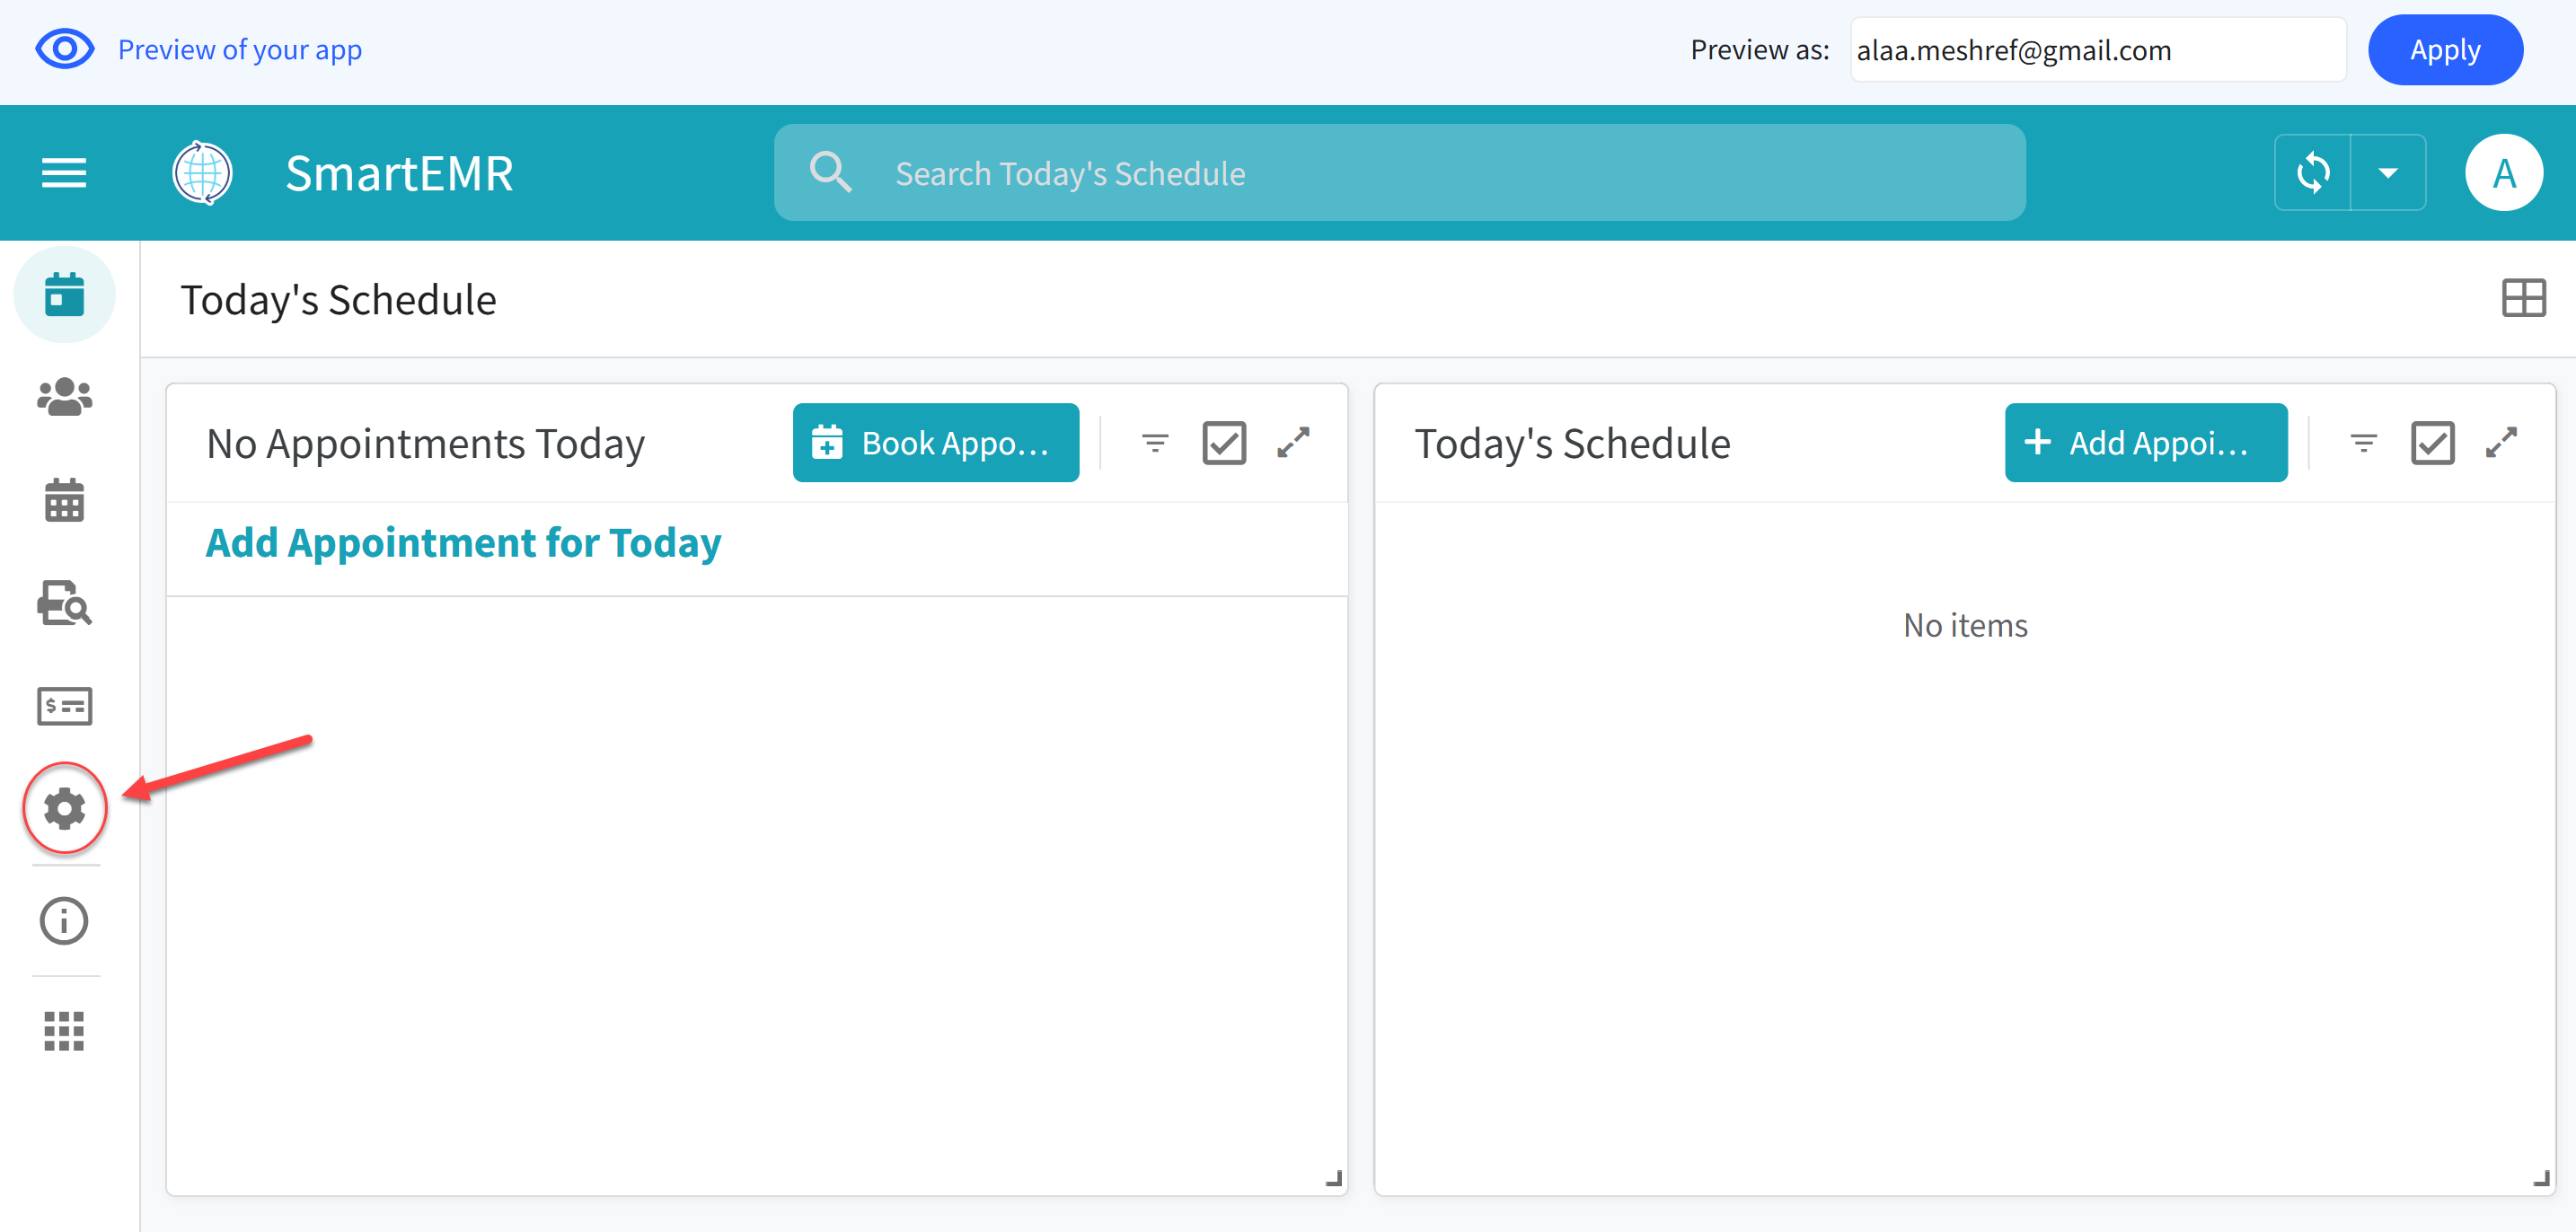
Tap the hamburger menu, then tap Setup to access all configuration options
Part B: Add Your Admin Account
- Tap the USERS tab at the top of the Setup screen
- Tap the Add button (+ icon) to create a new user
- Fill in:
- Email: Your real Gmail address (must be the same as your CDA and AppSheet account)
- Name: Your full name (e.g., "Dr. Ahmed Mohamed")
- Roles: Check the box next to Admin
- Active: Set to Yes
- Tap Save

Add yourself as Admin — enter your Gmail, name, and check the Admin role
Part C: Remove the Placeholder User
- Go back to the USERS tab
- Tap on the entry with the email
SETUP_REQUIRED@clinic.com - Tap Delete to remove this placeholder user
- Confirm the deletion
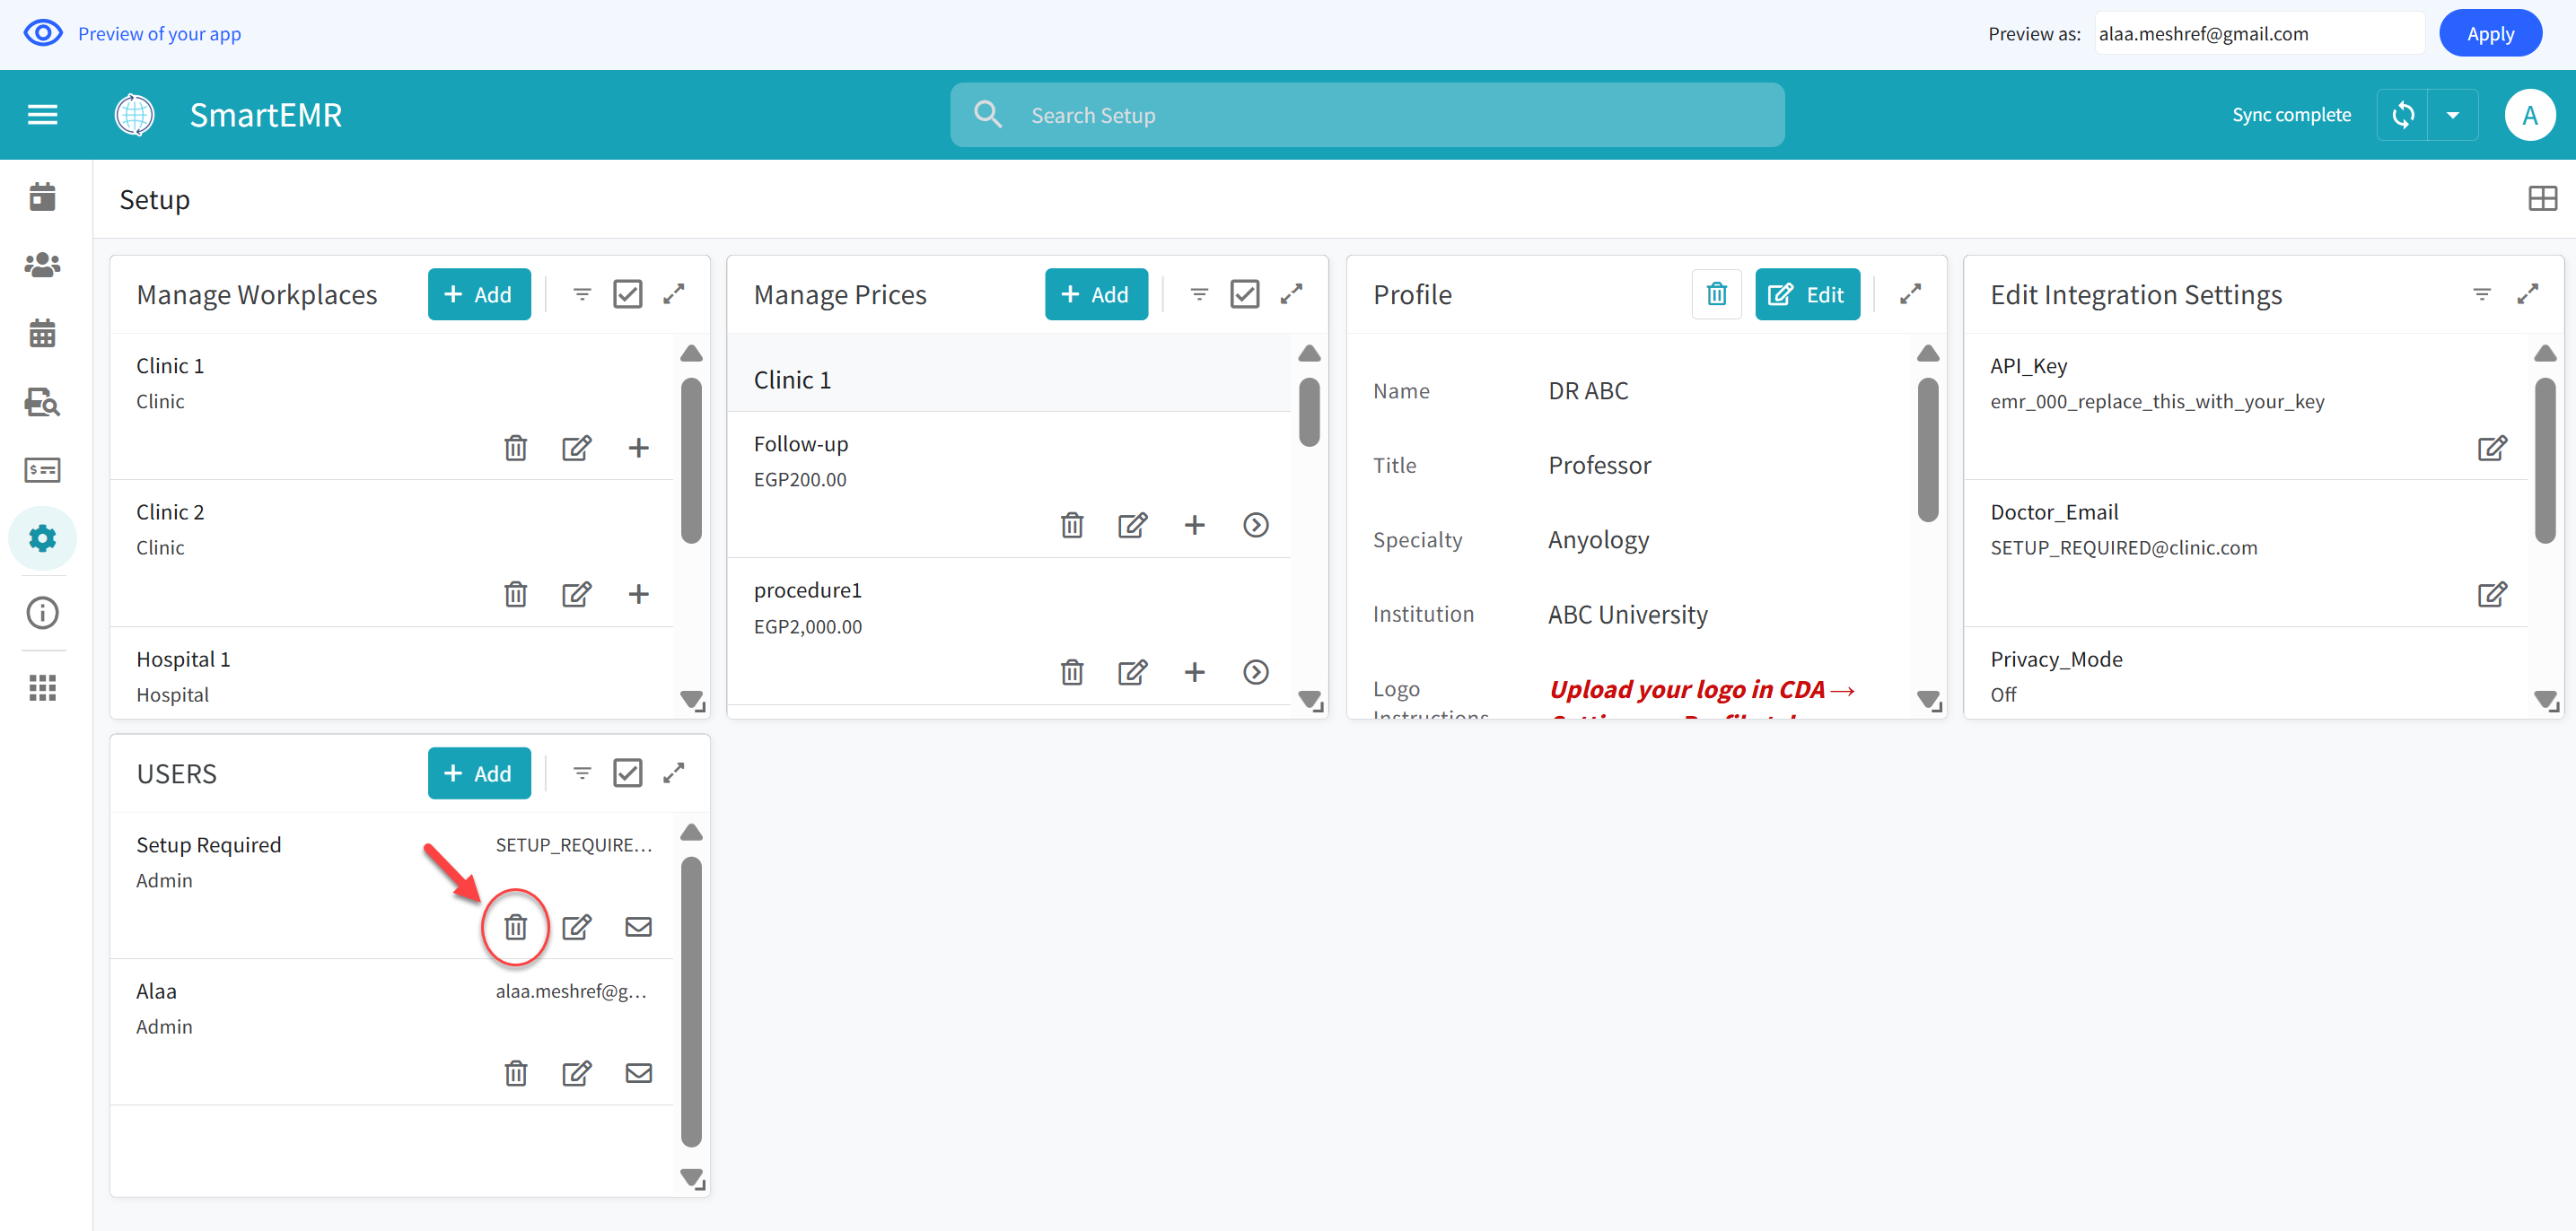
Delete the SETUP_REQUIRED placeholder — tap on it and delete it
- On phone/tablet: Pull down from the top of the screen (like pulling a curtain)
- On computer: Click the circular refresh icon at the top right
- This is called "Sync." You will need to do this frequently. The app does NOT refresh automatically — always sync manually after any action
Step 2: Connect the AI (API Key, Email, and Sheet ID)
This step connects your Smart EMR to the AI4Docs.AI Clinical Documentation Assistant (CDA). You need three things: your API Key, your CDA email address, and your Google Sheet ID.
Part A: Copy Your API Key from the CDA App
- On your computer browser, go to clinic.ai4docs.ai and sign in
- Click the Settings icon (gear)
- In the General tab, scroll down to find your EMR API Key. It looks like:
emr_a1b2c3-d4e5f6-7890a-bcdef1 - Click the Copy button next to the key to copy it to your clipboard
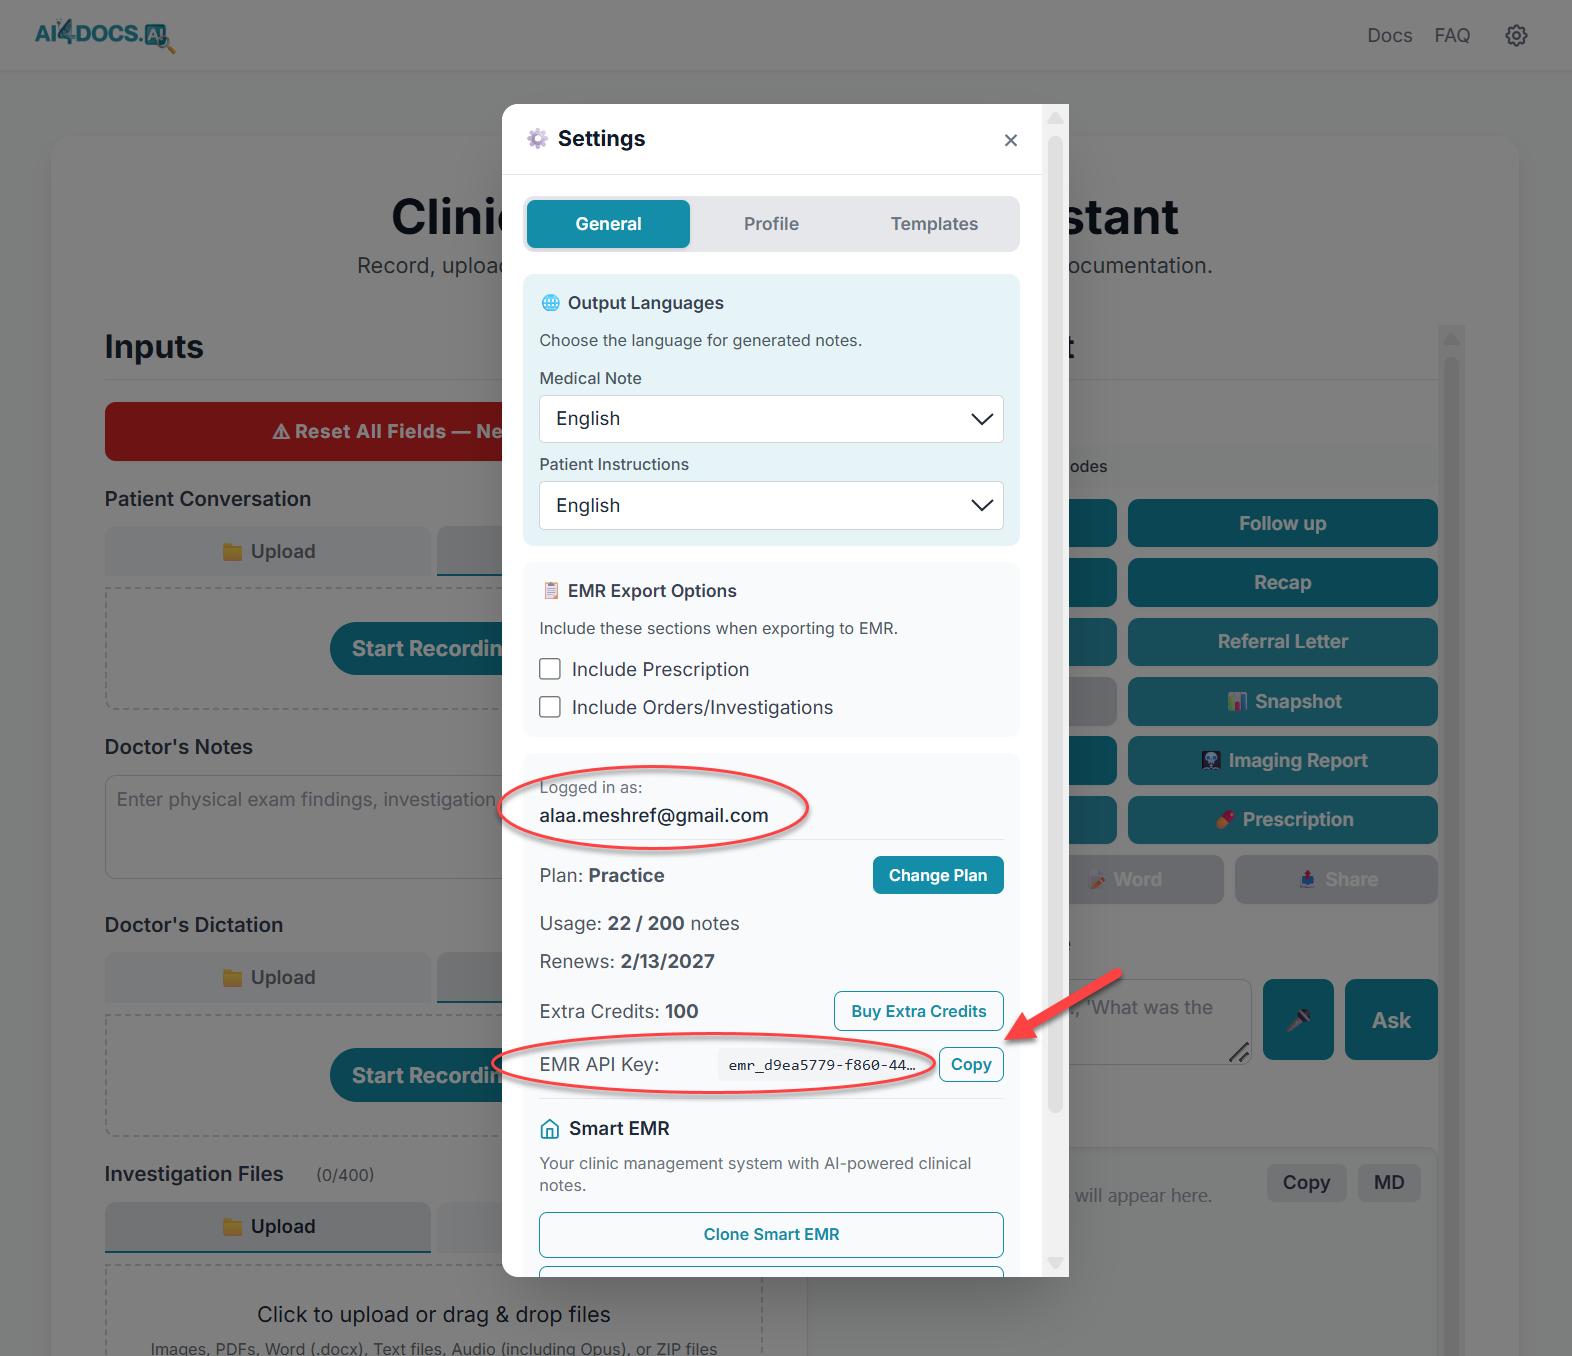
CDA Settings — copy your EMR API Key by clicking the Copy button
Part B: Enter the API Key, Email, and Sheet ID in Smart EMR
- Go back to Smart EMR > hamburger menu > Setup > SETTINGS tab
- Tap the Edit button (pencil icon)
- In the API_Key field: paste the API key you copied. Replace the entire placeholder text
emr_000_replace_this_with_your_keywith your real key
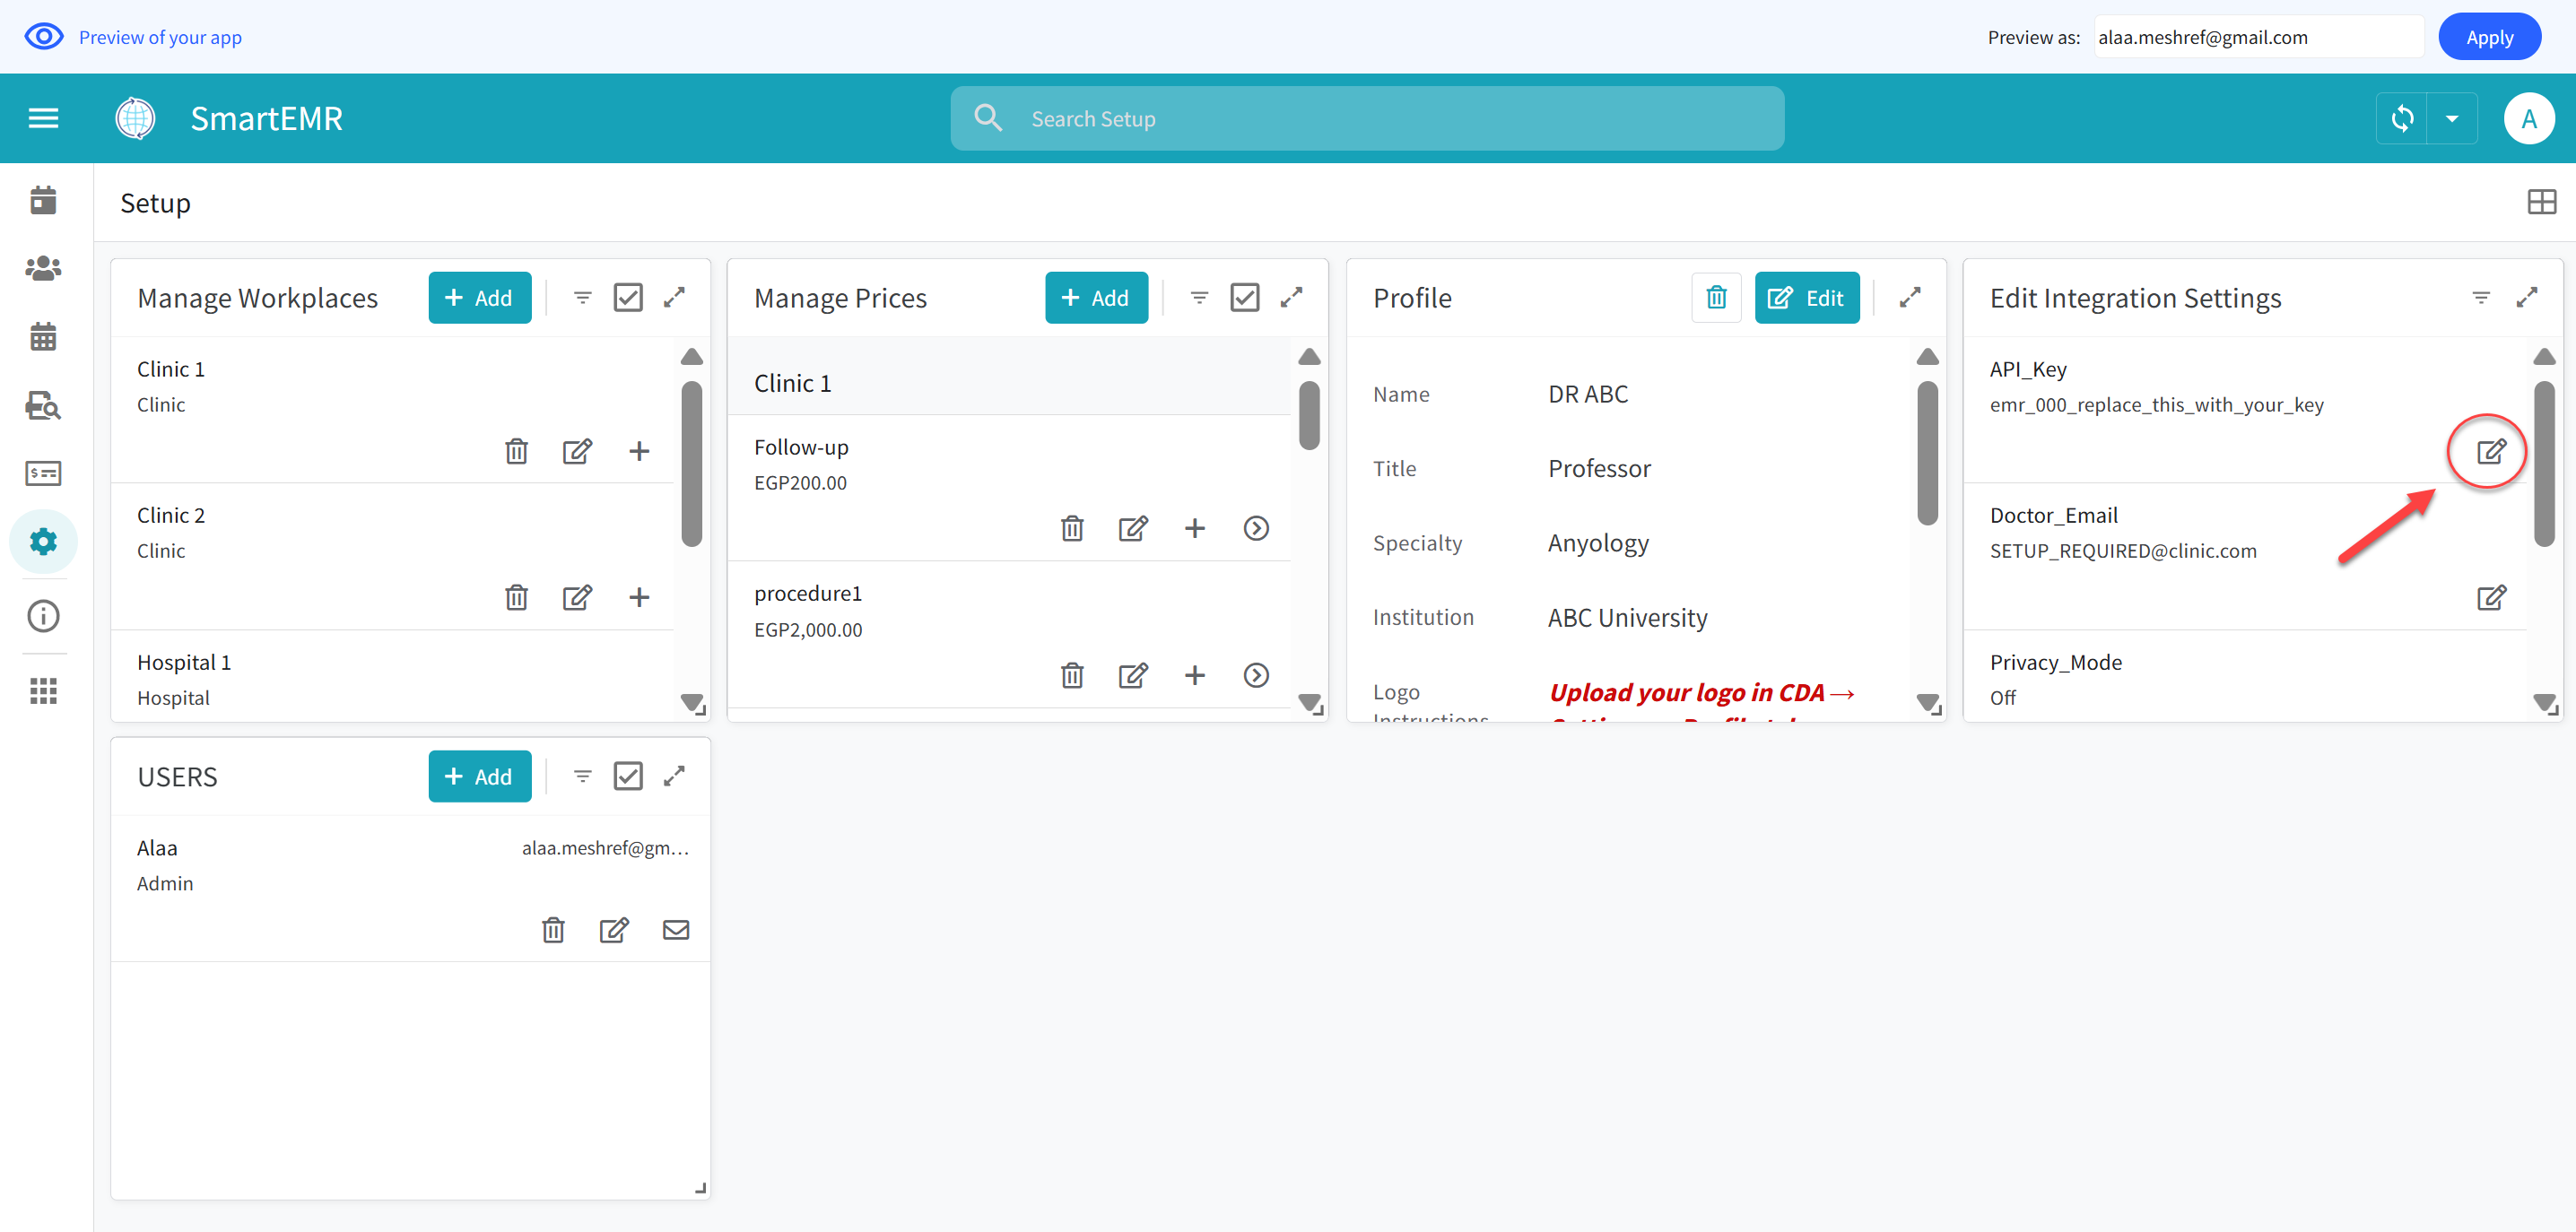
Replace the placeholder API key with your real key from CDA
- In the Doctor_Email field: type the exact same email address you use to sign into the CDA app at clinic.ai4docs.ai. This must match exactly. Replace the placeholder text
SETUP_REQUIRED@clinic.com
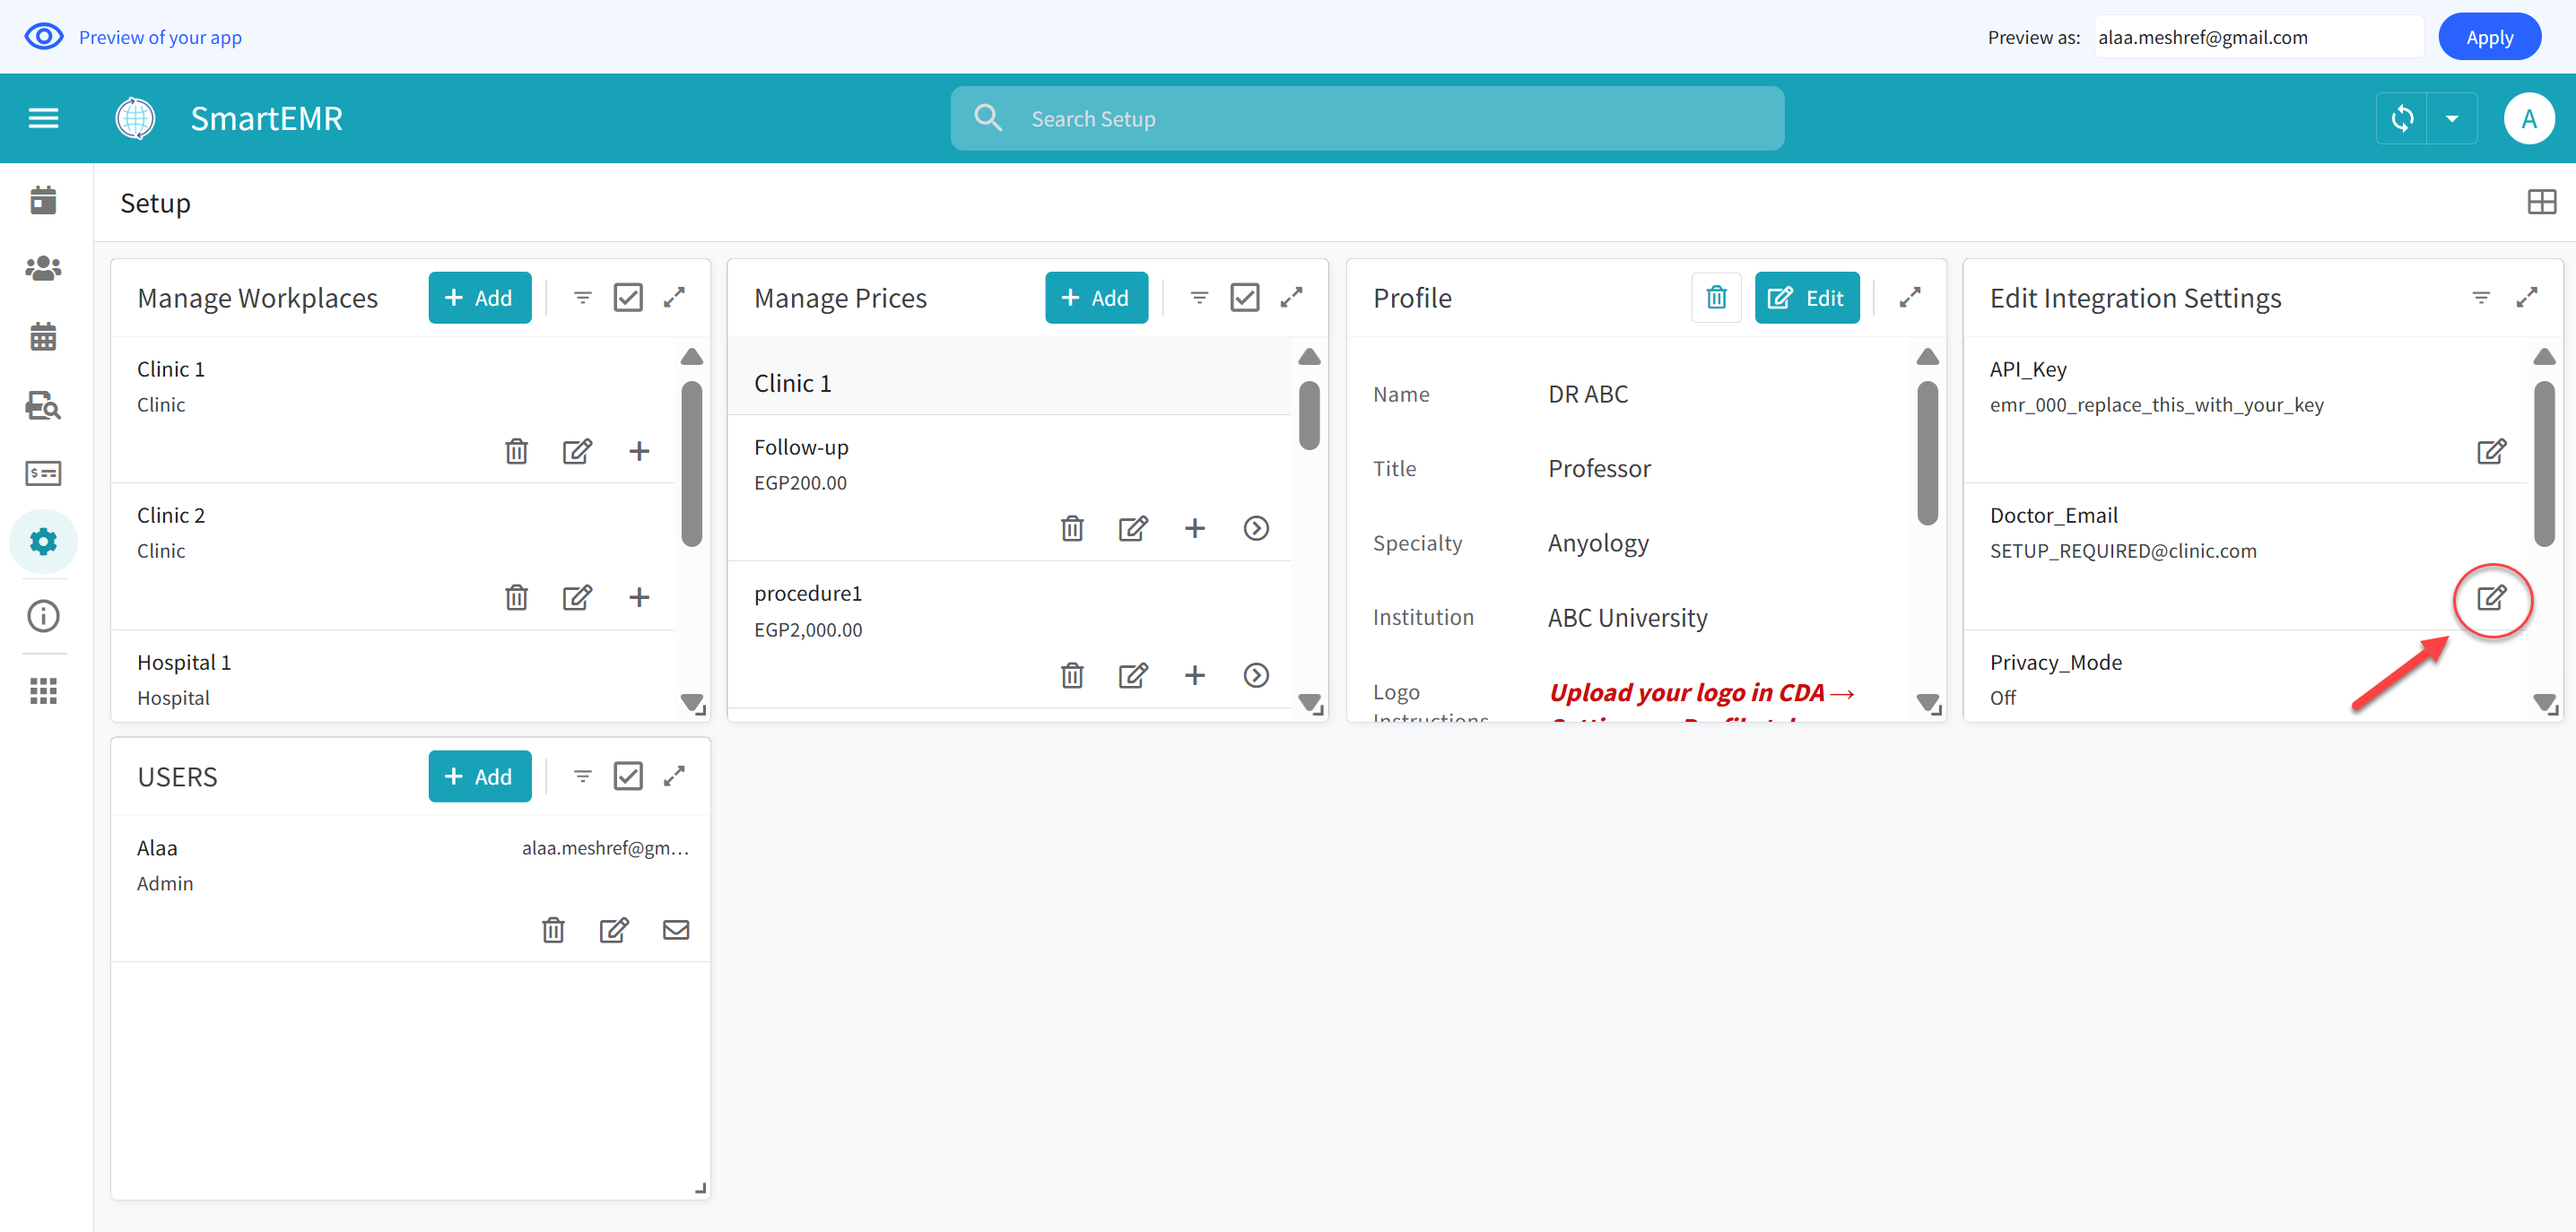
Replace the placeholder email with your real CDA email address
- In the Sheet_ID field: enter your Google Sheet ID. This is critical — without the Sheet ID, printing and AI note fetching will not work.
/d/ and /edit. For example:https://docs.google.com/spreadsheets/d/1aBcDeFgHiJkLmNoPqRsTuVwXyZ/editThe bold part is your Sheet ID. Copy it and paste it into the Sheet_ID field.

Find and copy the Sheet ID from your Google Sheets URL bar
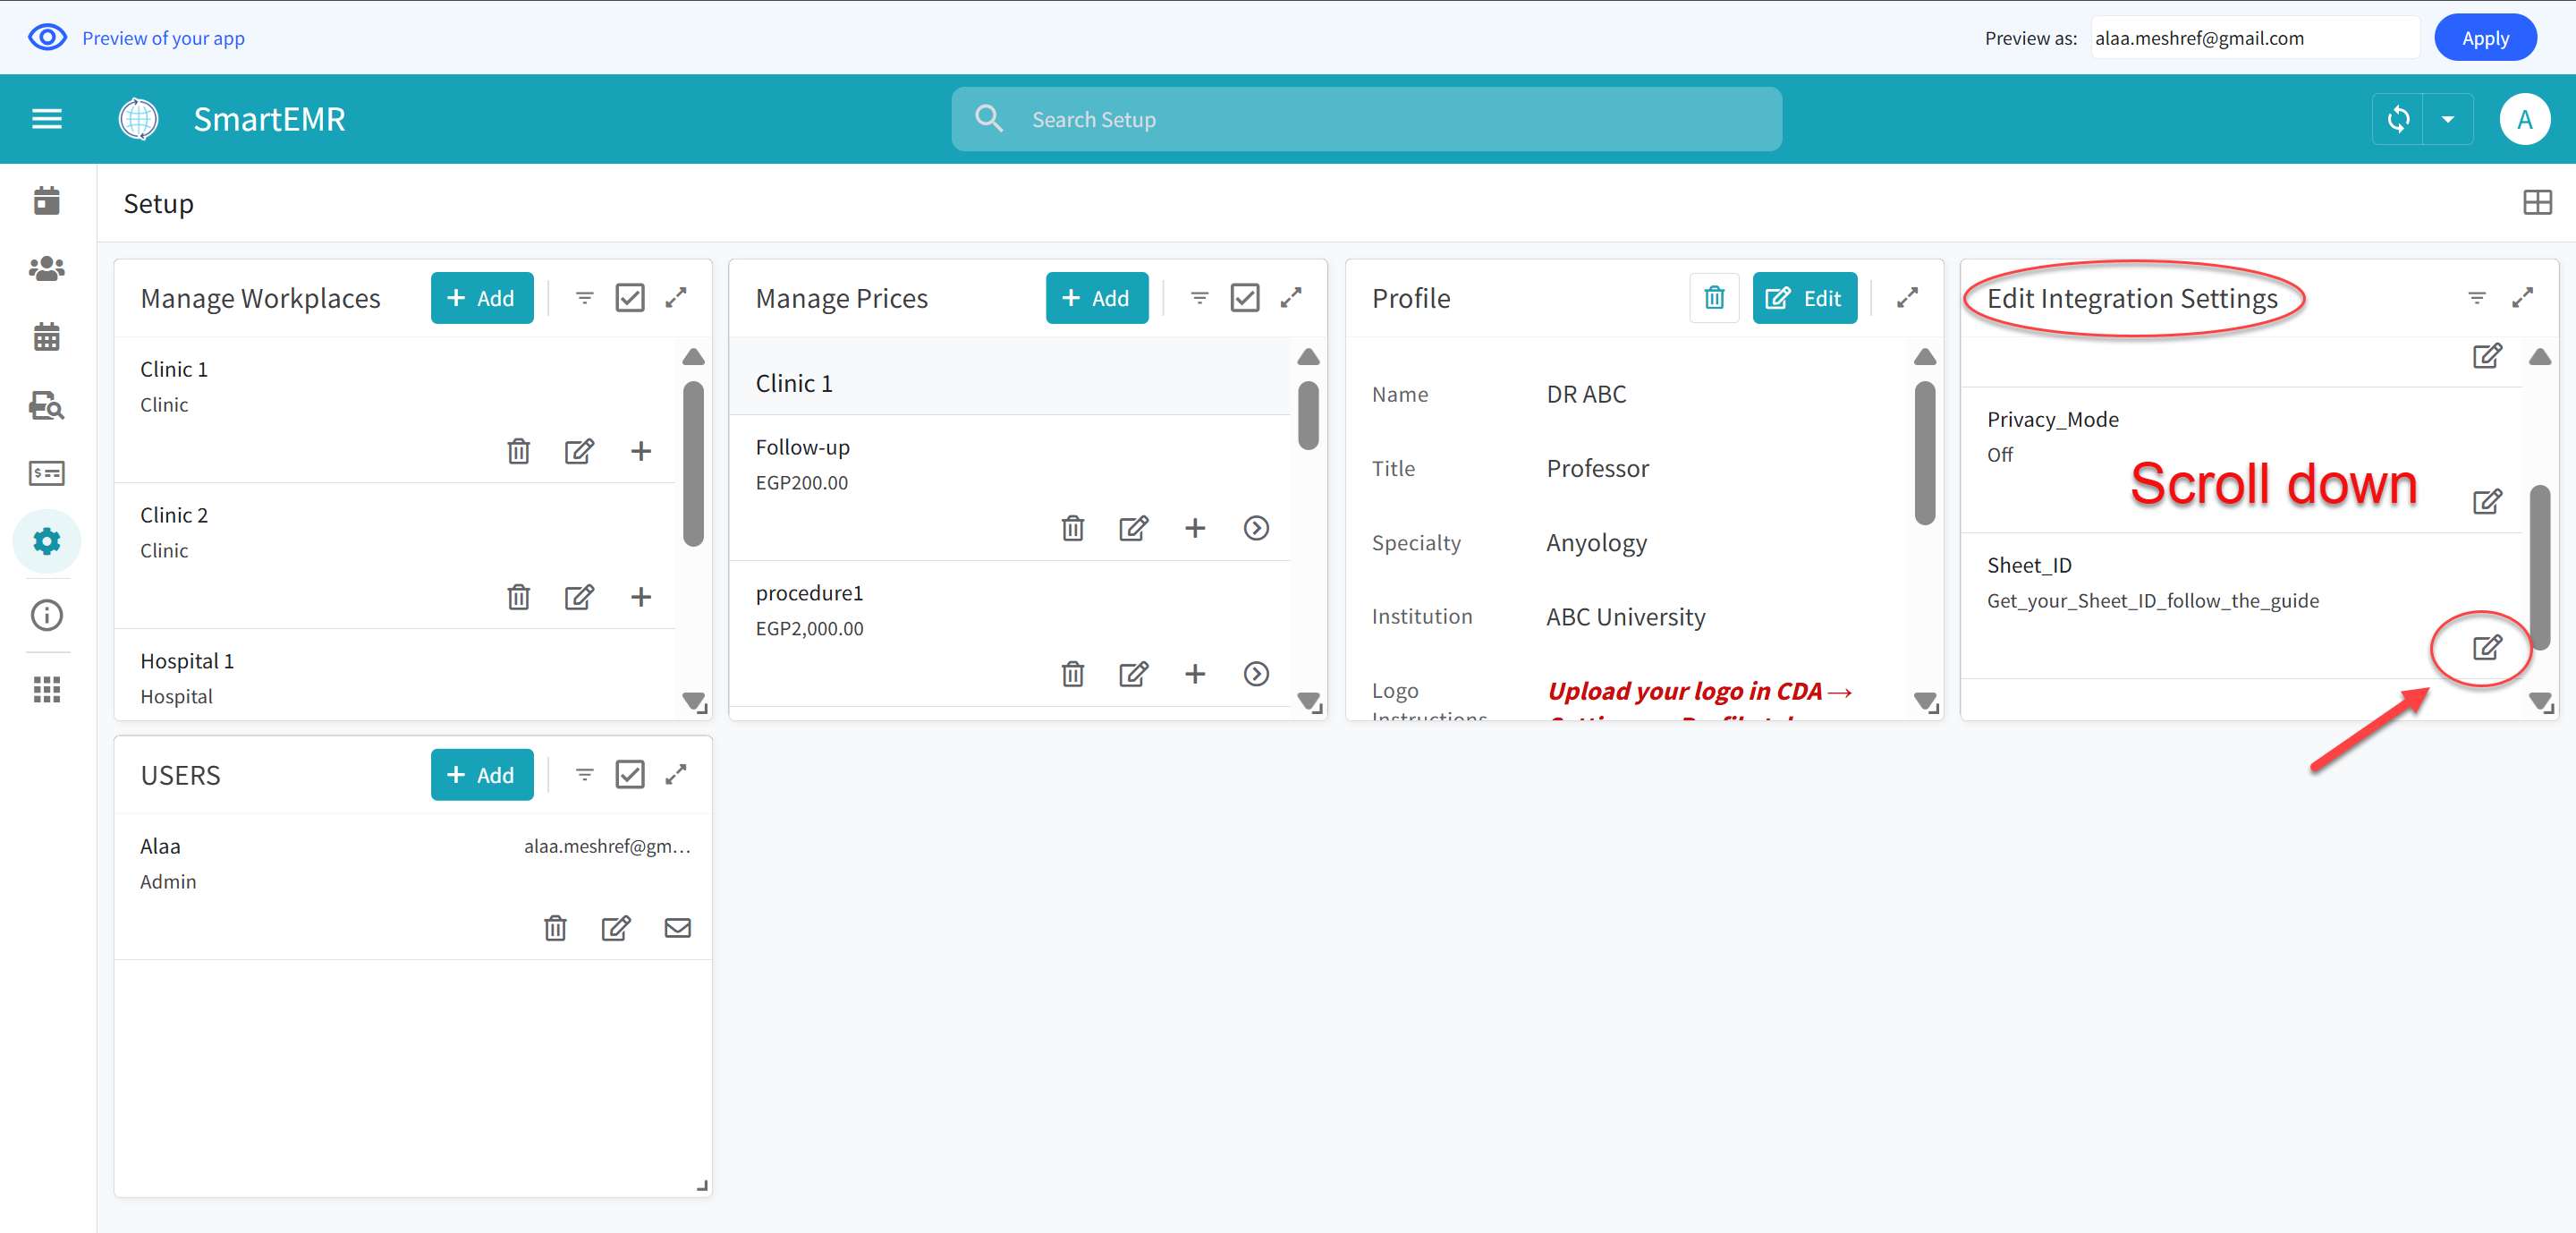
Edit the Sheet_ID field in Smart EMR Settings
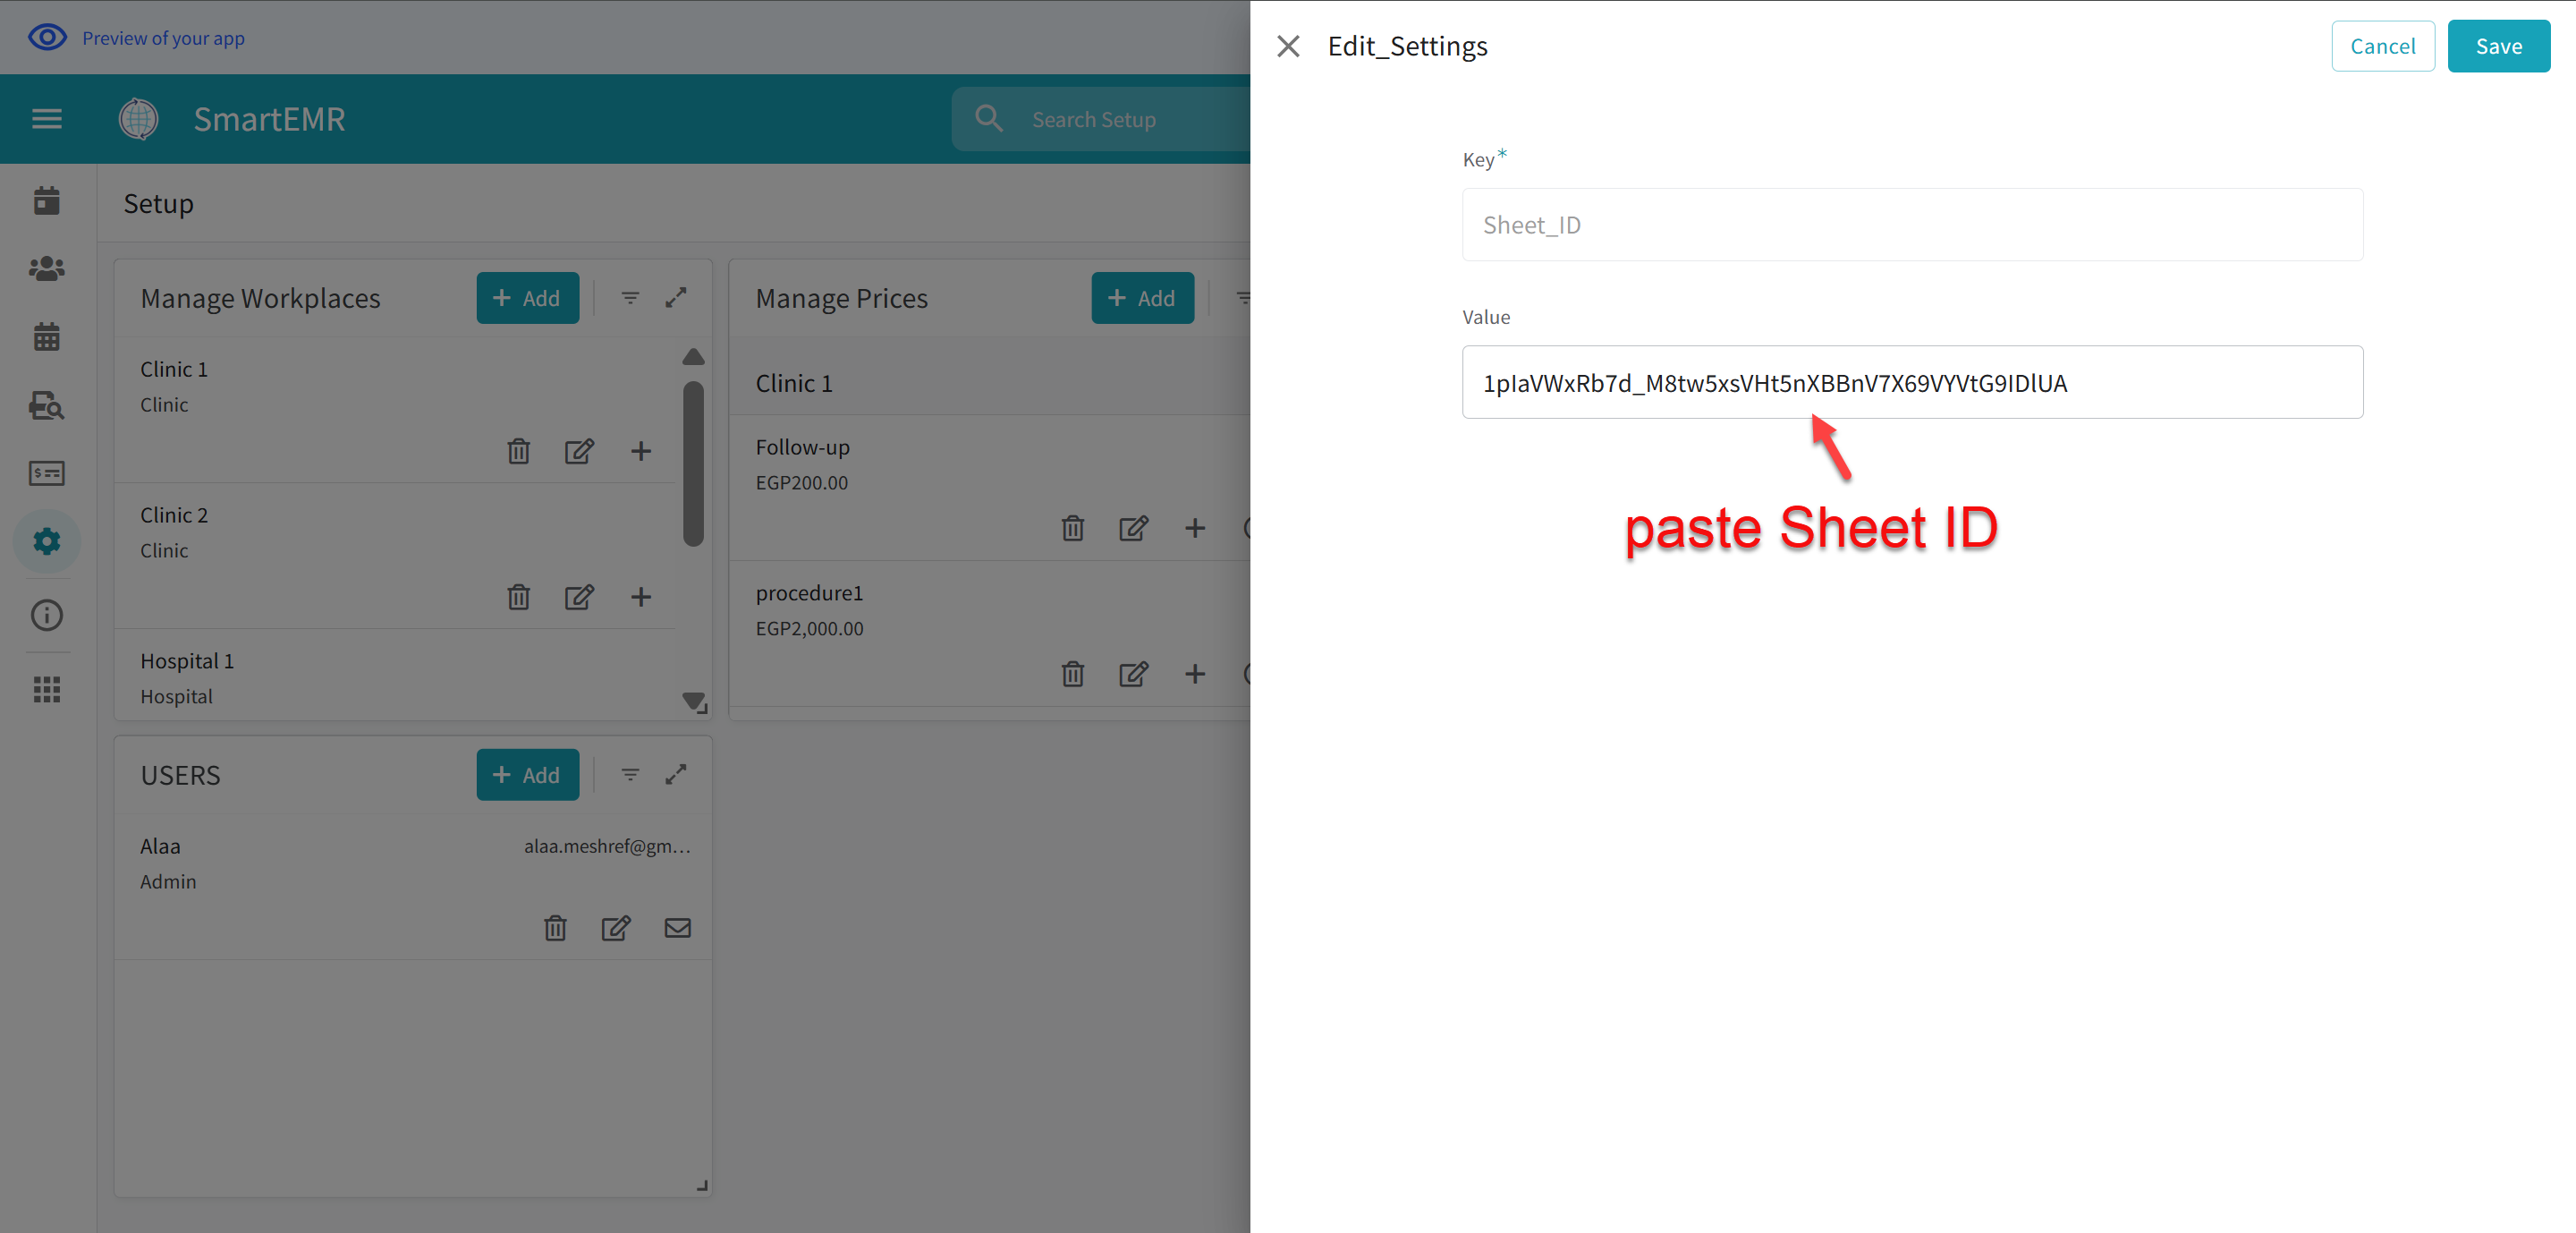
Paste your Sheet ID into the Sheet_ID field and save
- Tap Save
Step 3: Share Your Spreadsheet with the Backend Service
Smart EMR uses a backend service to handle printing and AI note fetching. For this to work, you need to share your Visits spreadsheet with our service account. This is a one-time step — you only need to do it once.
How to Find Your Visits Spreadsheet
- Open Google Drive in your browser: go to drive.google.com

Open Google Drive in your browser
- Navigate to the appsheet folder in your Drive
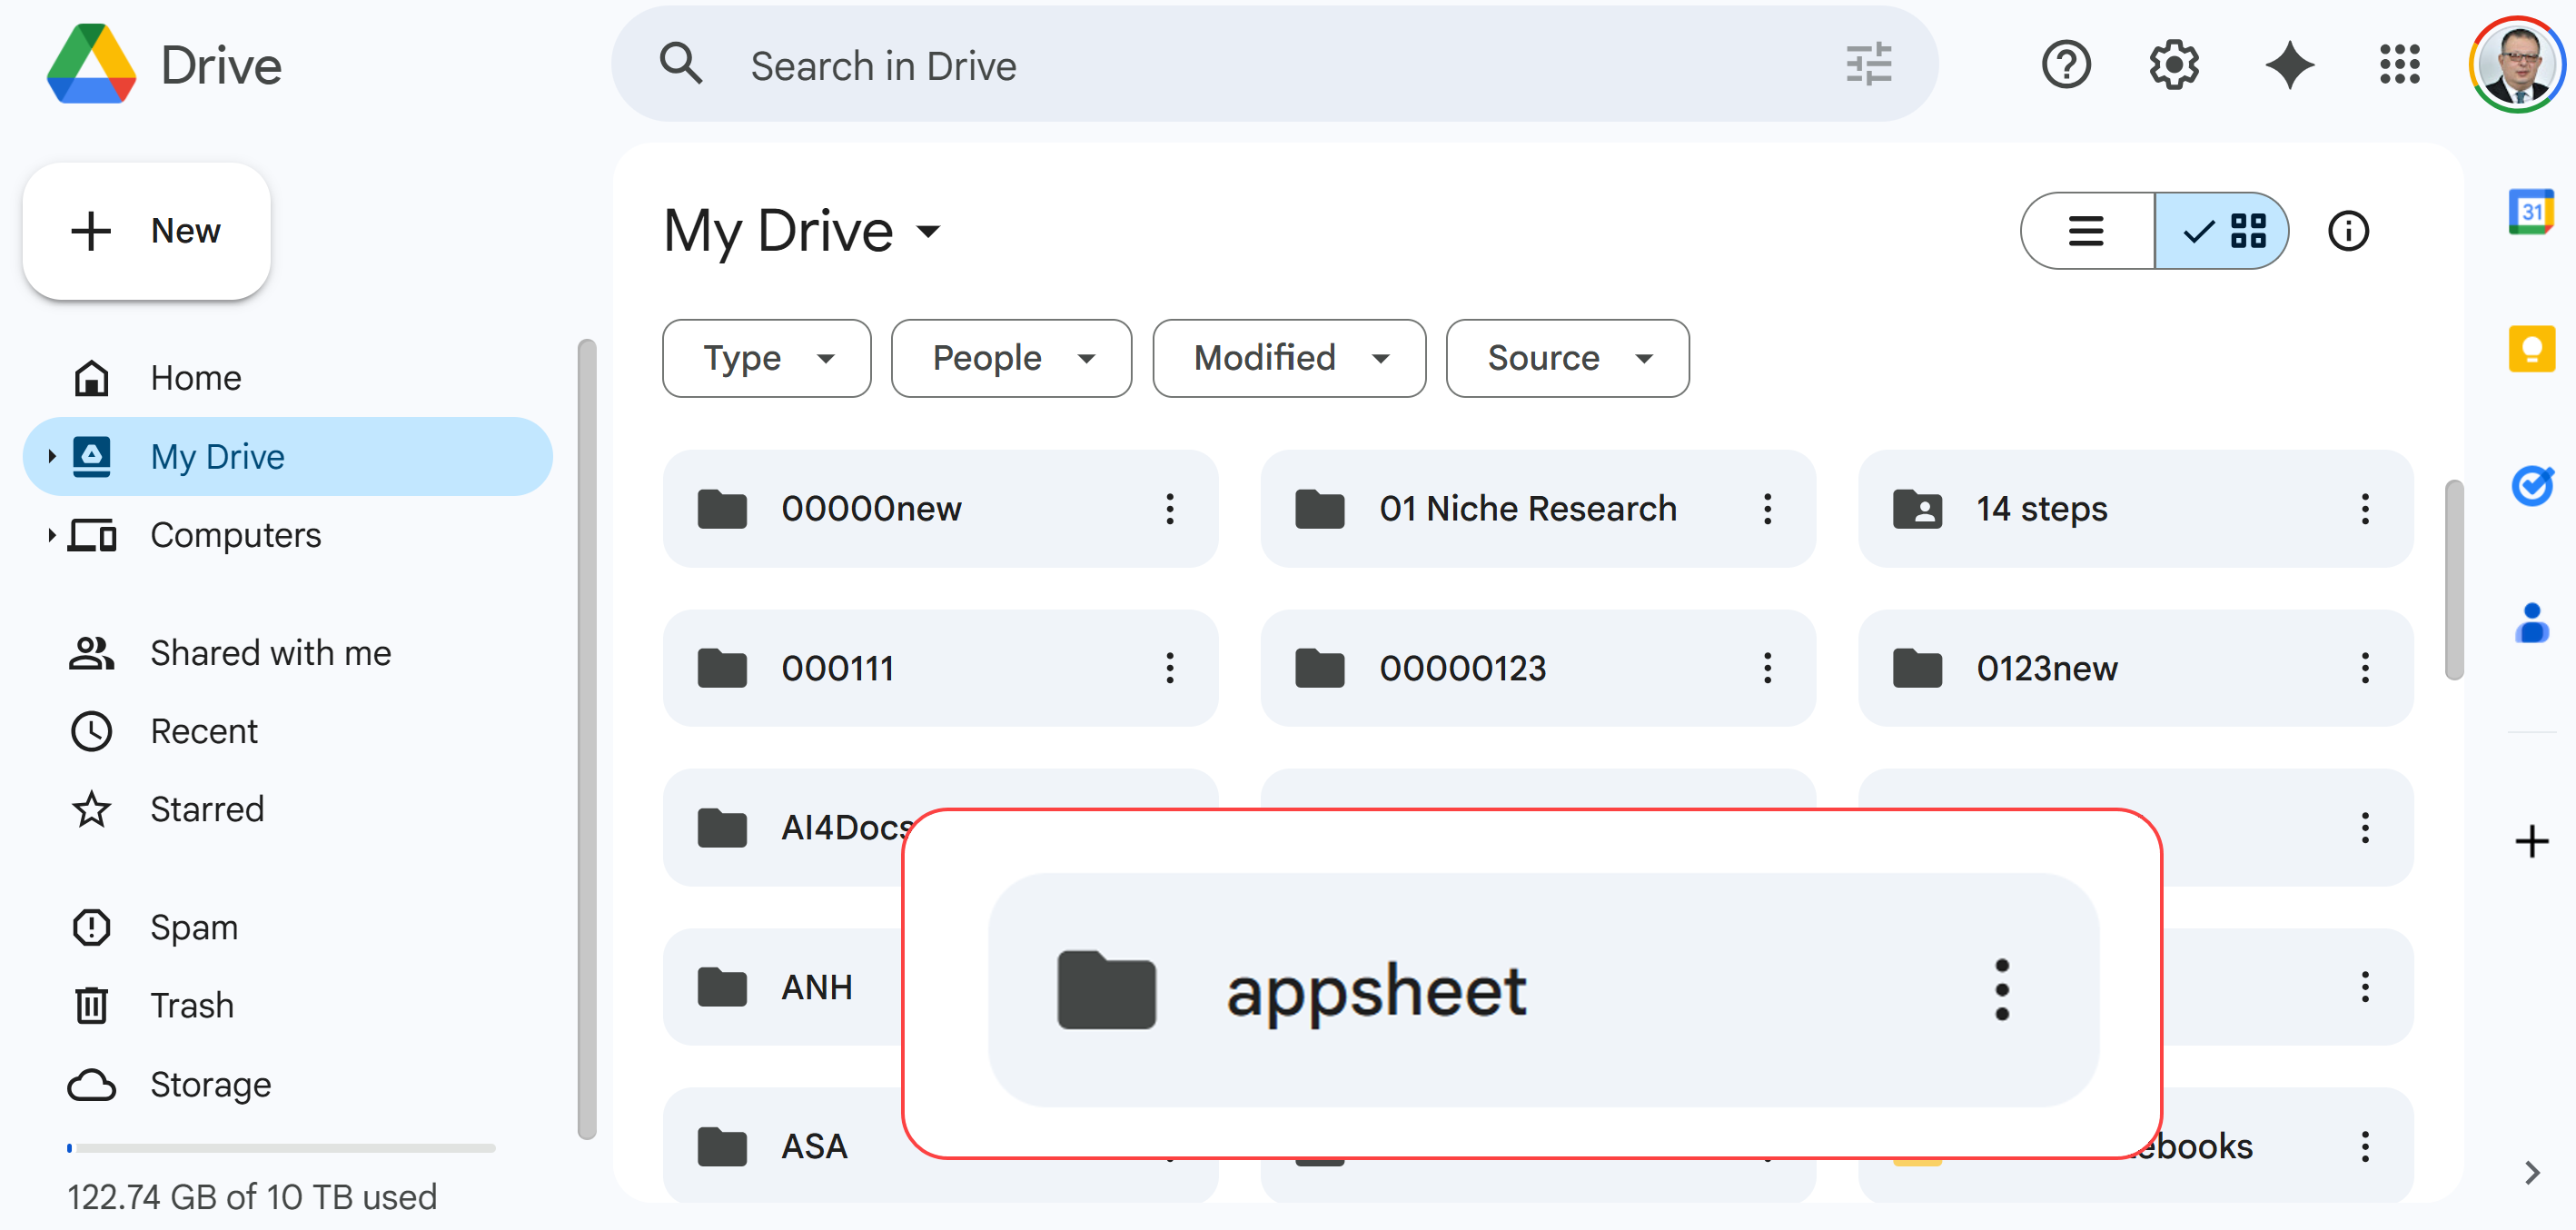
Find and open the "appsheet" folder in your Google Drive
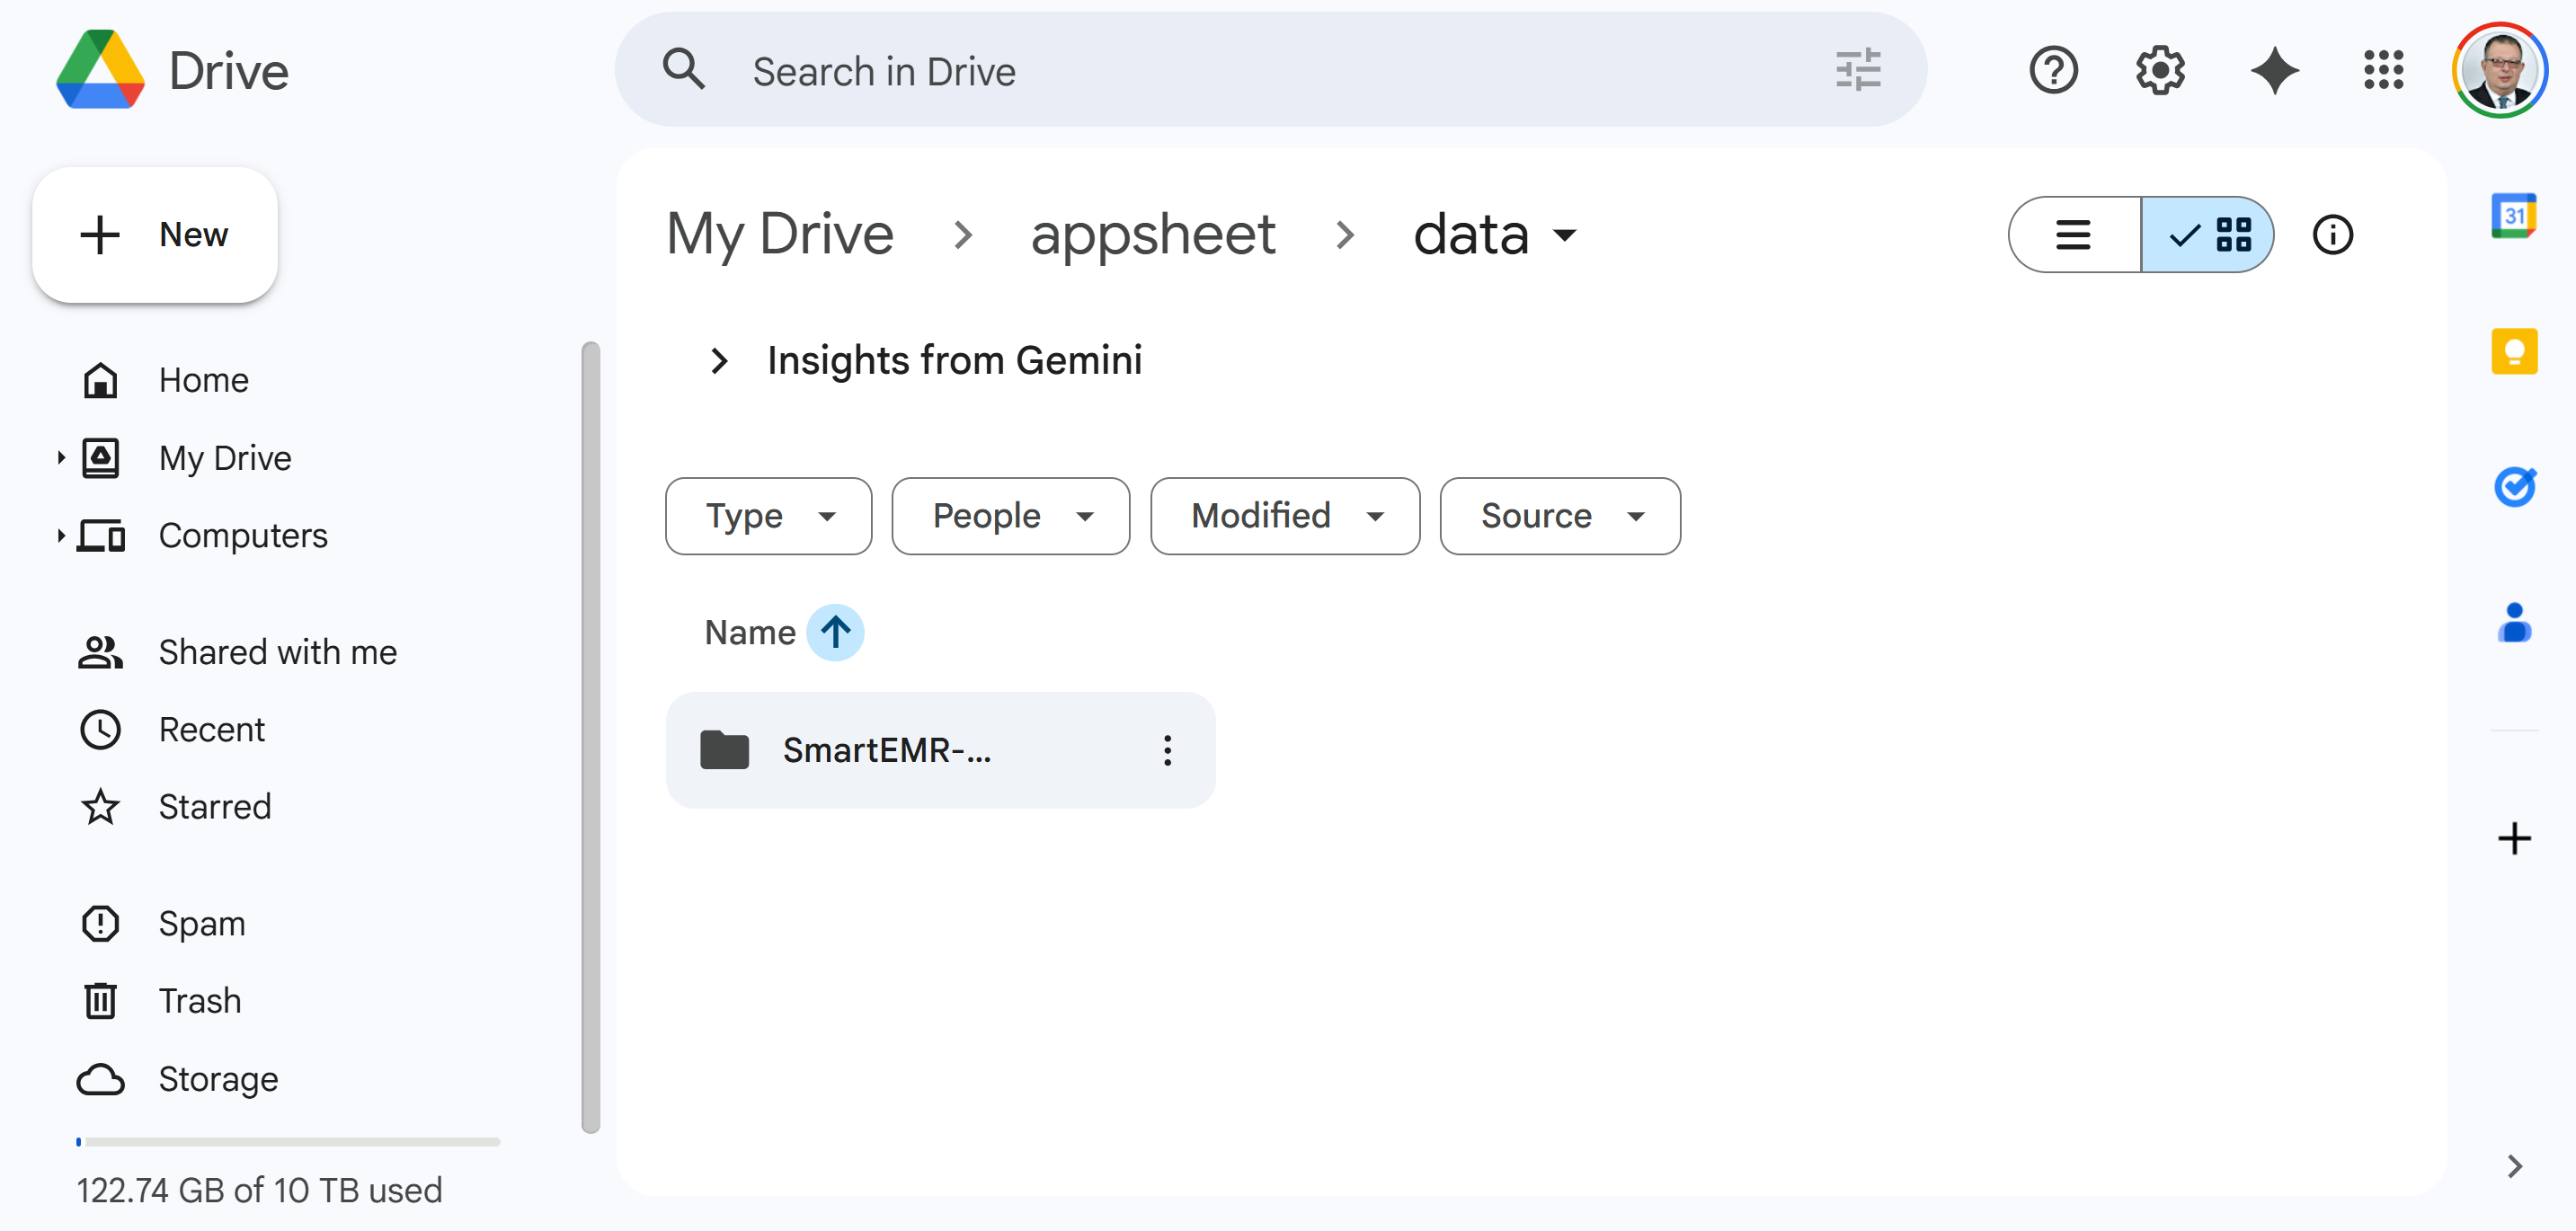
- Open the data subfolder
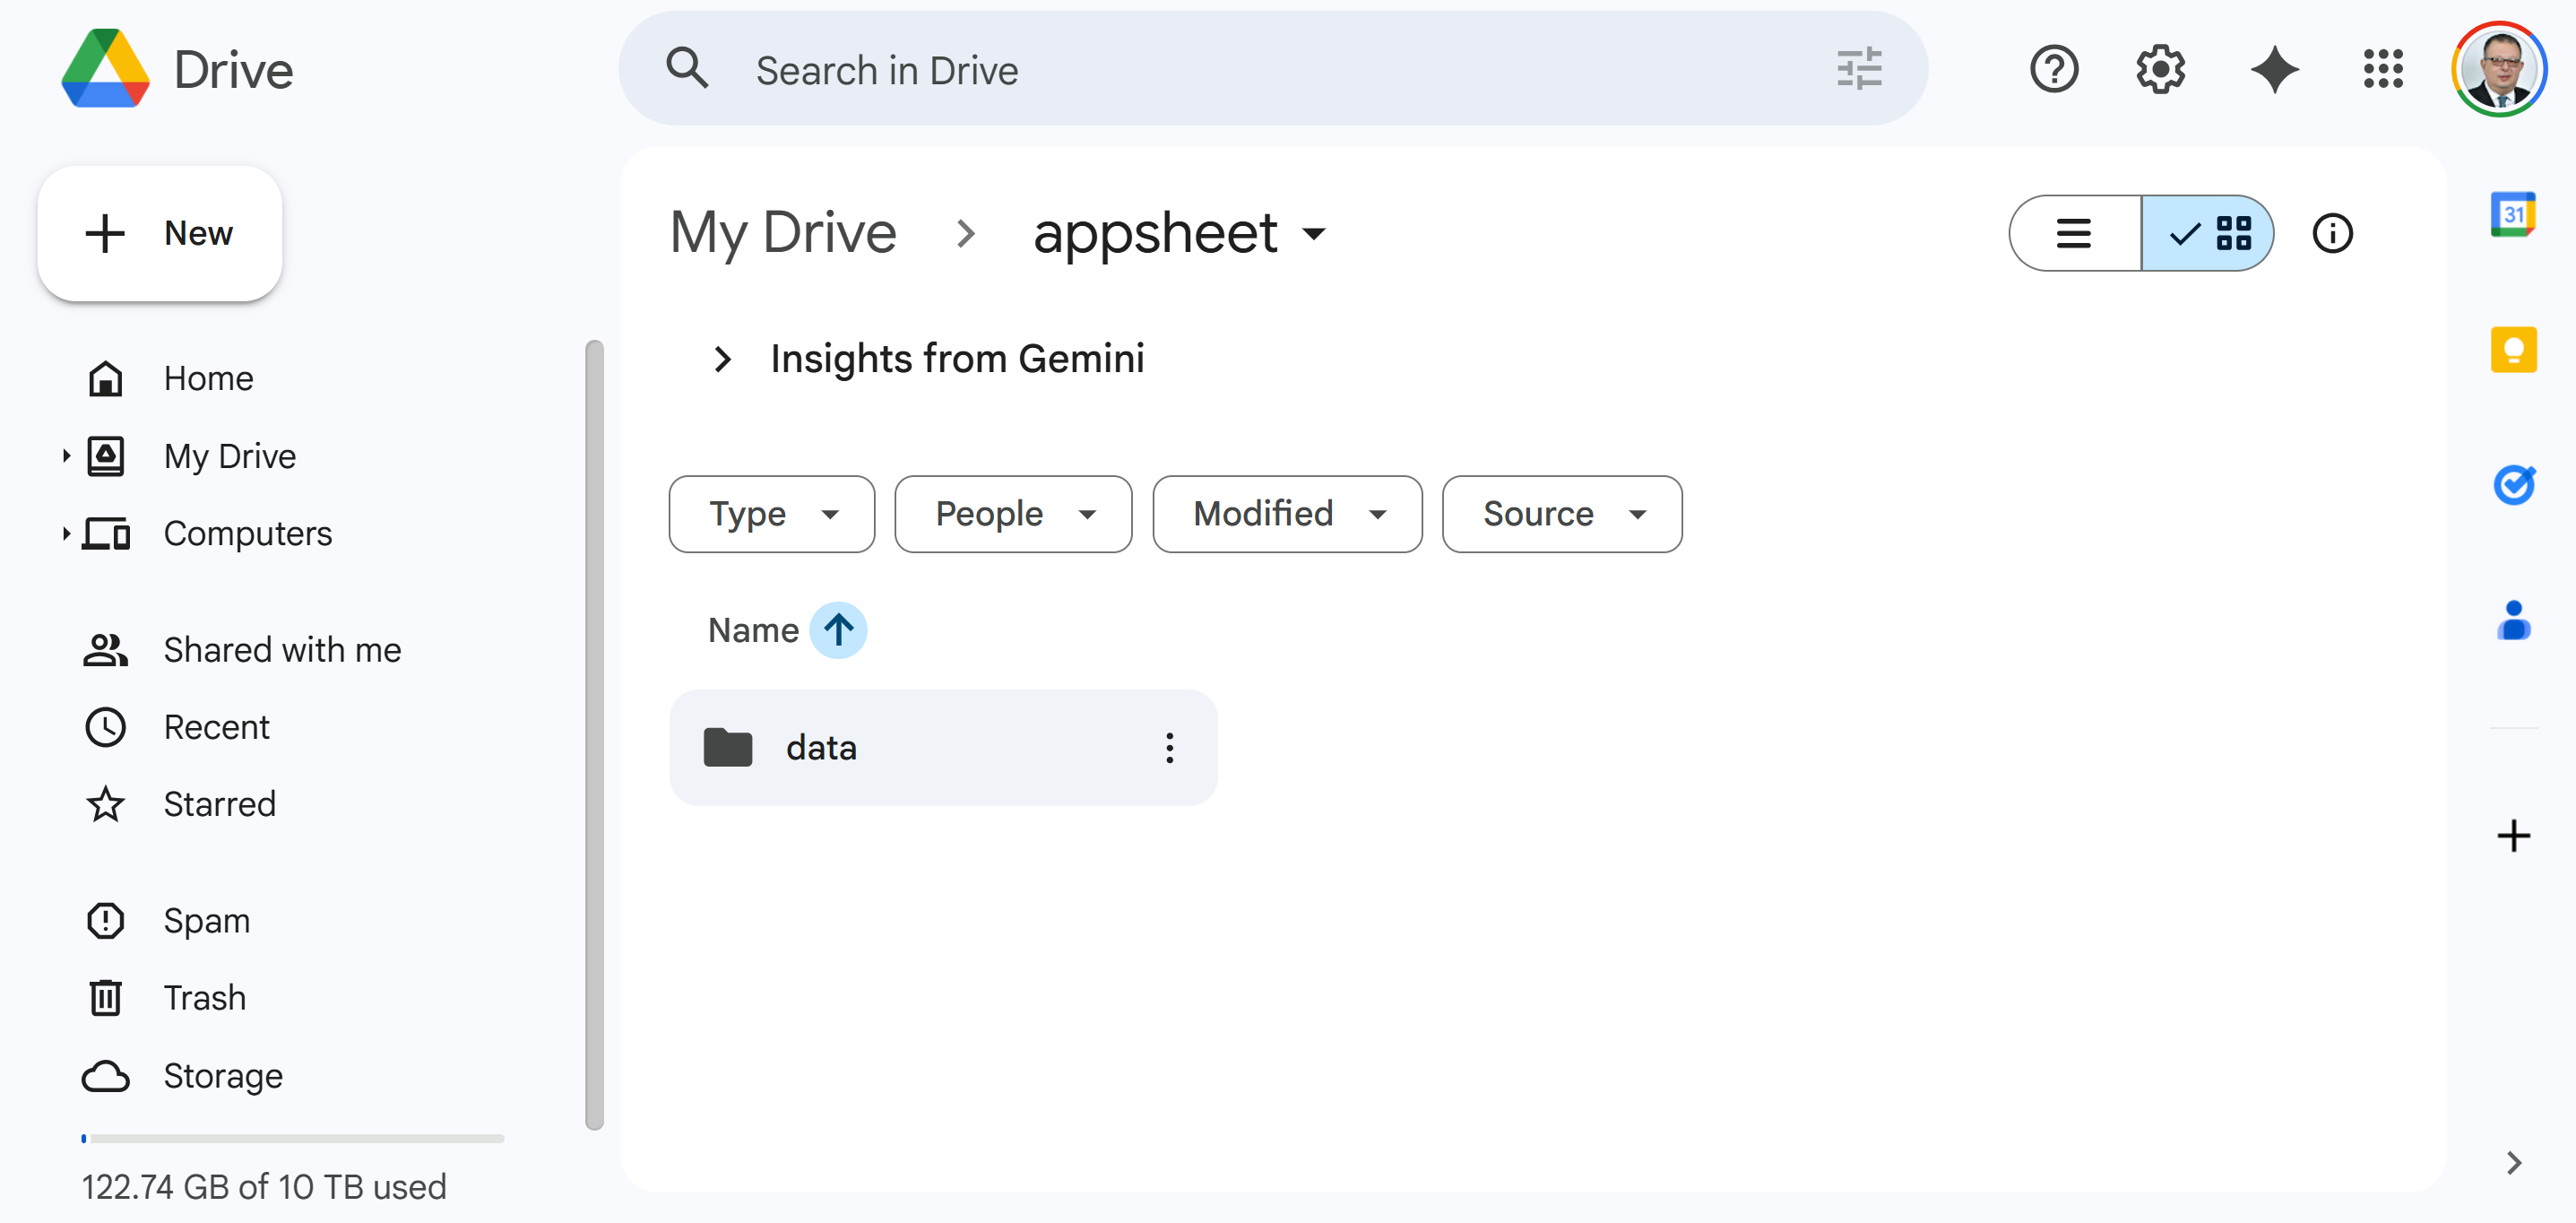
Open the "data" subfolder
- Find and open the SmartEMR-XXXXX folder (the folder name starts with "SmartEMR" followed by numbers)
Find your SmartEMR folder (the name includes numbers unique to your app)
- Inside that folder, you will see the Visits Google Sheet (green spreadsheet icon). Double-click on it to open it
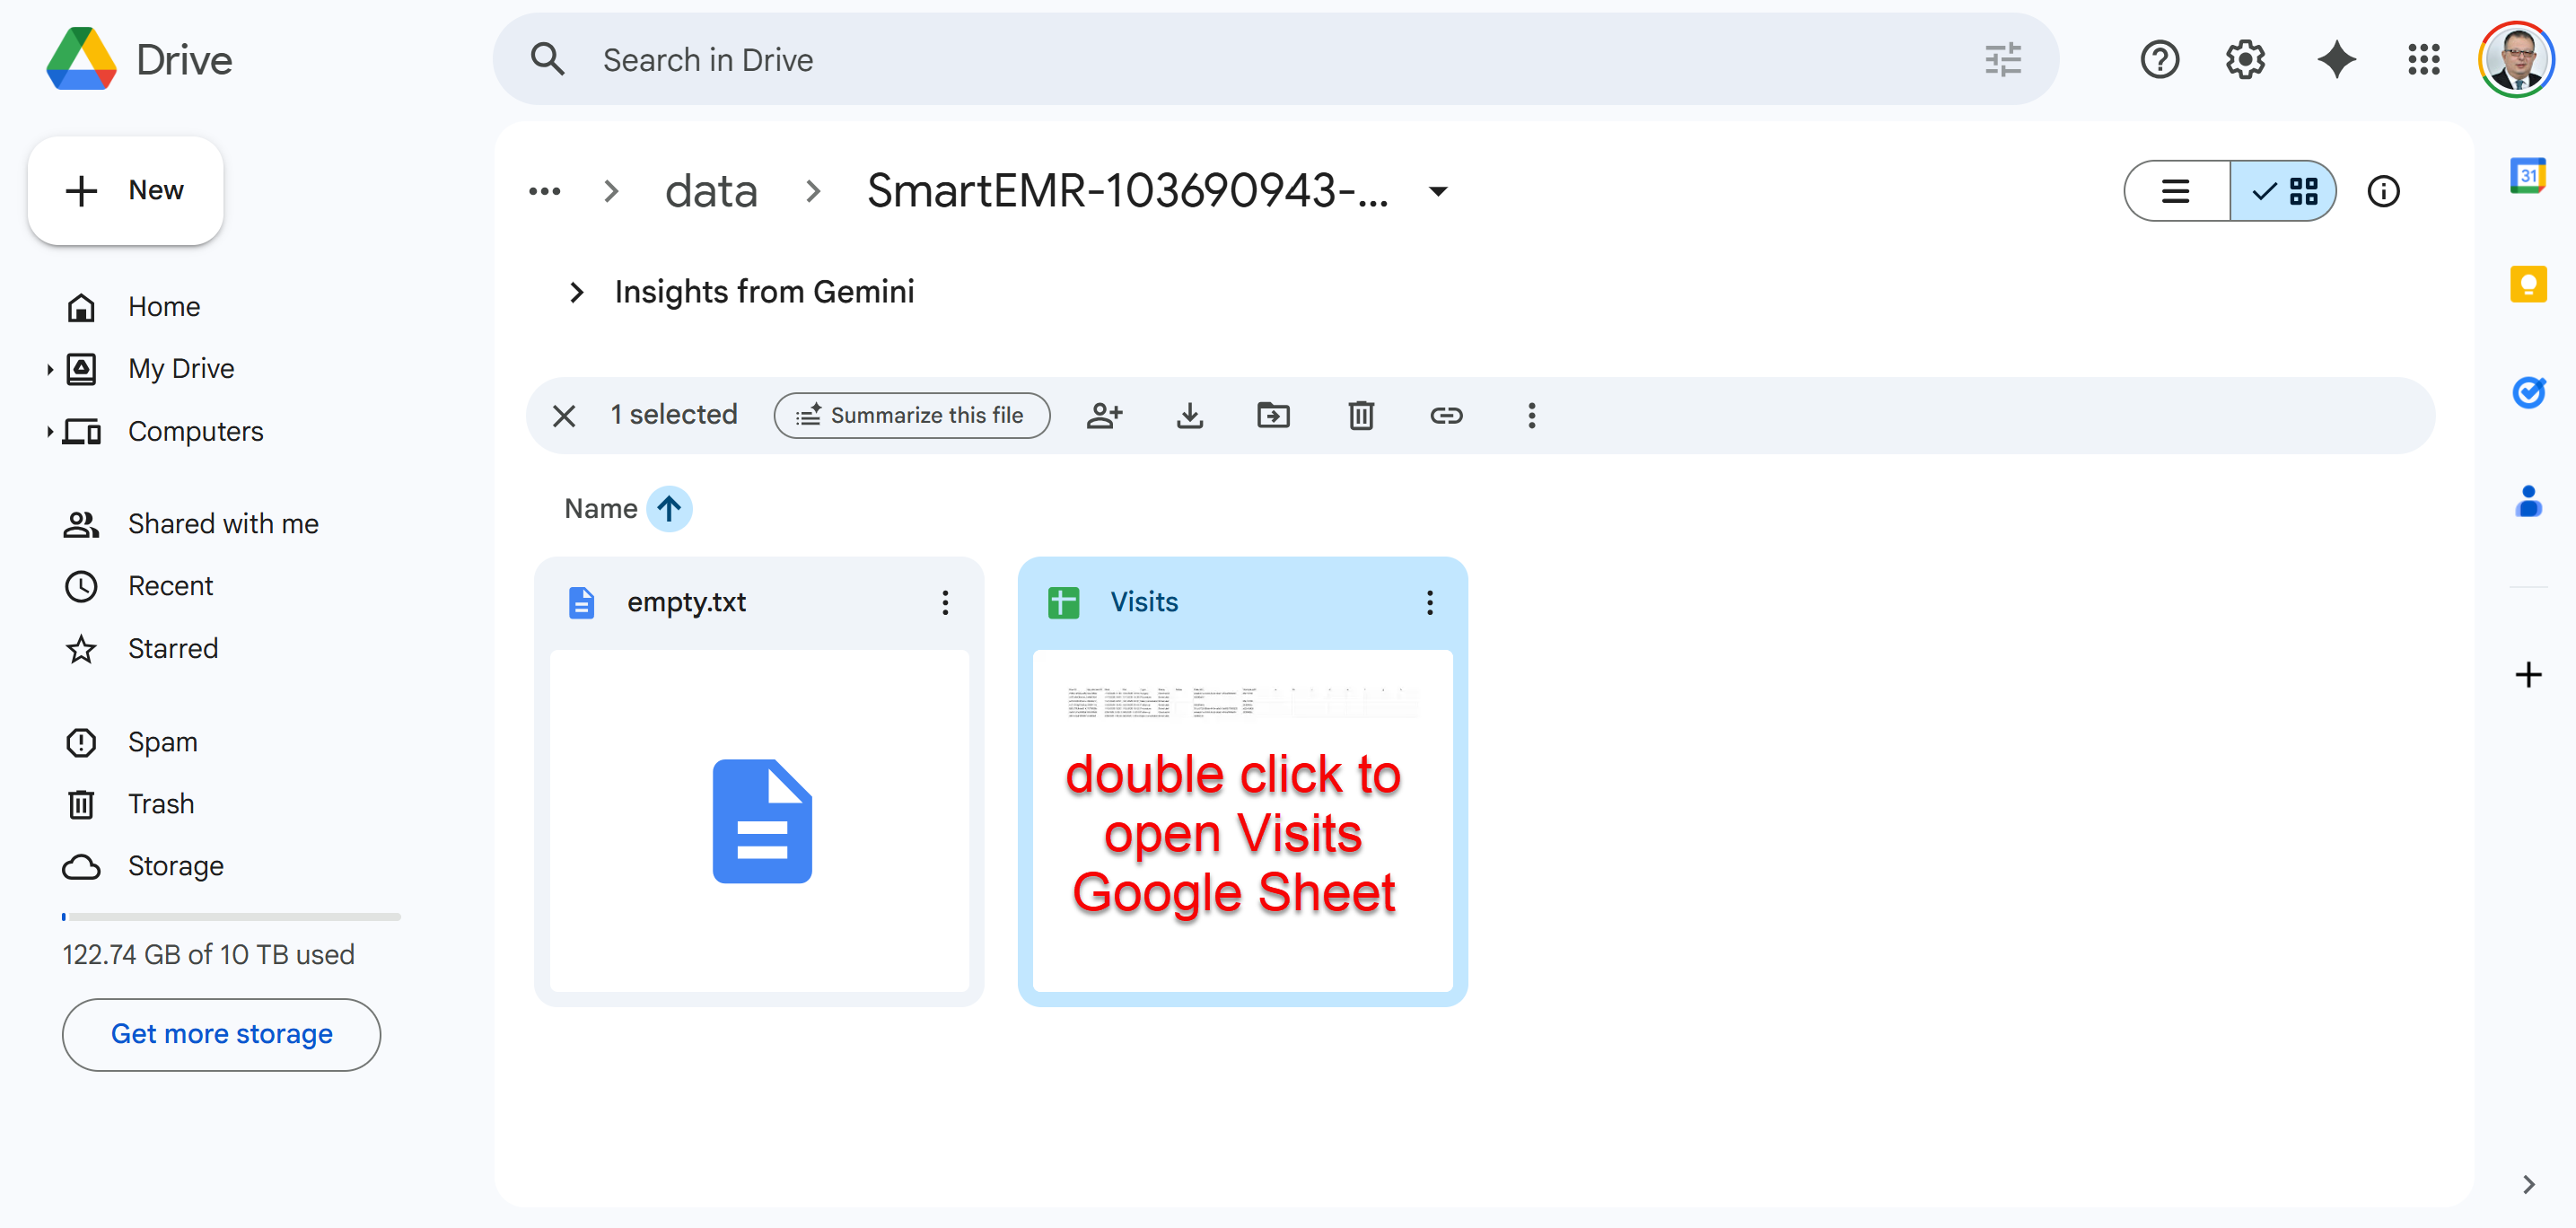
Open the "Visits" Google Sheet — this is where all your data lives
/d/ and /edit.
How to Share the Spreadsheet
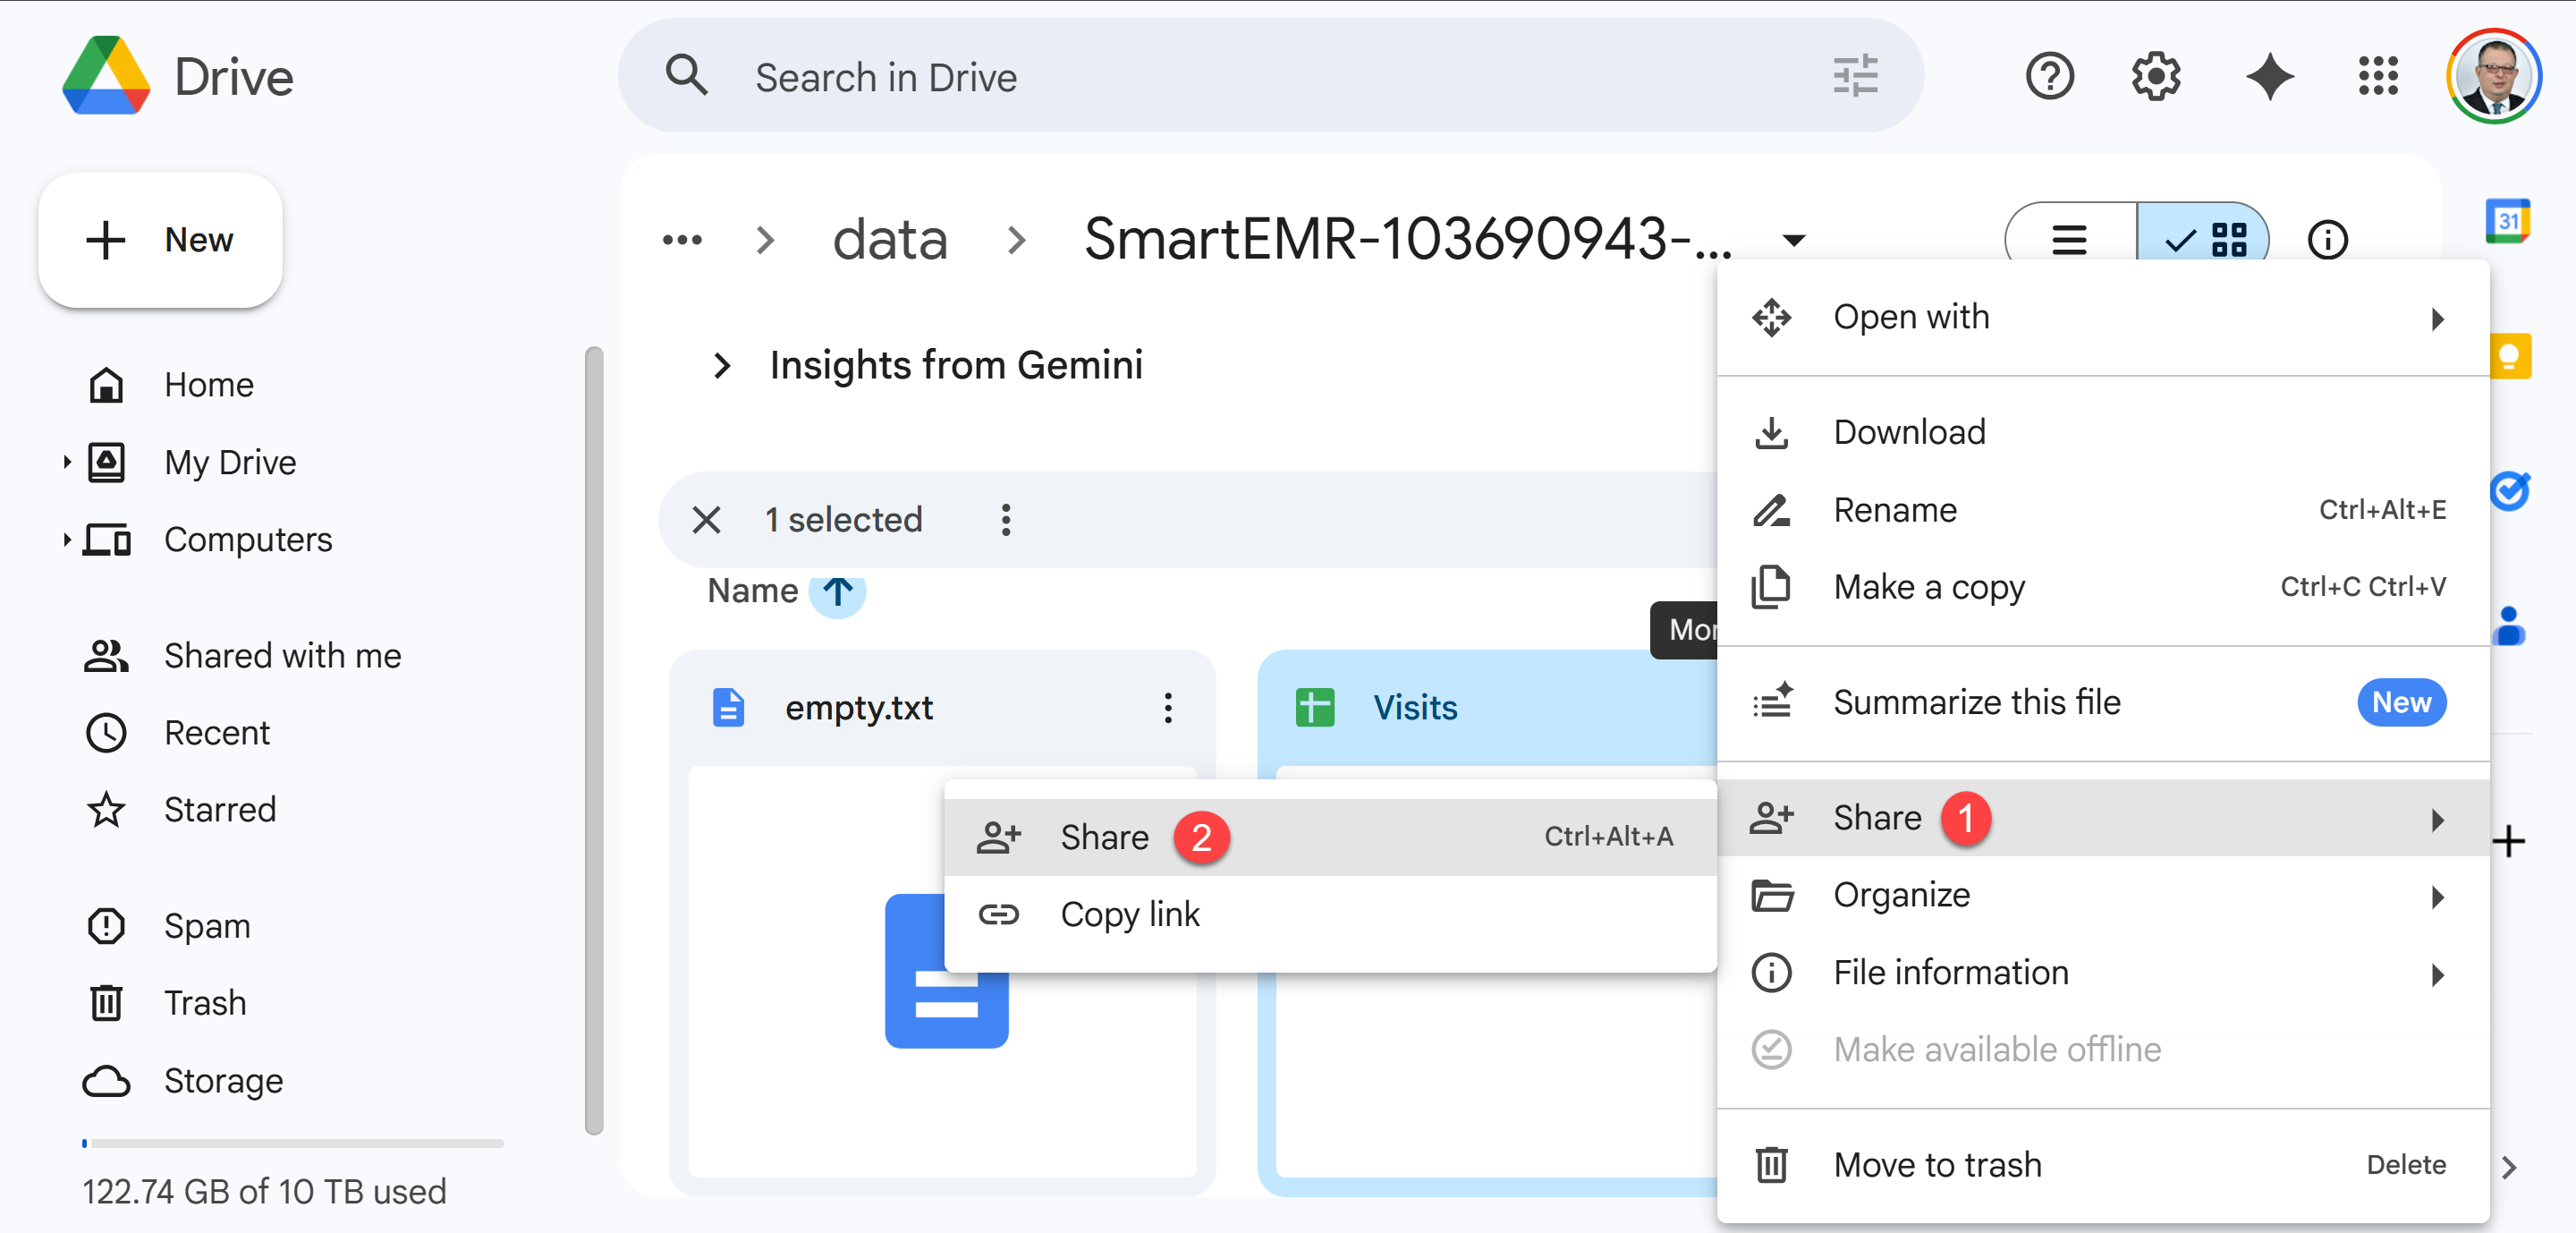
- With the Visits spreadsheet open, click the Share button at the top right corner (green button)
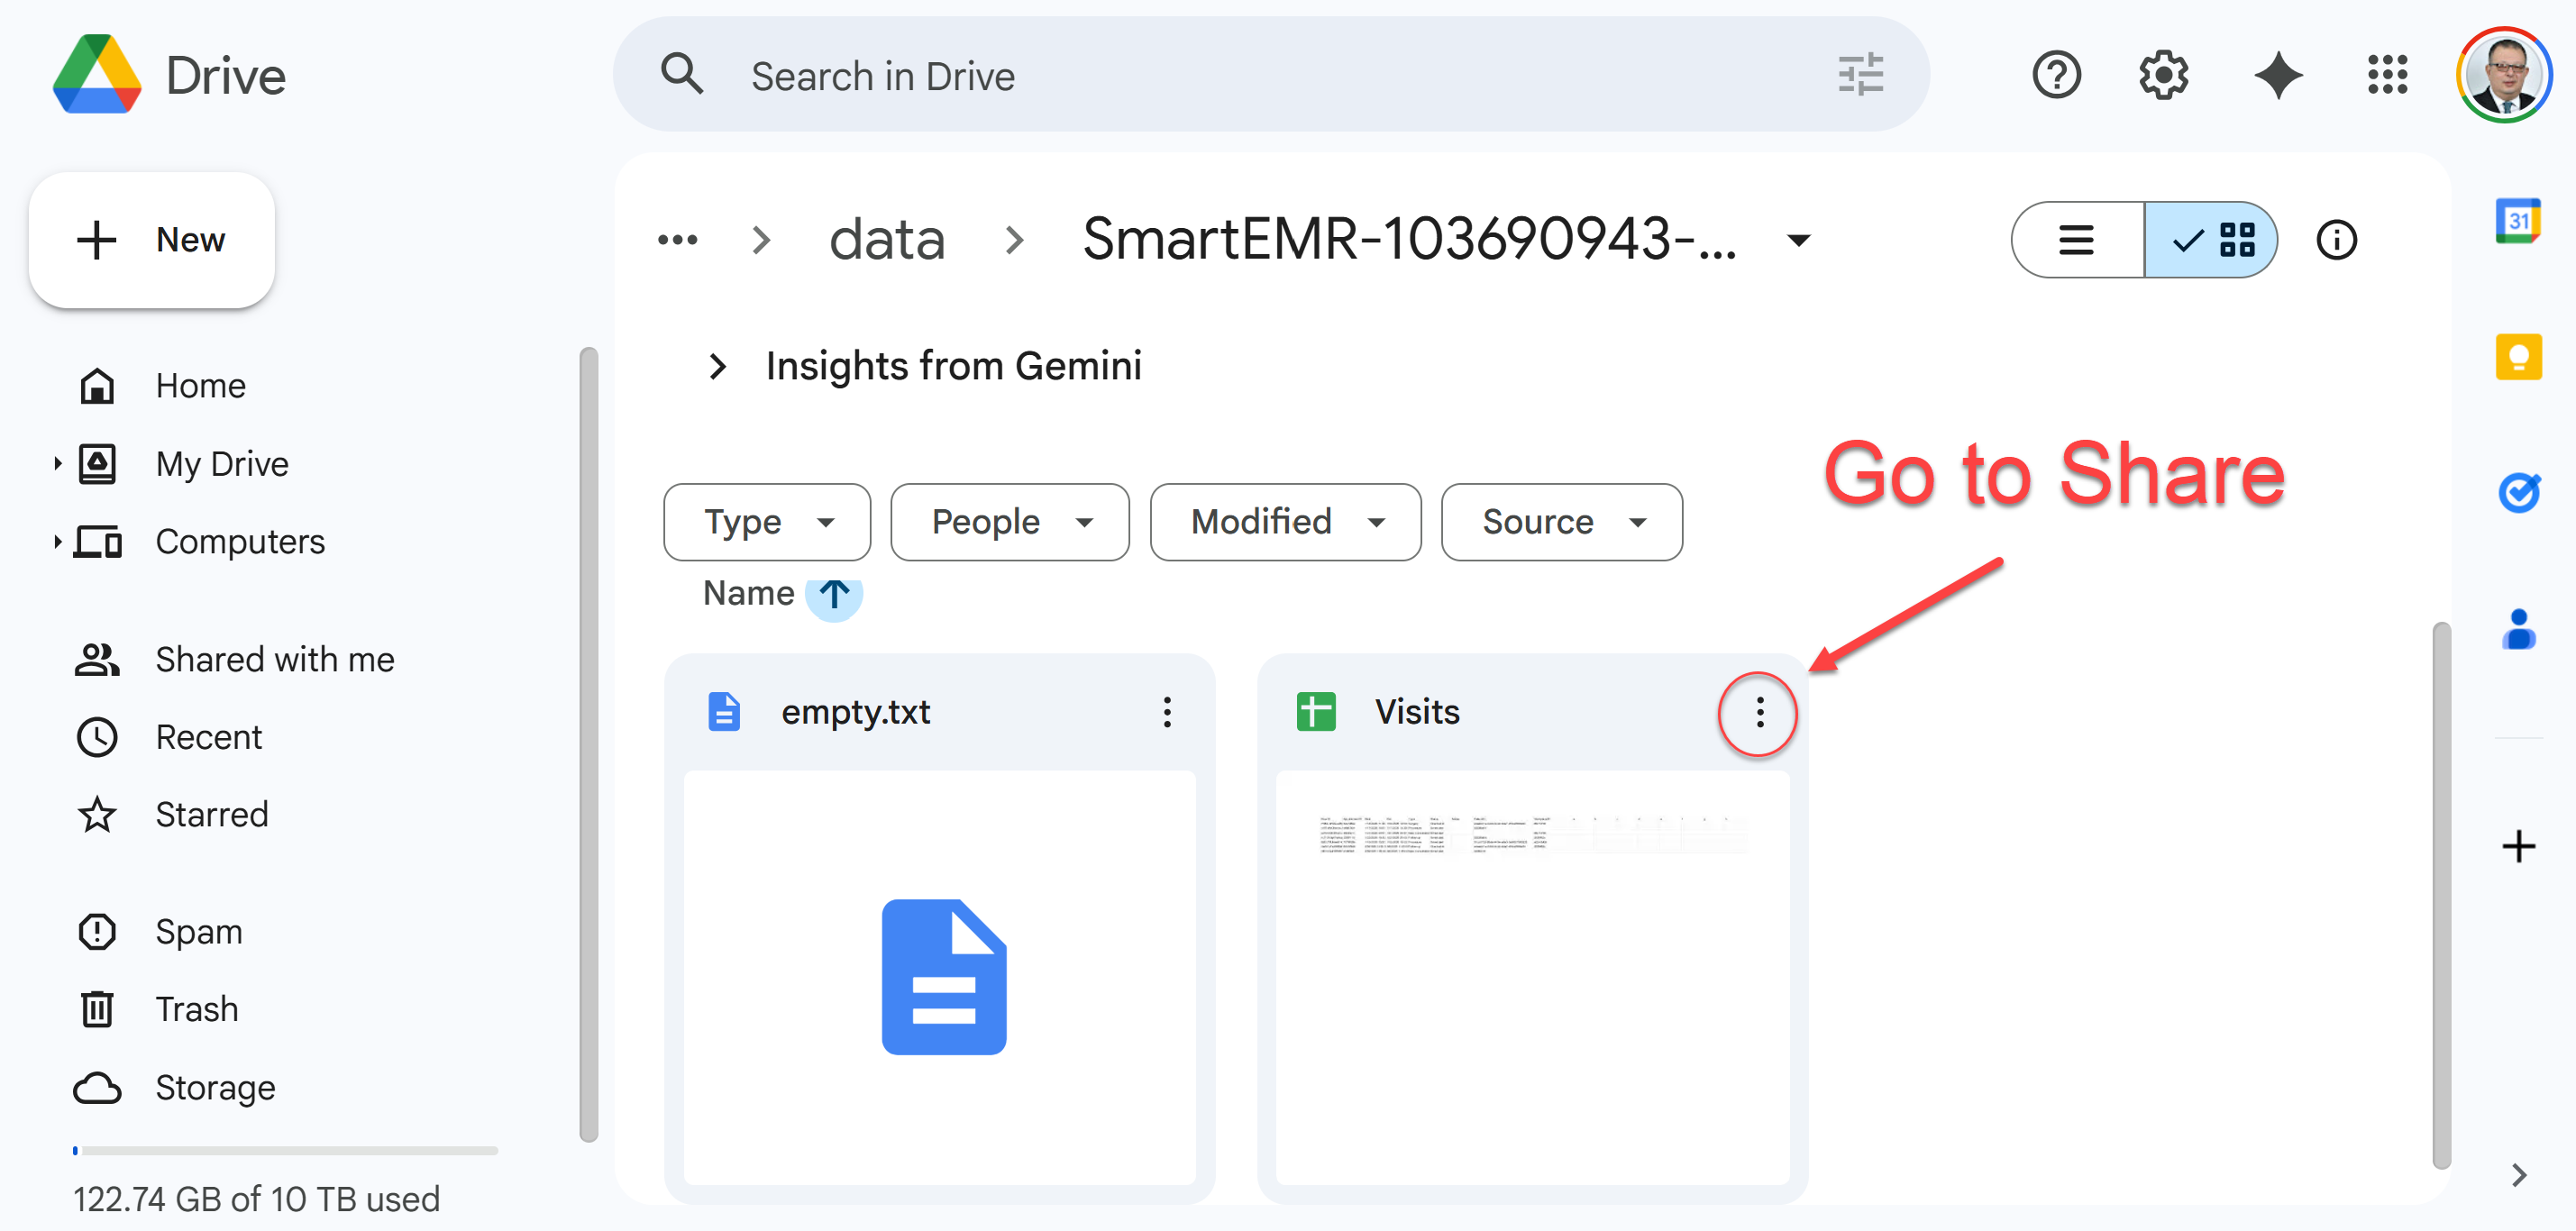
Click the "Share" button at the top right of the Visits spreadsheet
- In the "Add people and groups" field, paste the following email address exactly:
smartemr@ai4docs.iam.gserviceaccount.com
Paste the service account email address into the sharing field
- Make sure the permission is set to Editor (this allows the backend to read data for printing and write notes when you fetch from CDA)
- Click Send (you can uncheck "Notify people" since this is a service account, not a real person)
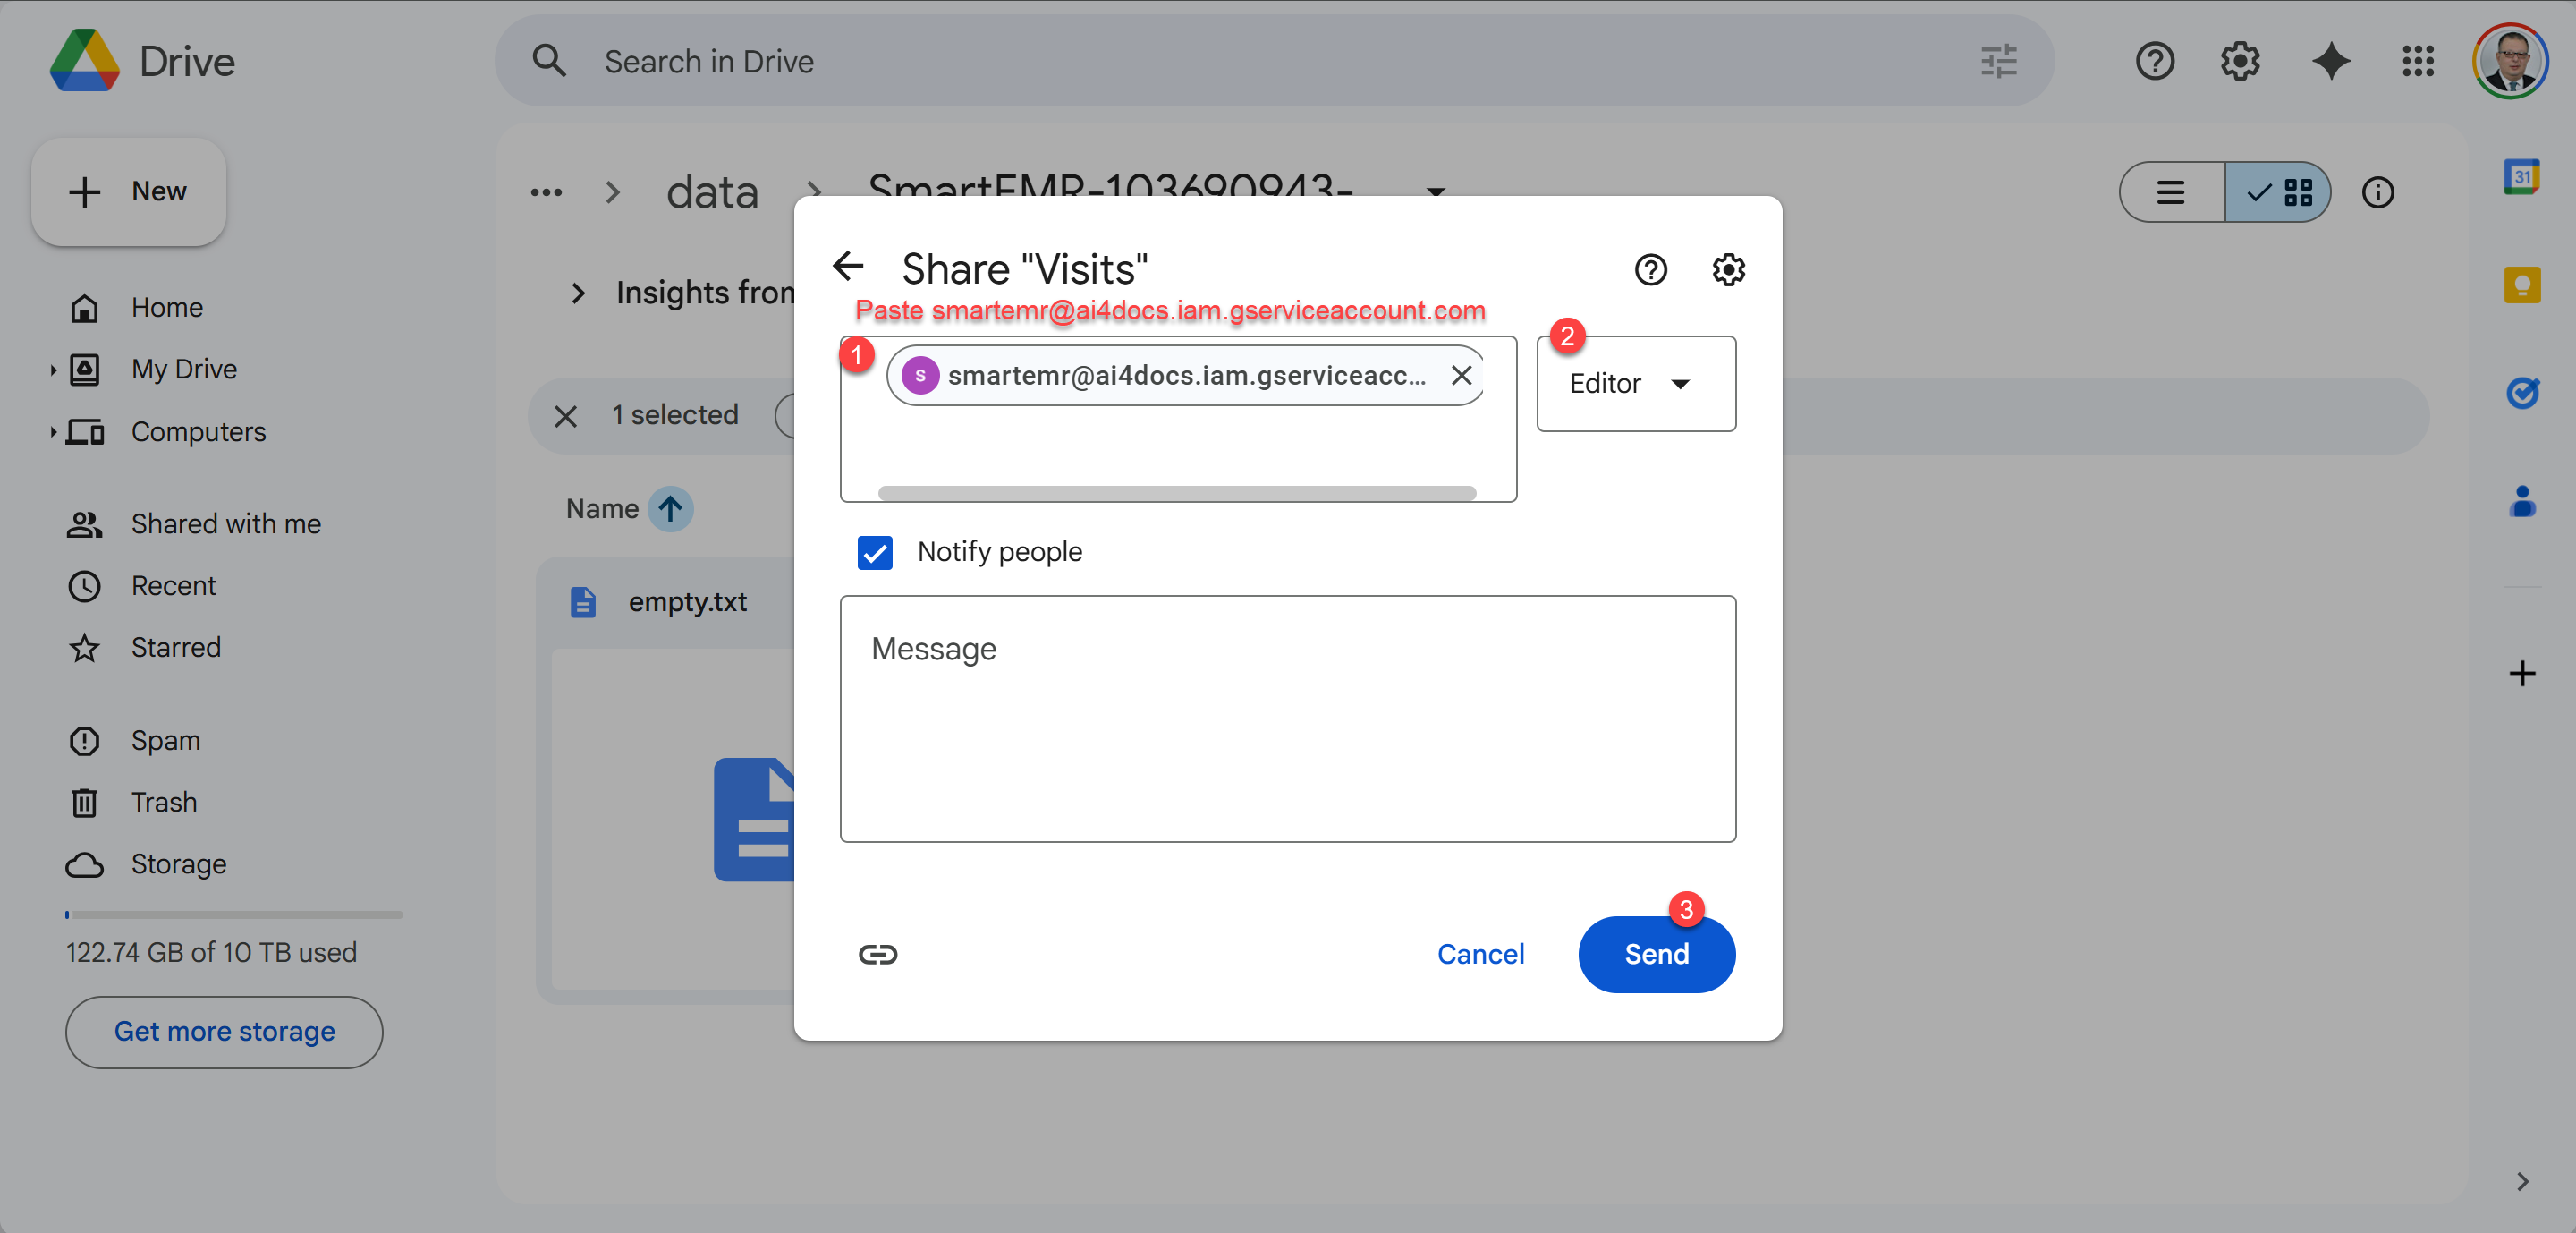
Set permission to "Editor" and click Send to complete sharing
Step 4: Create Your Doctor Profile & Set Print Settings
Your profile information appears on every printed document — prescriptions, medical reports, referral letters, and lab orders. Fill this in carefully.
- Tap the hamburger menu > Setup
- Tap the Profile tab at the top
- Tap the Add button (+ icon)
- Fill in your information:
| Field | What to Enter | Example |
|---|---|---|
| Name | Your full name as printed on documents | Dr. Ahmed Mohamed |
| Title | Your professional title | Prof. Dr. / Dr. / Consultant |
| Specialty | Your medical specialty | Urology / Cardiology / Pediatrics |
| Institution | Hospital or clinic name (optional) | Cairo University Hospital |
| LicenseNumber | Medical license number (optional) | 12345 |
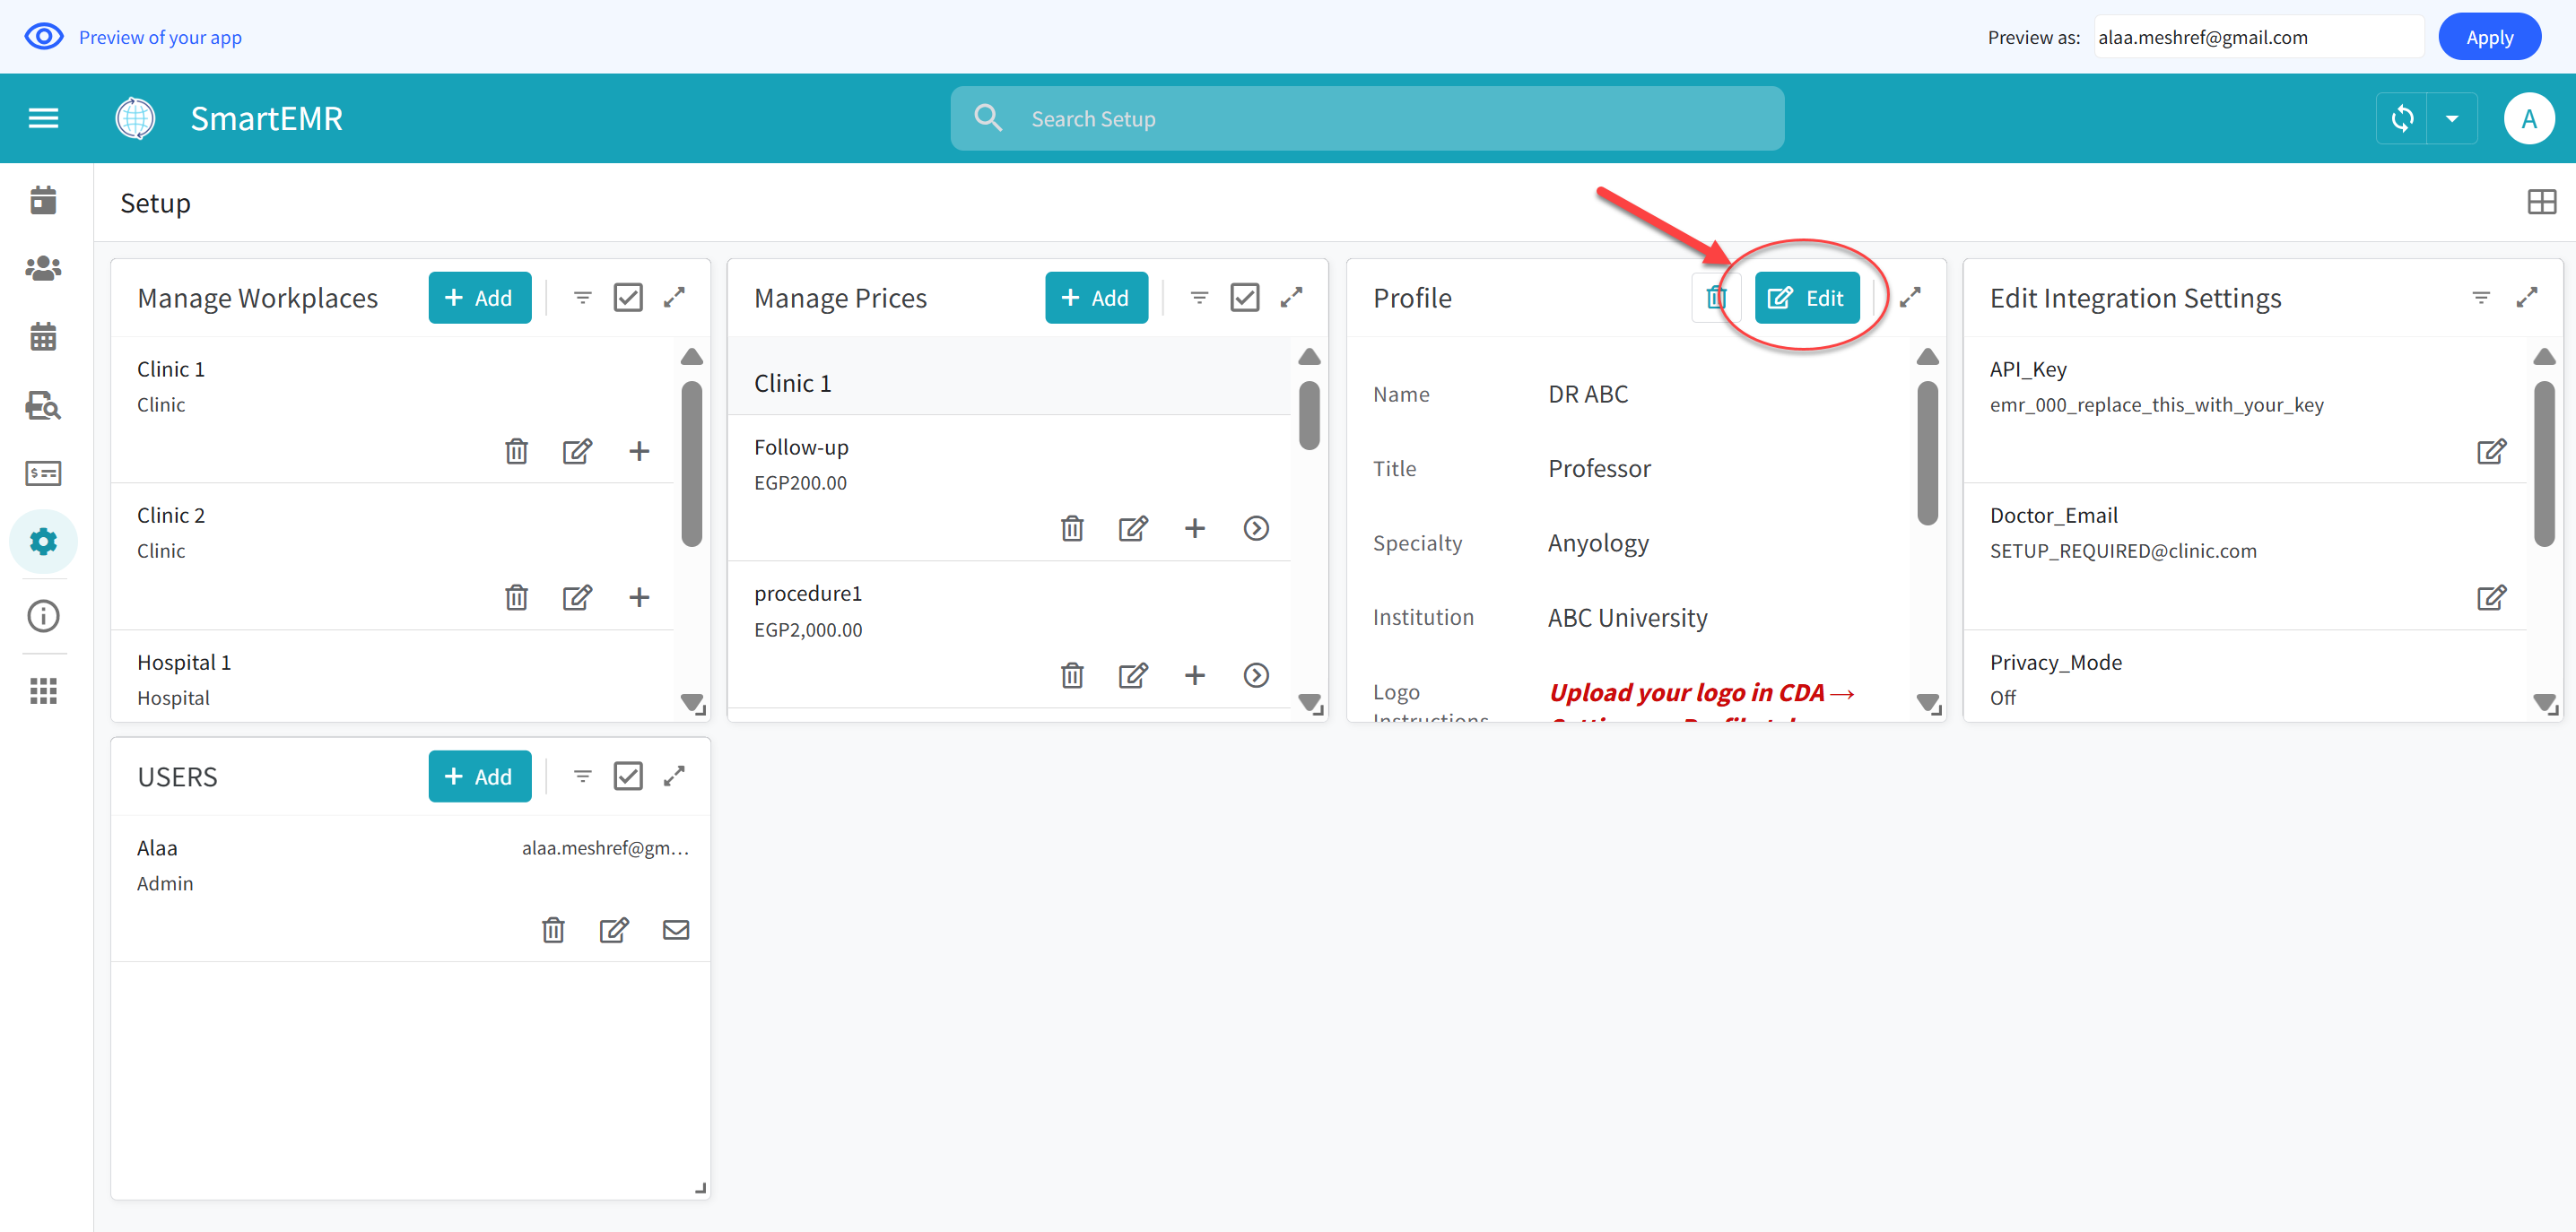
Edit your doctor profile — this information appears on all printed documents
Setting Up Print Mode (Important)
Scroll down in the Profile form. You will find two important settings:
PrintMode_Rx (how your printed prescriptions look):
- "Full Letterhead" — Use this if you print on blank white paper. The app prints your logo, name, credentials, patient info, prescription content, and clinic address — everything on the page.
- "Content Only" — Use this if you print on pre-printed prescription paper (paper that already has your clinic name and logo printed on it by a print shop). The app only prints the patient name, date, diagnosis, and medications.
PrintMode_Orders (how your lab/imaging orders look):
- Same choice. "Full Letterhead" for blank paper, "Content Only" for pre-printed paper.
You will also find a Content_Top_Margin setting. This controls the top margin (in millimeters) when using "Content Only" mode. Adjust it to match the space at the top of your pre-printed prescription paper.
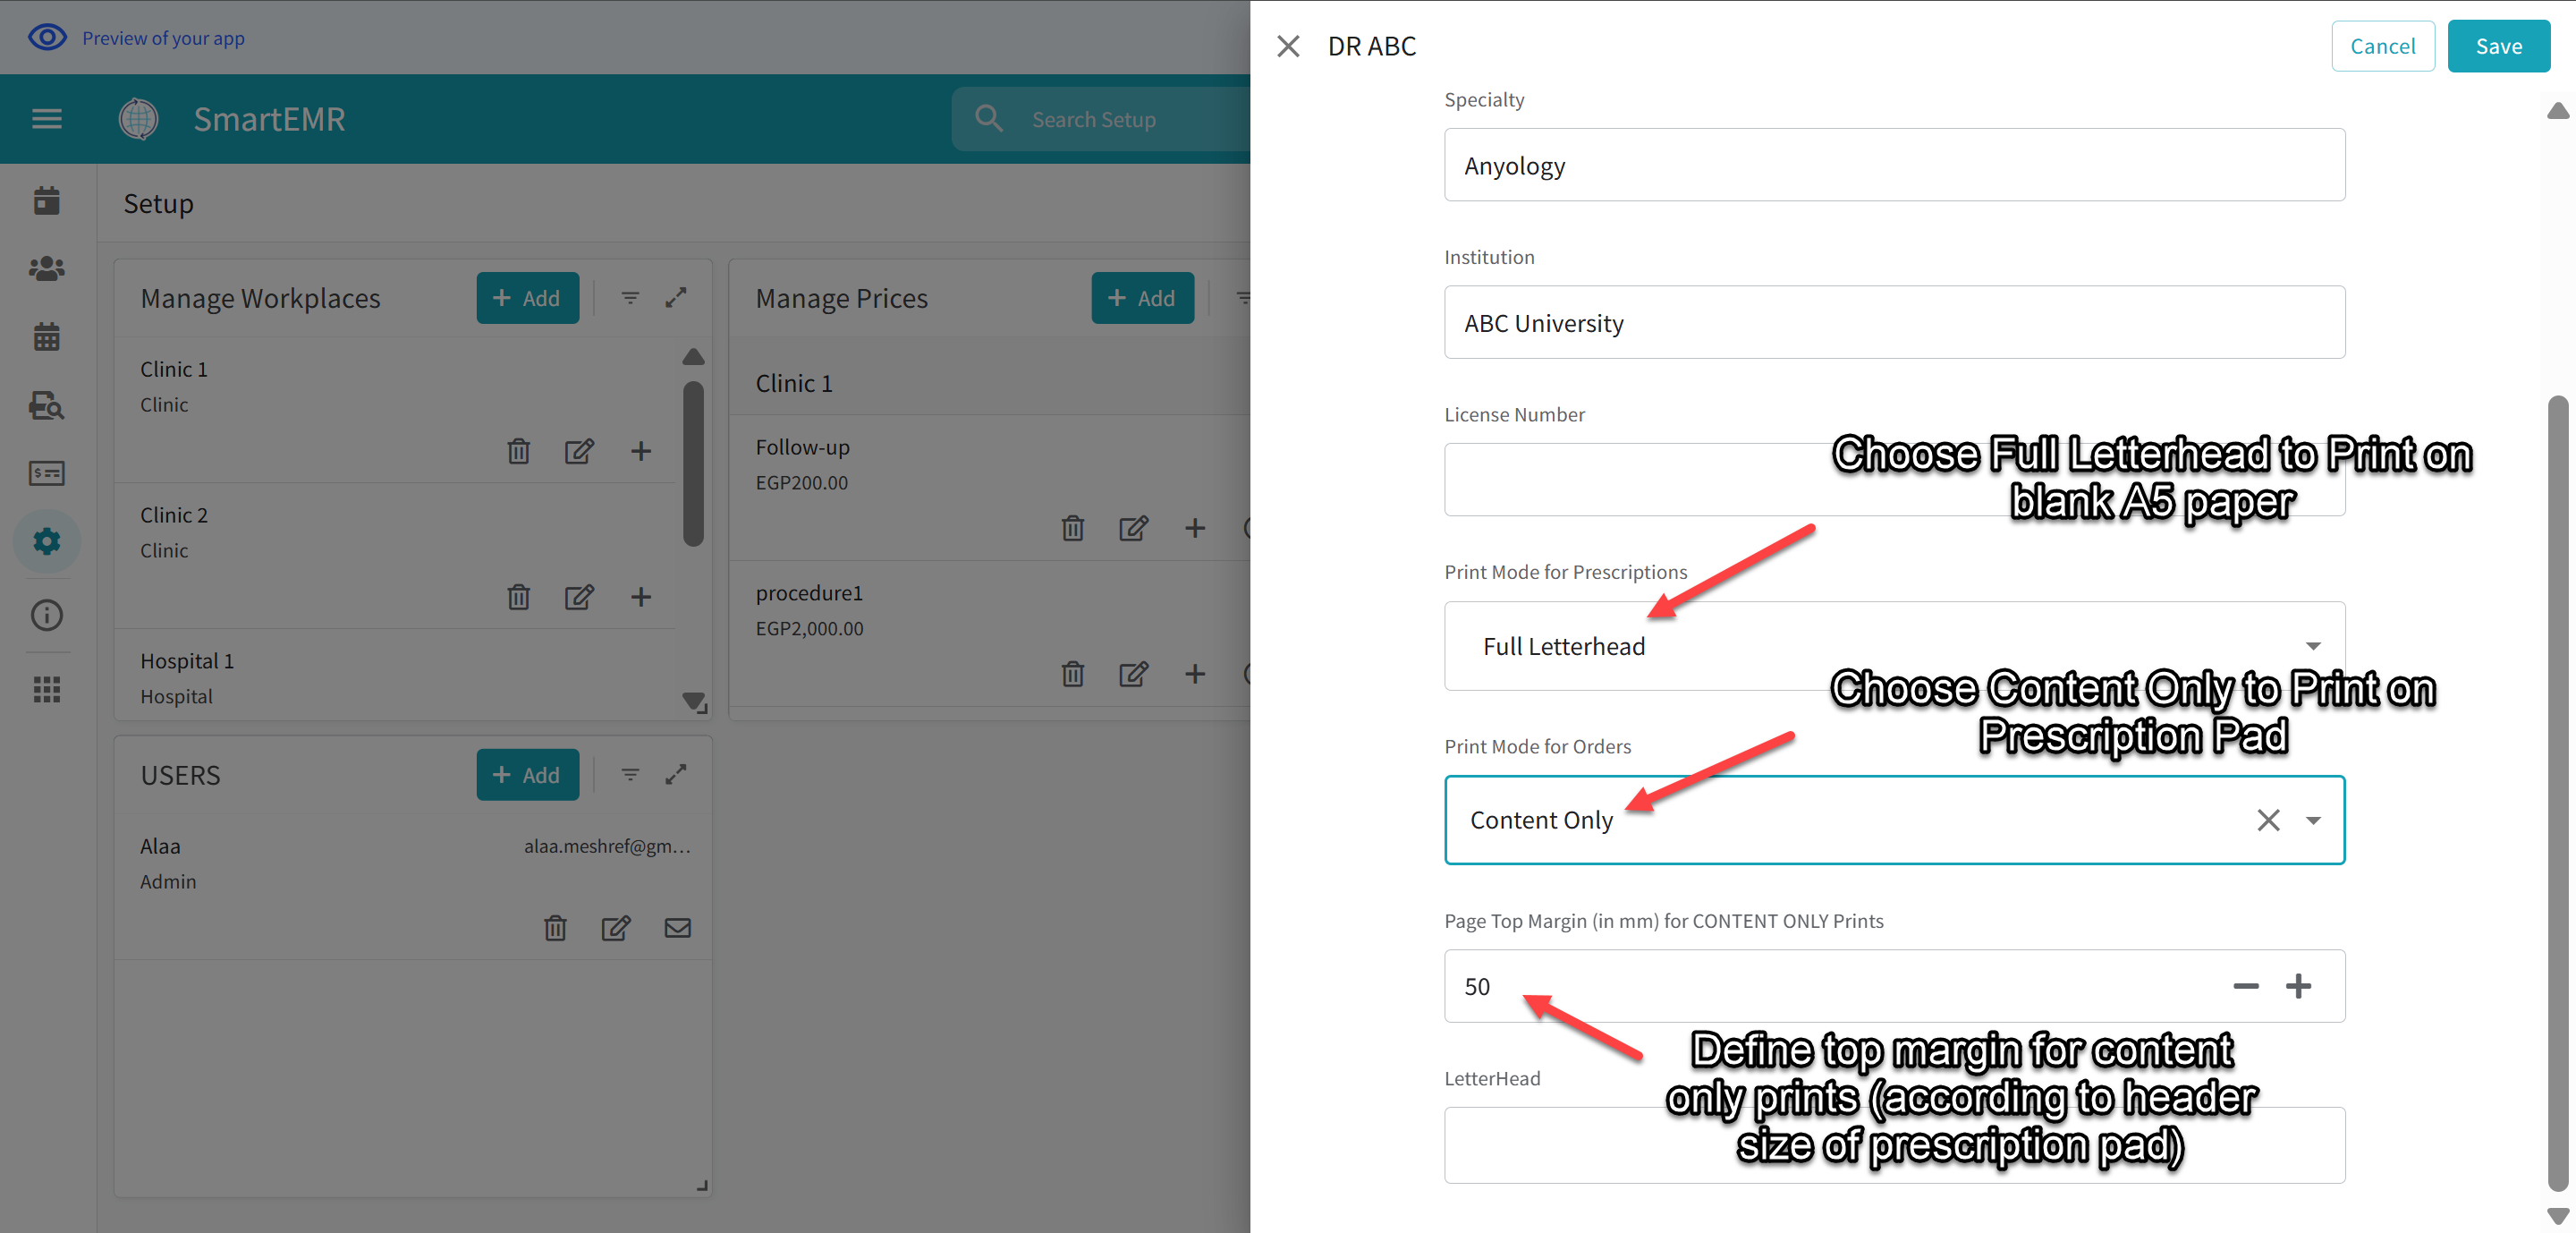
Print settings in your profile — choose Full Letterhead or Content Only, and set margins
- Tap Save
Step 5: Upload Your Clinic Logo
Your clinic logo appears at the top of every printed document when using "Full Letterhead" mode. The logo is uploaded through the CDA app, not through Smart EMR.
- Open the CDA app: go to clinic.ai4docs.ai and sign in
- Click the Settings icon (gear)
- Go to the Profile tab
- Scroll down to find the "Clinic Logo (Optional)" section
- Click "Click to upload logo" and select your logo image file
- Your logo will be uploaded and saved. It will now appear on all printed documents from Smart EMR
Upload your clinic logo in CDA Settings → Profile tab
Logo uploaded successfully — it will now appear on all letterhead prints
Step 6: Add Your Clinic Locations
If you work at more than one location, you need to tell the app about each location. Even if you work at only one place, you must add it here — otherwise the app will not know your clinic's address and phone number for printed documents.
- Tap the hamburger menu > Setup
- Tap the Manage Workplaces tab
- Tap the Add button (+ icon)
- Fill in:
| Field | What to Enter | Example |
|---|---|---|
| Name | The name of this clinic/hospital | Dr. Ahmed Clinic - Maadi |
| Type | Clinic, Center, or Hospital | Clinic |
| Address | Full street address | 15 Road 9, Maadi, Cairo |
| Phone | Clinic phone number | 02-2345-6789 |
| Clinic email (optional) | info@drahmed.com | |
| ShowInFooter | Show this clinic in printed document footers? | Yes or No |
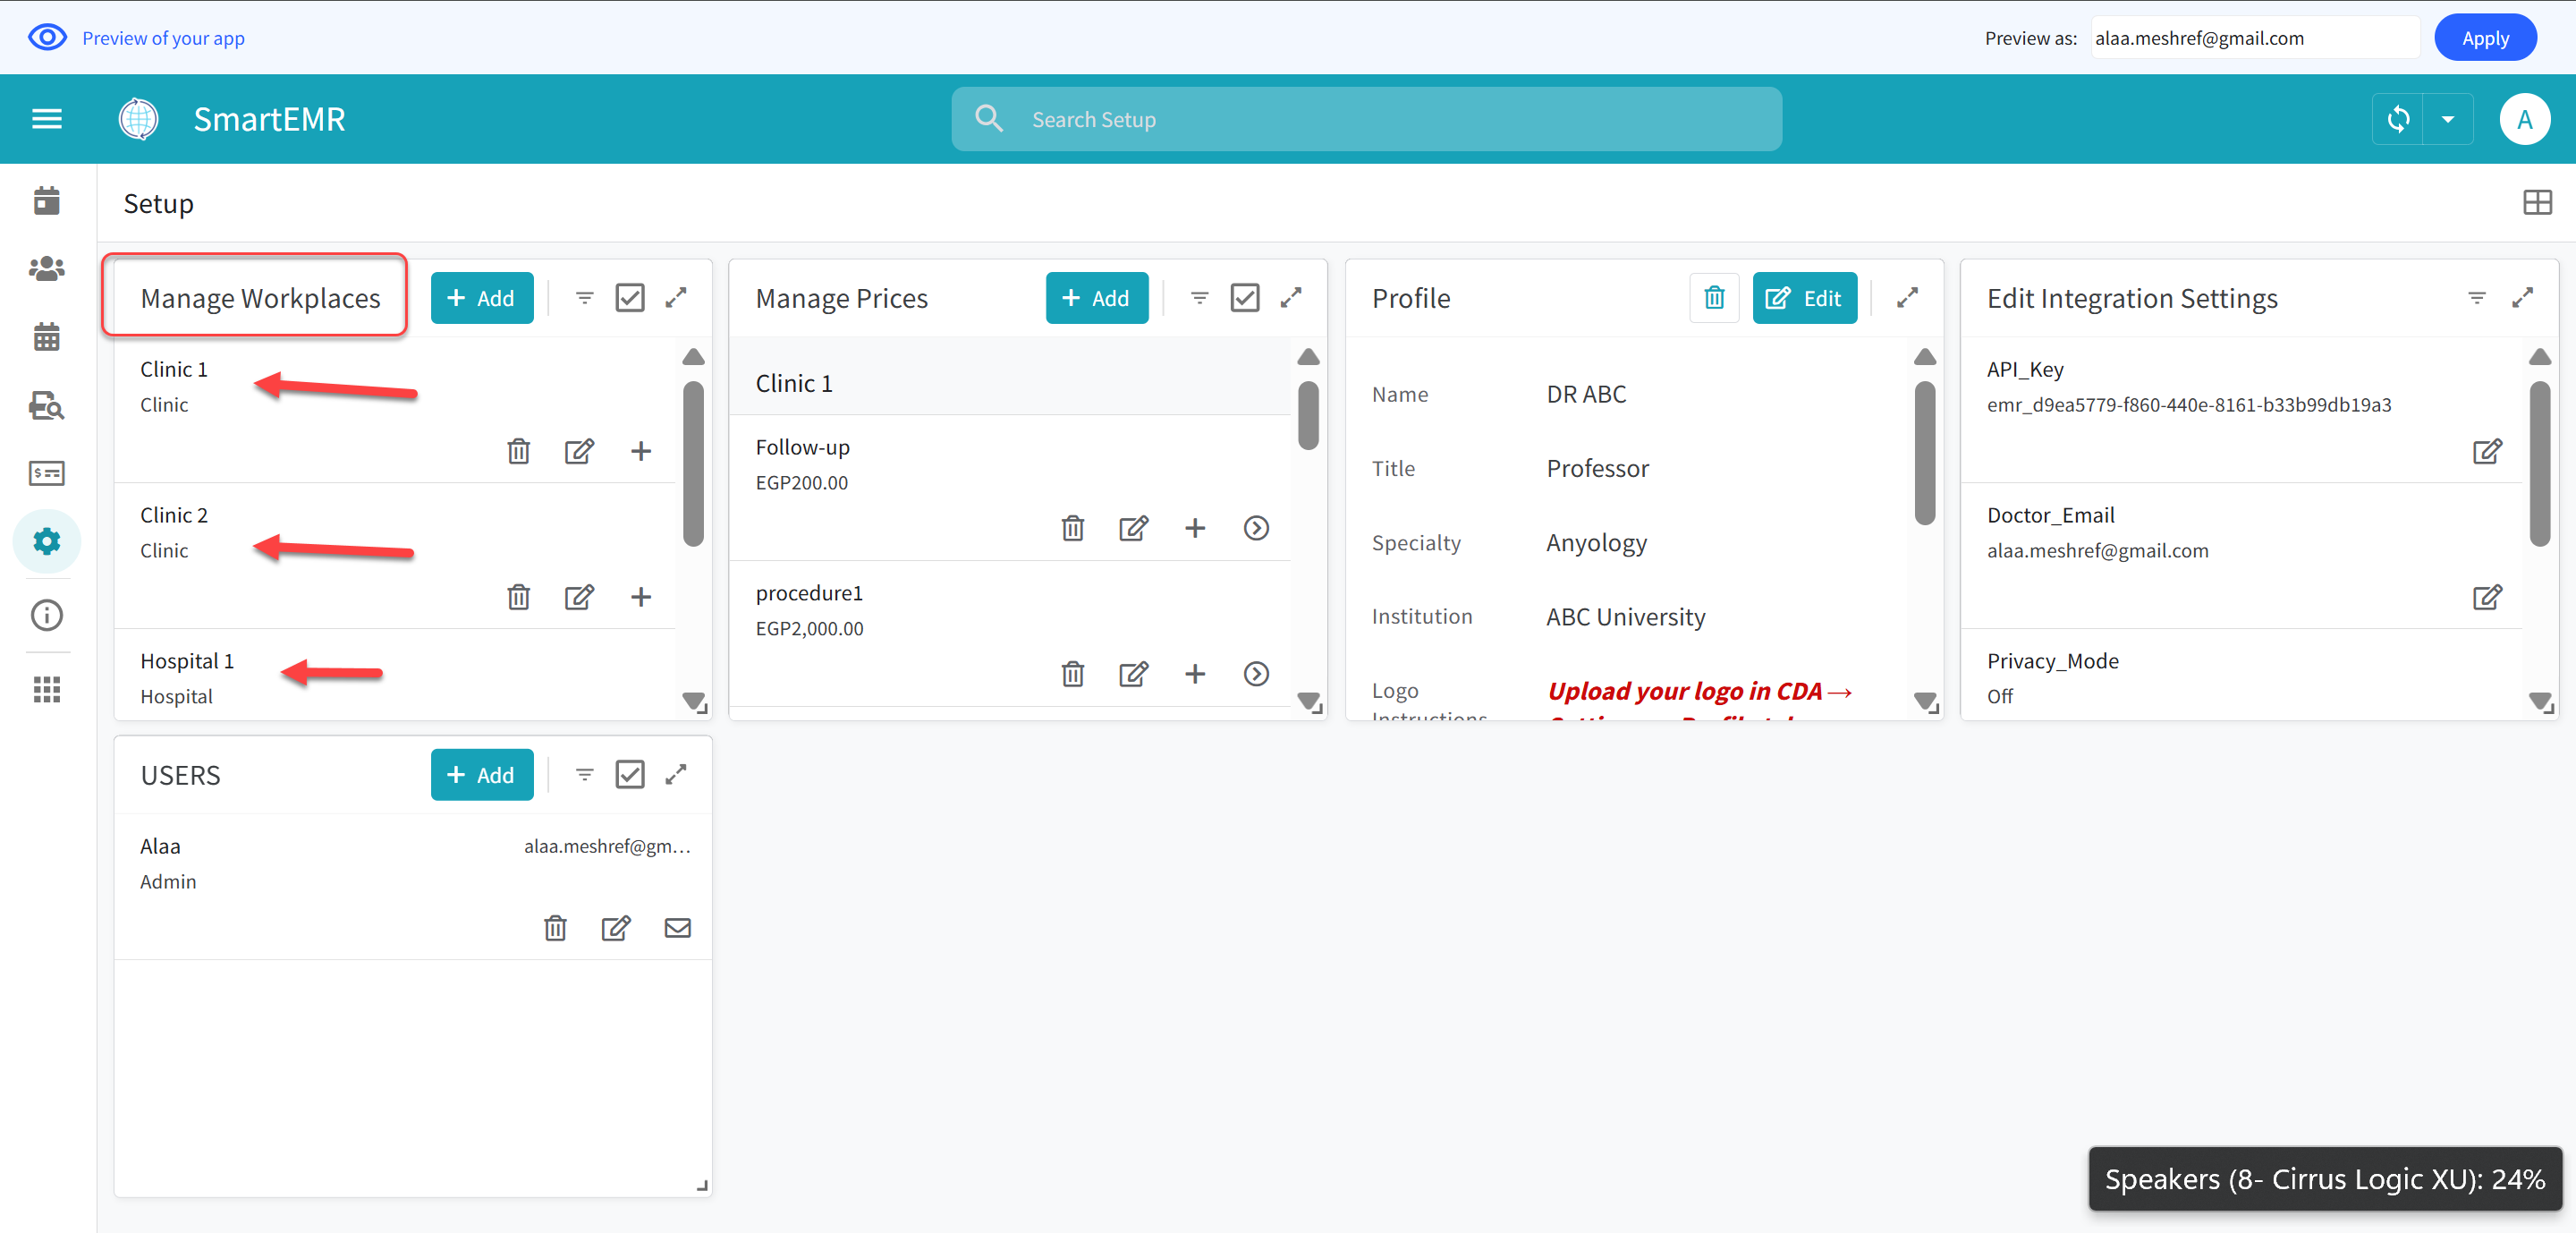
Manage Workplaces — add your clinic locations with address and phone
What does ShowInFooter mean?
When you print a document with Full Letterhead, the footer shows your clinic's contact information. Set ShowInFooter to Yes for clinics you want listed in the footer, and No for ones you do not want shown.
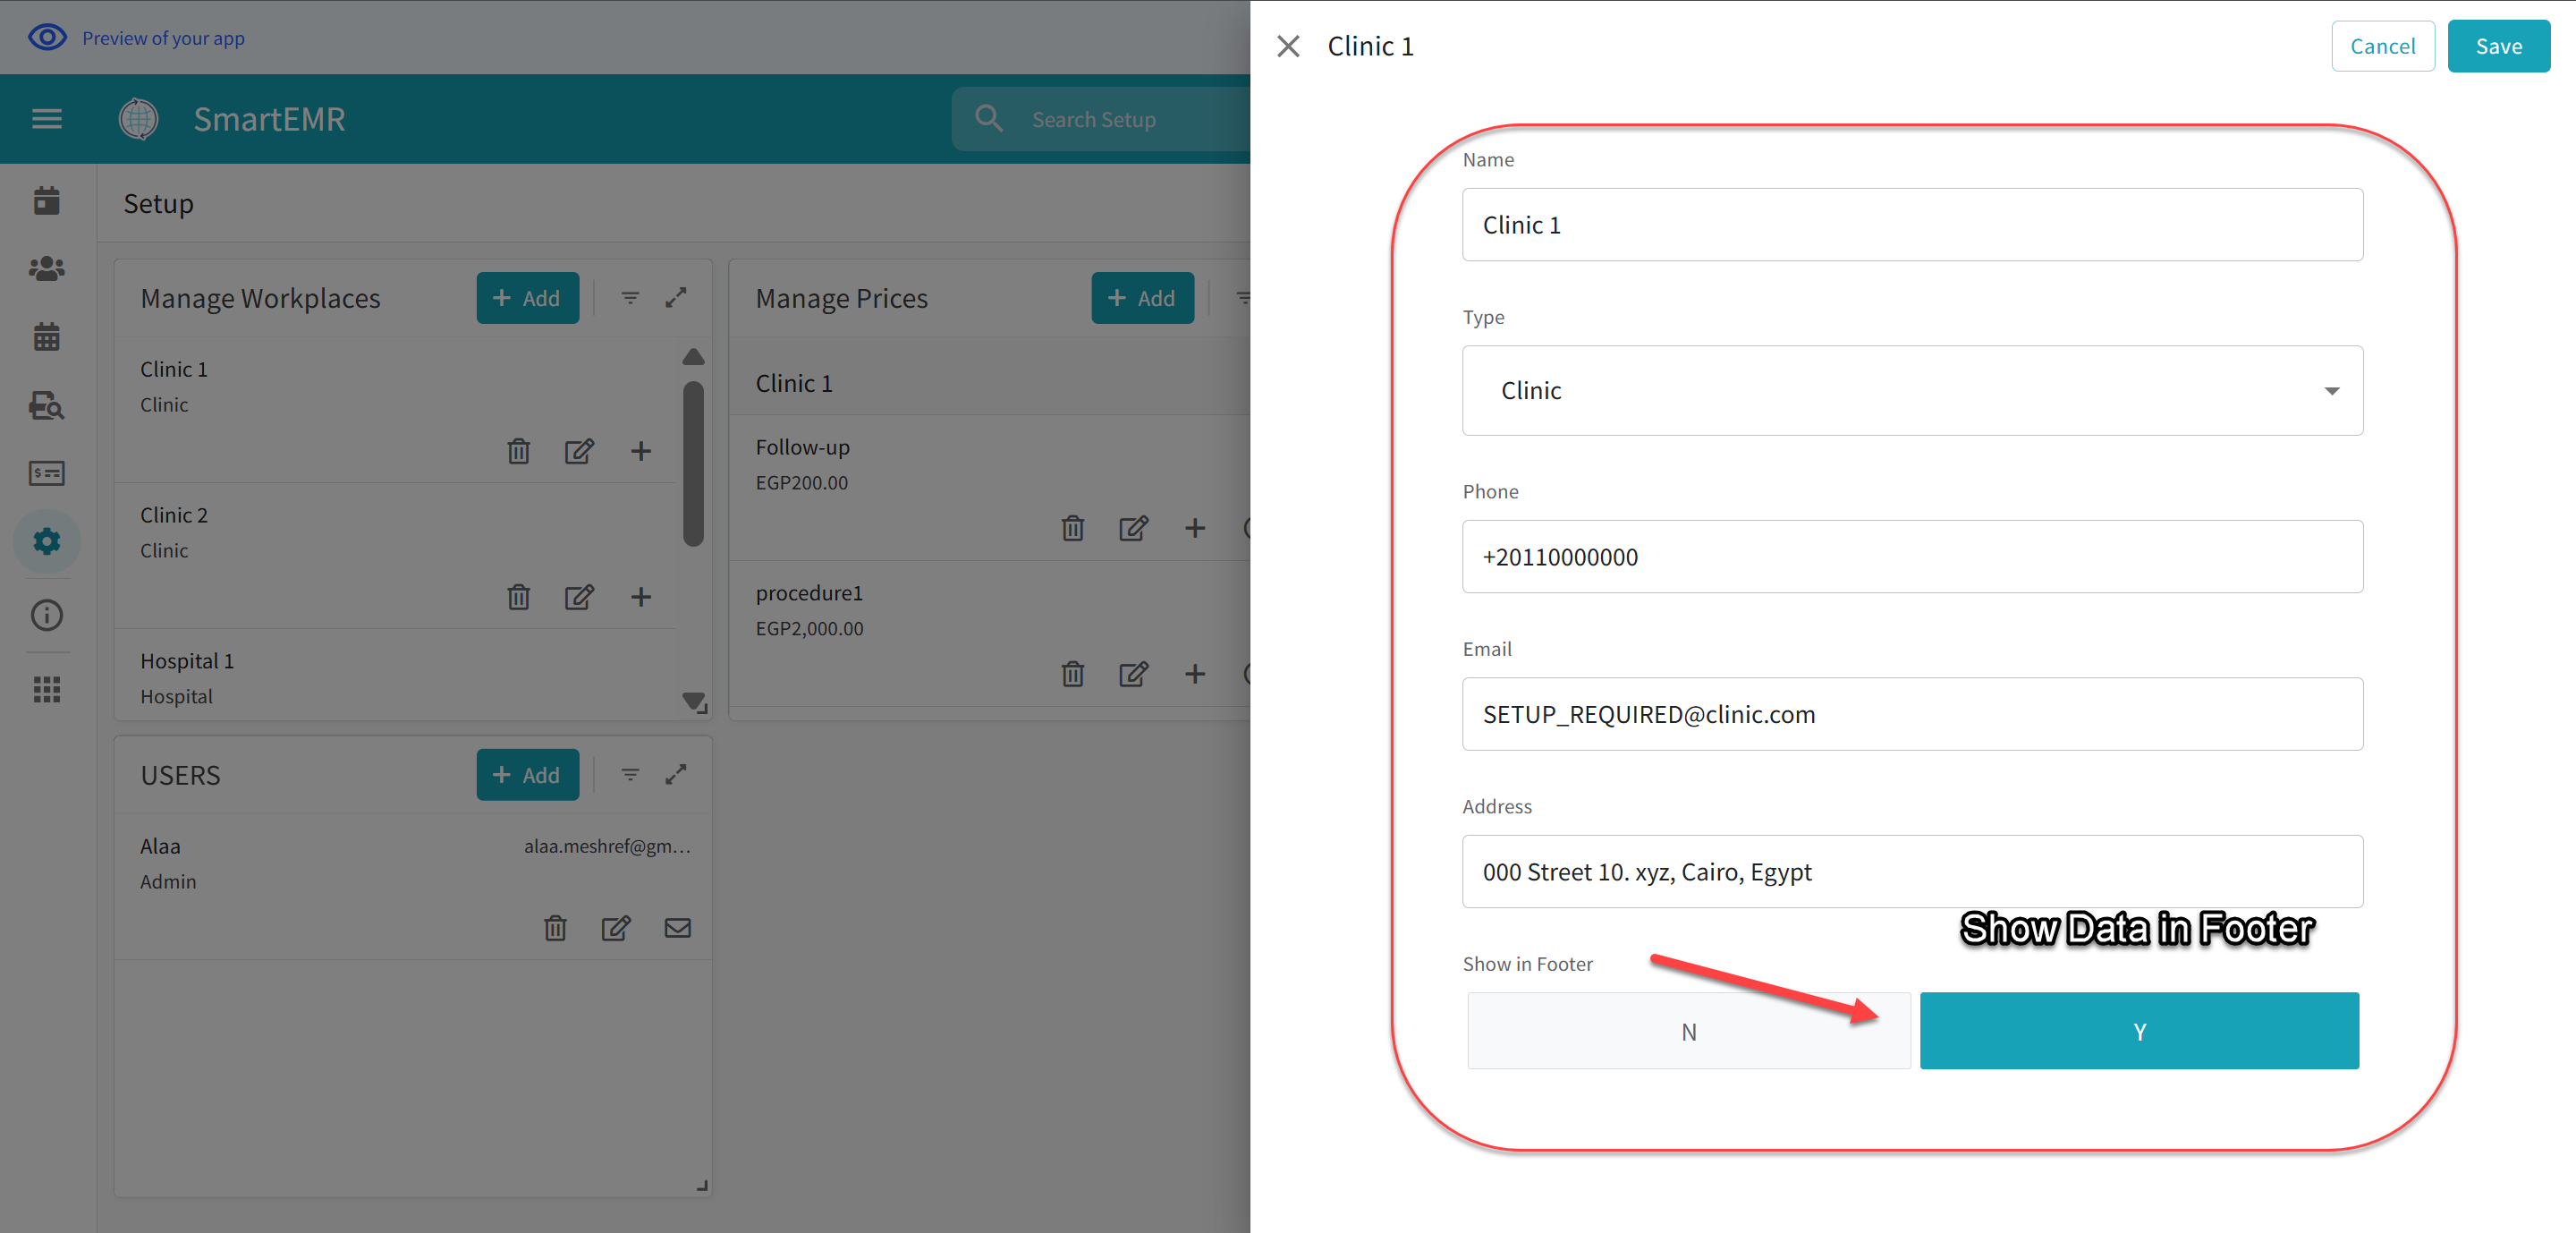
Workplace data appears in the footer of printed documents
- Tap Save
- Repeat for every location where you see patients
Step 7: Set Your Service Prices
This step lets the app automatically fill in the consultation fee when you create a visit. If you skip this, you can always type the fee manually each time.
- Tap the hamburger menu > Setup
- Tap the Manage Prices tab
- Tap the Add button (+ icon)
- Fill in:
| Field | What to Enter | Example |
|---|---|---|
| Category | Consultation, Follow-up, Procedure, Surgery, or Investigation | Consultation |
| ServiceName | A name for this service | First Visit |
| DefaultFee | Price you charge | 500 |
| WorkplaceID | If only for one clinic, select it. Leave empty for same price everywhere | (empty for global price) |
- Tap Save
- Repeat for all your services (Follow-up, Ultrasound, Minor Procedure, etc.)
Step 8: Add Your Staff Members
If you are a solo doctor with no staff, skip this step for now.
Adding a staff member requires TWO parts: (1) adding them in the Users table, and (2) inviting them through AppSheet sharing.
Part A: Add Staff in the Users Table
- Hamburger menu > Setup > USERS tab
- Tap Add (+ icon)
- Fill in:
- Email: Their Gmail address (must match their AppSheet sign-in)
- Name: Their full name
- Roles: Check the appropriate role(s) — see "Understanding Roles" below
- Active: Yes
- Tap Save
Part B: Invite Through AppSheet Sharing
Adding to the Users table is not enough. You must also invite them through AppSheet:
- On a computer, open your Smart EMR in the AppSheet Editor (go to www.appsheet.com, sign in, click your app)
- Click the Share icon (person with + sign)
- Type their Gmail address, set permission to "Use app"
- Check "Notify users" and click Send
They will receive an email with instructions to install AppSheet and open Smart EMR.
The 7 Roles Explained
Each role controls what a person can see and do. Admin has full access to everything.
Admin
Clinic owner/manager. Full access to everything: patients, clinical notes, finances, settings, users. Only give to 1-2 trusted people.
Assistant
Employed doctors. Can view patients, create visits, write notes, use AI, print documents. Cannot see finances or change settings.
Secretary
Receptionist/front desk. Can add patients, edit patient info, manage appointments. Cannot see clinical notes or finances.
Accountant
Billing staff. Can see fees, mark visits paid, view financial reports. Cannot see clinical notes or prescriptions.
Nurse
Nurses/medical assistants. Can view patients, read notes, see prescriptions and orders (read-only). Cannot edit clinical data or see finances.
Pharmacist
For pharmacists. Can view patient names, allergies, prescriptions, diagnosis. Cannot see full notes, orders, or finances.
Lab_Tech
Lab/radiology staff. Can view lab orders and imaging requests. Cannot see prescriptions, notes, or finances.
When One Person Does Multiple Jobs
You can give any user multiple roles. They get the combined permissions of all their roles.
Complete Permissions Table
| What Can They Do? | Admin | Assistant | Secretary | Accountant | Nurse | Pharmacist | Lab_Tech |
|---|---|---|---|---|---|---|---|
| View patient names | Yes | Yes | Yes | Yes* | Yes | Yes* | Yes* |
| Add new patients | Yes | Yes | Yes | No | No | No | No |
| Edit patient info | Yes | Yes | Yes | No | No | No | No |
| Delete patients | Yes | No | No | No | No | No | No |
| Create visits | Yes | Yes | No | No | No | No | No |
| Edit clinical notes | Yes | Yes | No | No | No | No | No |
| View clinical notes | Yes | Yes | No | No | Yes | No | No |
| View prescriptions | Yes | Yes | No | No | Yes | Yes | No |
| View lab orders | Yes | Yes | No | No | Yes | No | Yes |
| Print prescriptions | Yes | Yes | No | No | No | Yes | No |
| Print lab orders | Yes | Yes | No | No | No | No | Yes |
| Print reports/referrals | Yes | Yes | No | No | No | No | No |
| Create appointments | Yes | Yes | Yes | No | Yes | No | No |
| Delete appointments | Yes | No | Yes | No | No | No | No |
| View/edit visit fees | Yes | No | No | Yes | No | No | No |
| Mark visits as paid | Yes | No | No | Yes | No | No | No |
| View financial reports | Yes | No | No | Yes | No | No | No |
| Manage users | Yes | No | No | No | No | No | No |
| Change settings | Yes | No | No | No | No | No | No |
CDA Settings for Prescription & Orders Printing
Before you can print prescriptions or lab/imaging orders from Smart EMR, you need to enable the export options in the CDA app. This is a one-time setting.
- Open the CDA app at clinic.ai4docs.ai and sign in
- Click Settings (gear icon) > General tab
- Find the EMR Export Options section
- Make sure both checkboxes are checked:
- Include Prescription — so medications are included when the note is sent to Smart EMR. Without this, "Print Prescription" will have nothing to print
- Include Orders/Investigations — so lab tests and imaging orders are included. Without this, "Print Orders" will have nothing to print
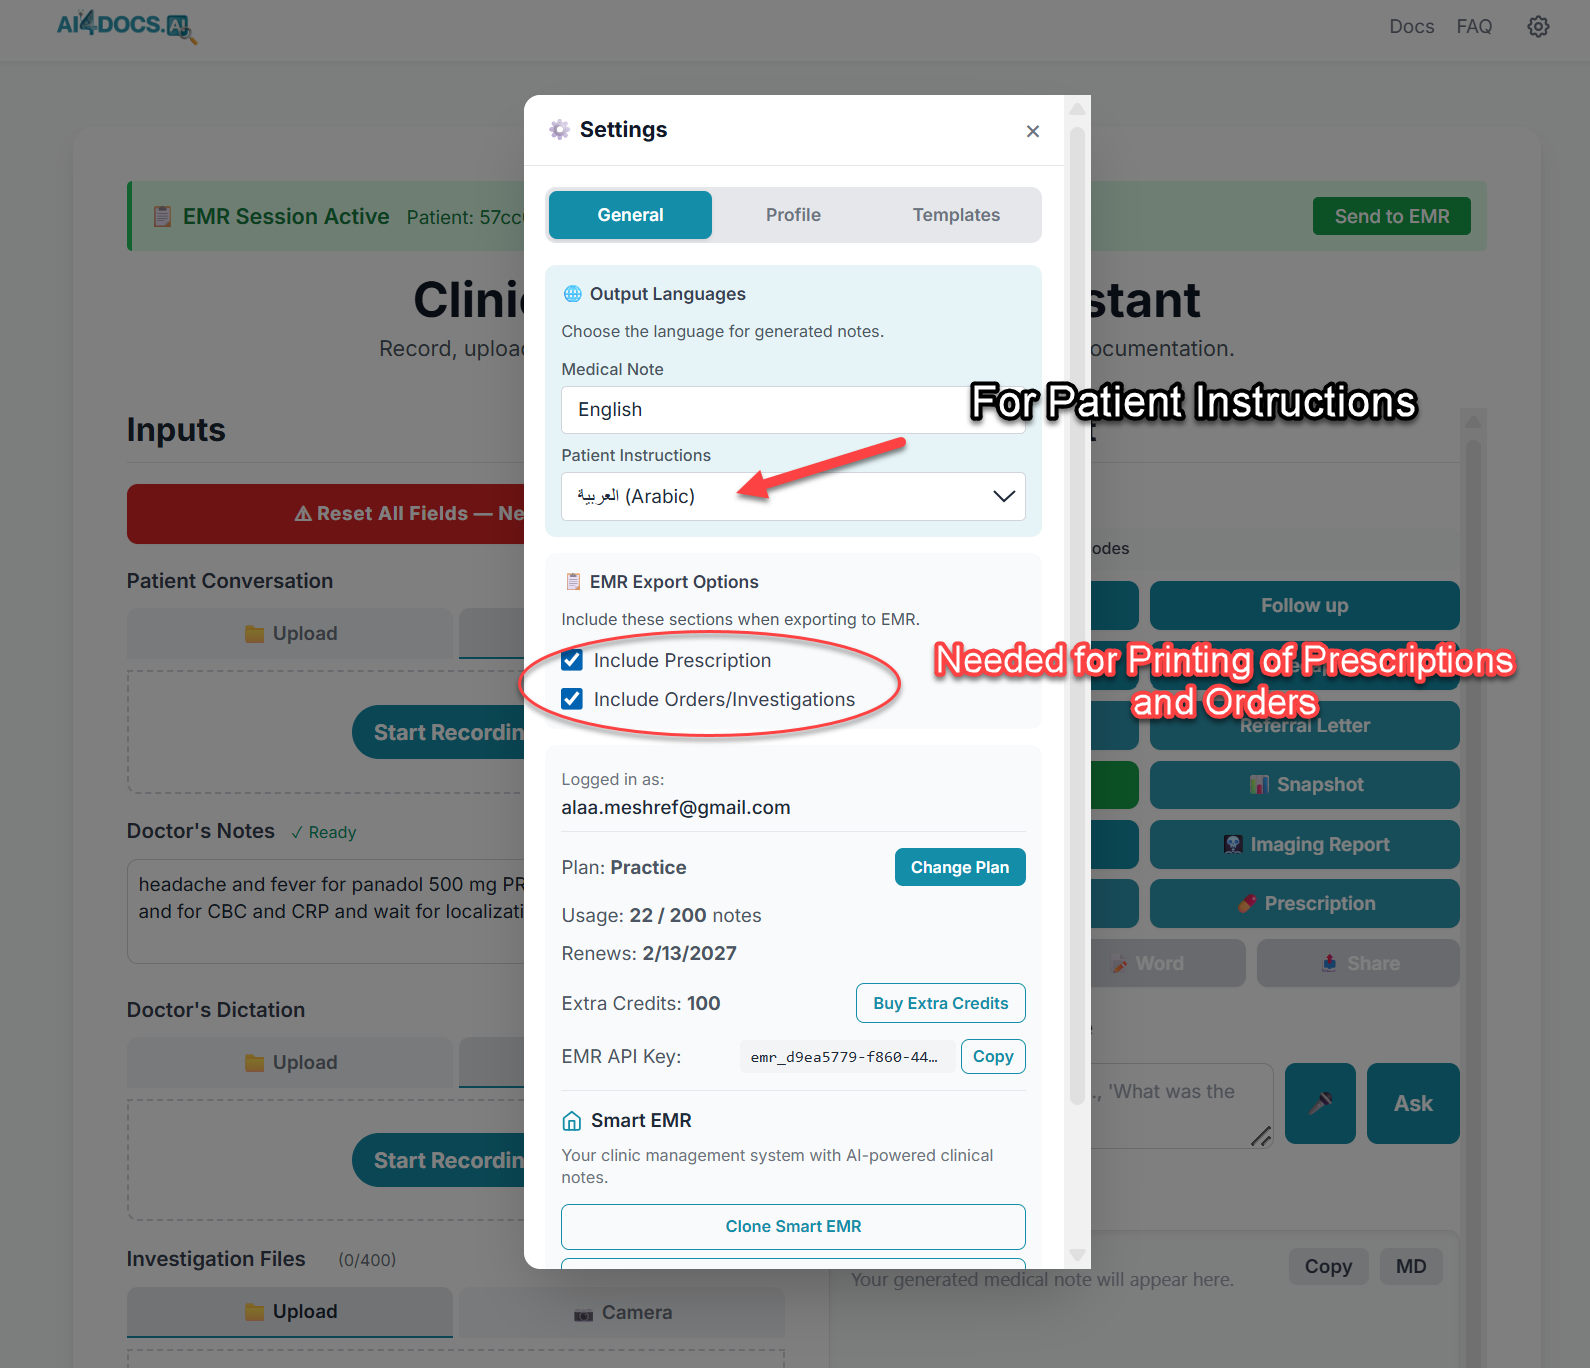
CDA Settings — enable "Include Prescription" and "Include Orders/Investigations" for printing
Language Settings
In the same CDA Settings > General tab, set your language preferences:
- Primary Language (e.g., English) — controls the medical documentation language
- Patient Instructions Language (e.g., Arabic) — controls the language of prescription instructions that patients read
How to Navigate the App
Bottom Menu (Main Navigation)
On a phone/tablet, look at the bottom of your screen. On a computer, look at the left sidebar. You will see 5 main buttons:
| Button | What It Does |
|---|---|
| Today's Schedule | Your daily dashboard — shows today's patient queue. Check patients in and start visits from here |
| Patients | Complete patient directory. Tap any patient to see their full file, call, WhatsApp, or email them |
| Calendar | Visual calendar of all past and future appointments |
| Clinical Search | Search through all past clinical notes by keyword and date range |
| Finance | Financial dashboard with filters (Admin and Accountant only) |
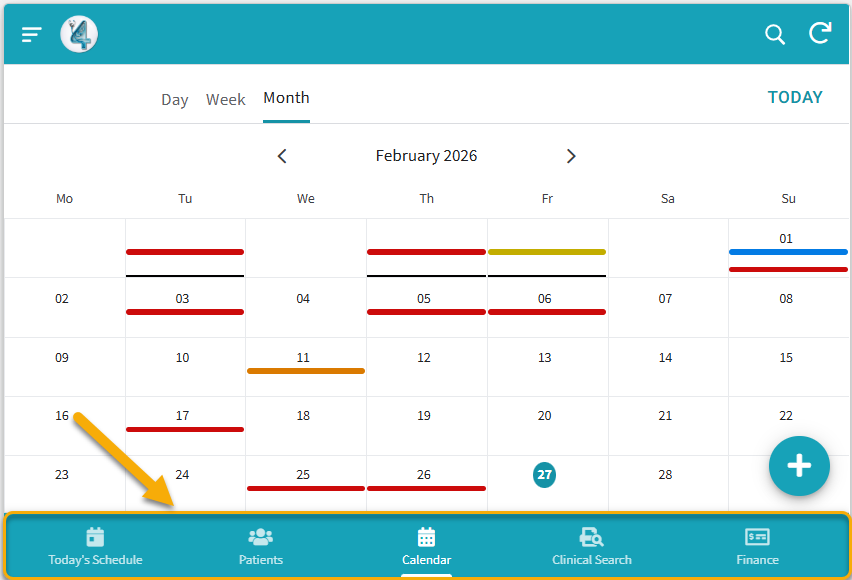
Bottom navigation bar — your 5 main sections
Hamburger Menu (Side Menu)
Tap the three horizontal lines at the top left to open the side menu with: Setup (configuration), About, Share, and Log Out.
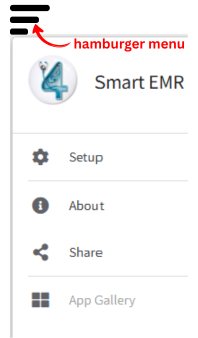
Hamburger menu — access Setup, Help, and account options
Adding a New Patient
- Tap Patients in the bottom menu
- Tap the Add button (+ icon)
- Fill in: FullName, DateOfBirth, Gender, Phone, Email (optional)
- Tap Save
The patient is now in your system permanently.
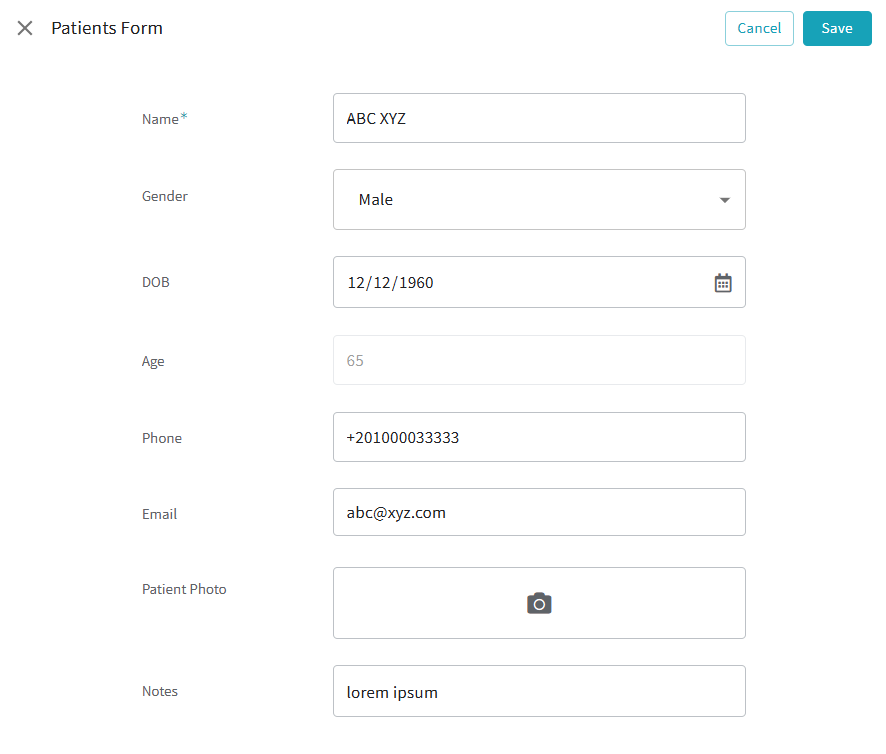
Add Patient form — enter the patient's basic information
Booking an Appointment
- Tap Patients > find and tap on the patient
- Tap the Book Appointment button
- Fill in: Start time, End time, Type (Consultation, Follow-up, Procedure, Emergency, WhatsApp), and Visit Site
- Tap Save
The appointment appears in the Calendar and Today's Schedule on the appointment day.
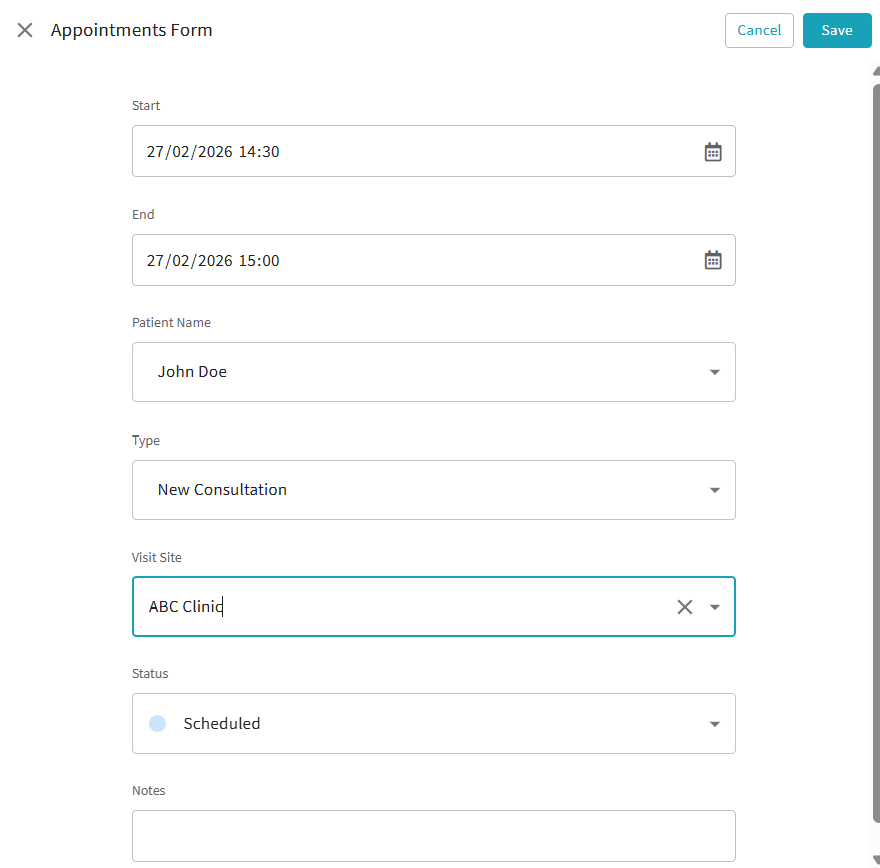
Appointment booking — set date, time, type, and clinic location
Patient Check-In
- Tap Today's Schedule in the bottom menu
- Find the patient in Today's Queue (status: "Scheduled")
- Tap Check-In — status changes to "Checked-In"
AI Clinical Notes — Complete Workflow
Starting the Visit
- From Today's Schedule, tap Start Visit on a checked-in patient
- Fill in the visit details: select your Visit Site (which clinic you are at today), Service Type, etc.
- Go through the tabs (Administrative, Clinical Notes, Images & Docs) — skip the Clinical Notes tab (the AI will fill it in later)
- Tap Save
Starting the CDA Session
- After saving, you are on the visit detail screen. You will see a "Start CDA" action button
- Tap "Start CDA" — the AI4Docs.AI Clinical Documentation Assistant opens immediately in a new browser tab with the patient's information pre-loaded
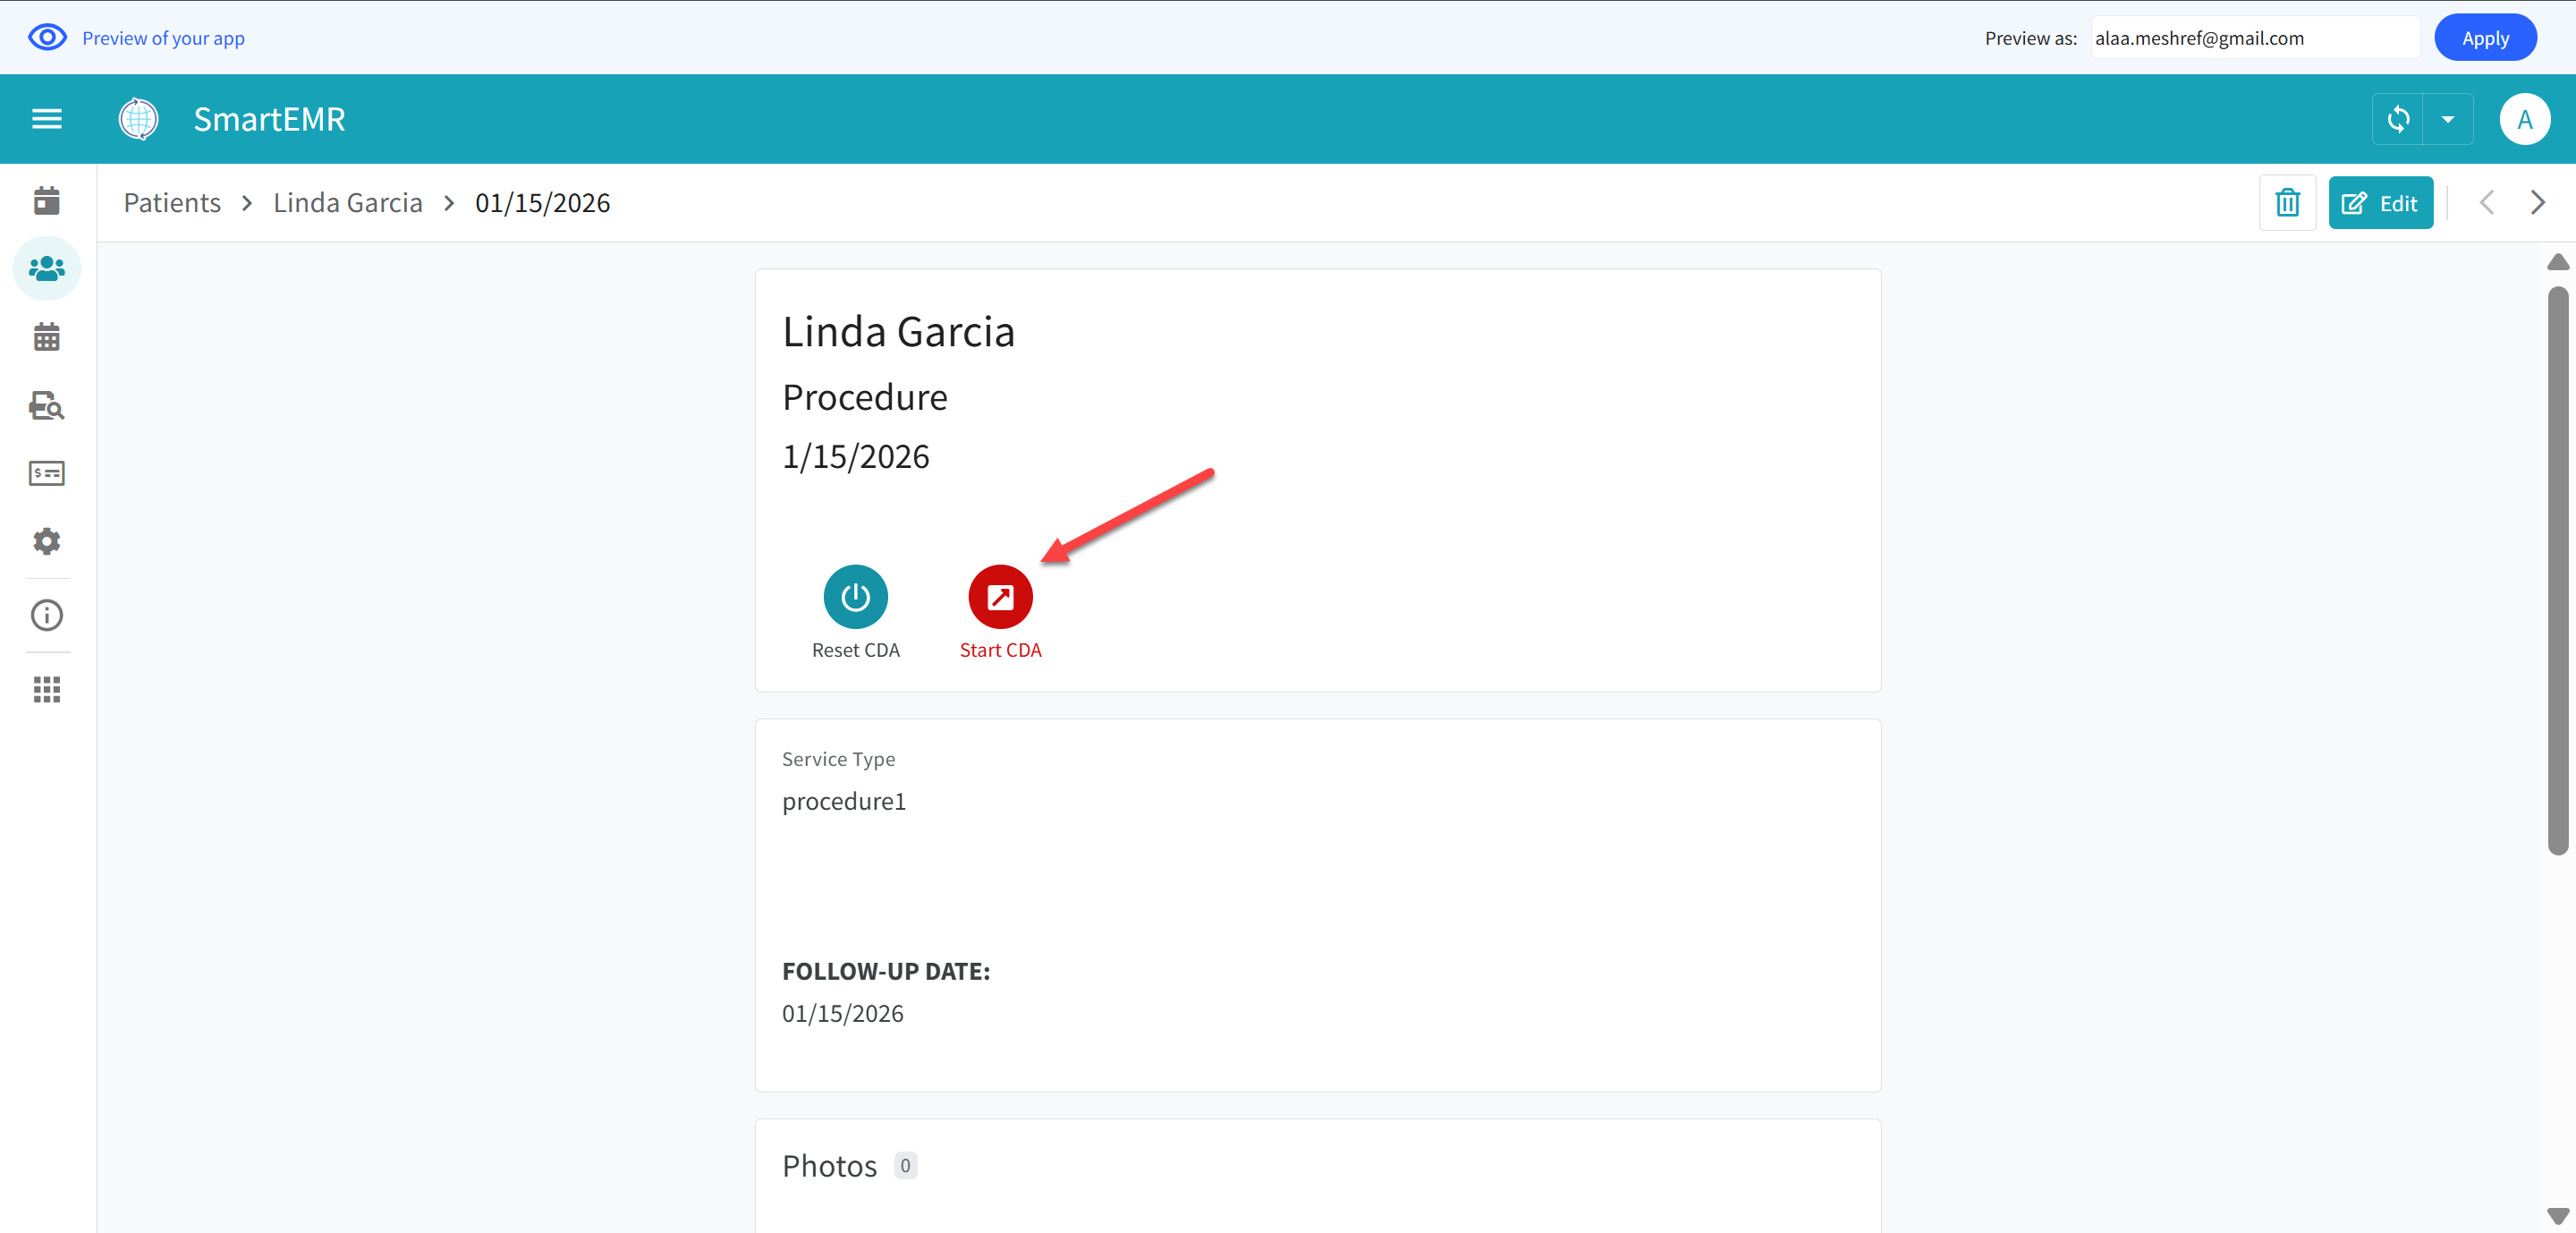
Tap "Start CDA" on the visit detail screen — the CDA app opens immediately
Creating Your Clinical Note
- In the CDA app, speak or type your clinical note naturally. The AI will understand and organize everything
- When finished, the AI generates a formatted clinical note
- Watch the notification bar at the top of the CDA screen:
- Green notification = The AI session is still active, the note is NOT ready yet. Do NOT go back to Smart EMR yet
- Blue notification = The note has been auto-saved and is READY to be fetched. Now you can go back to Smart EMR
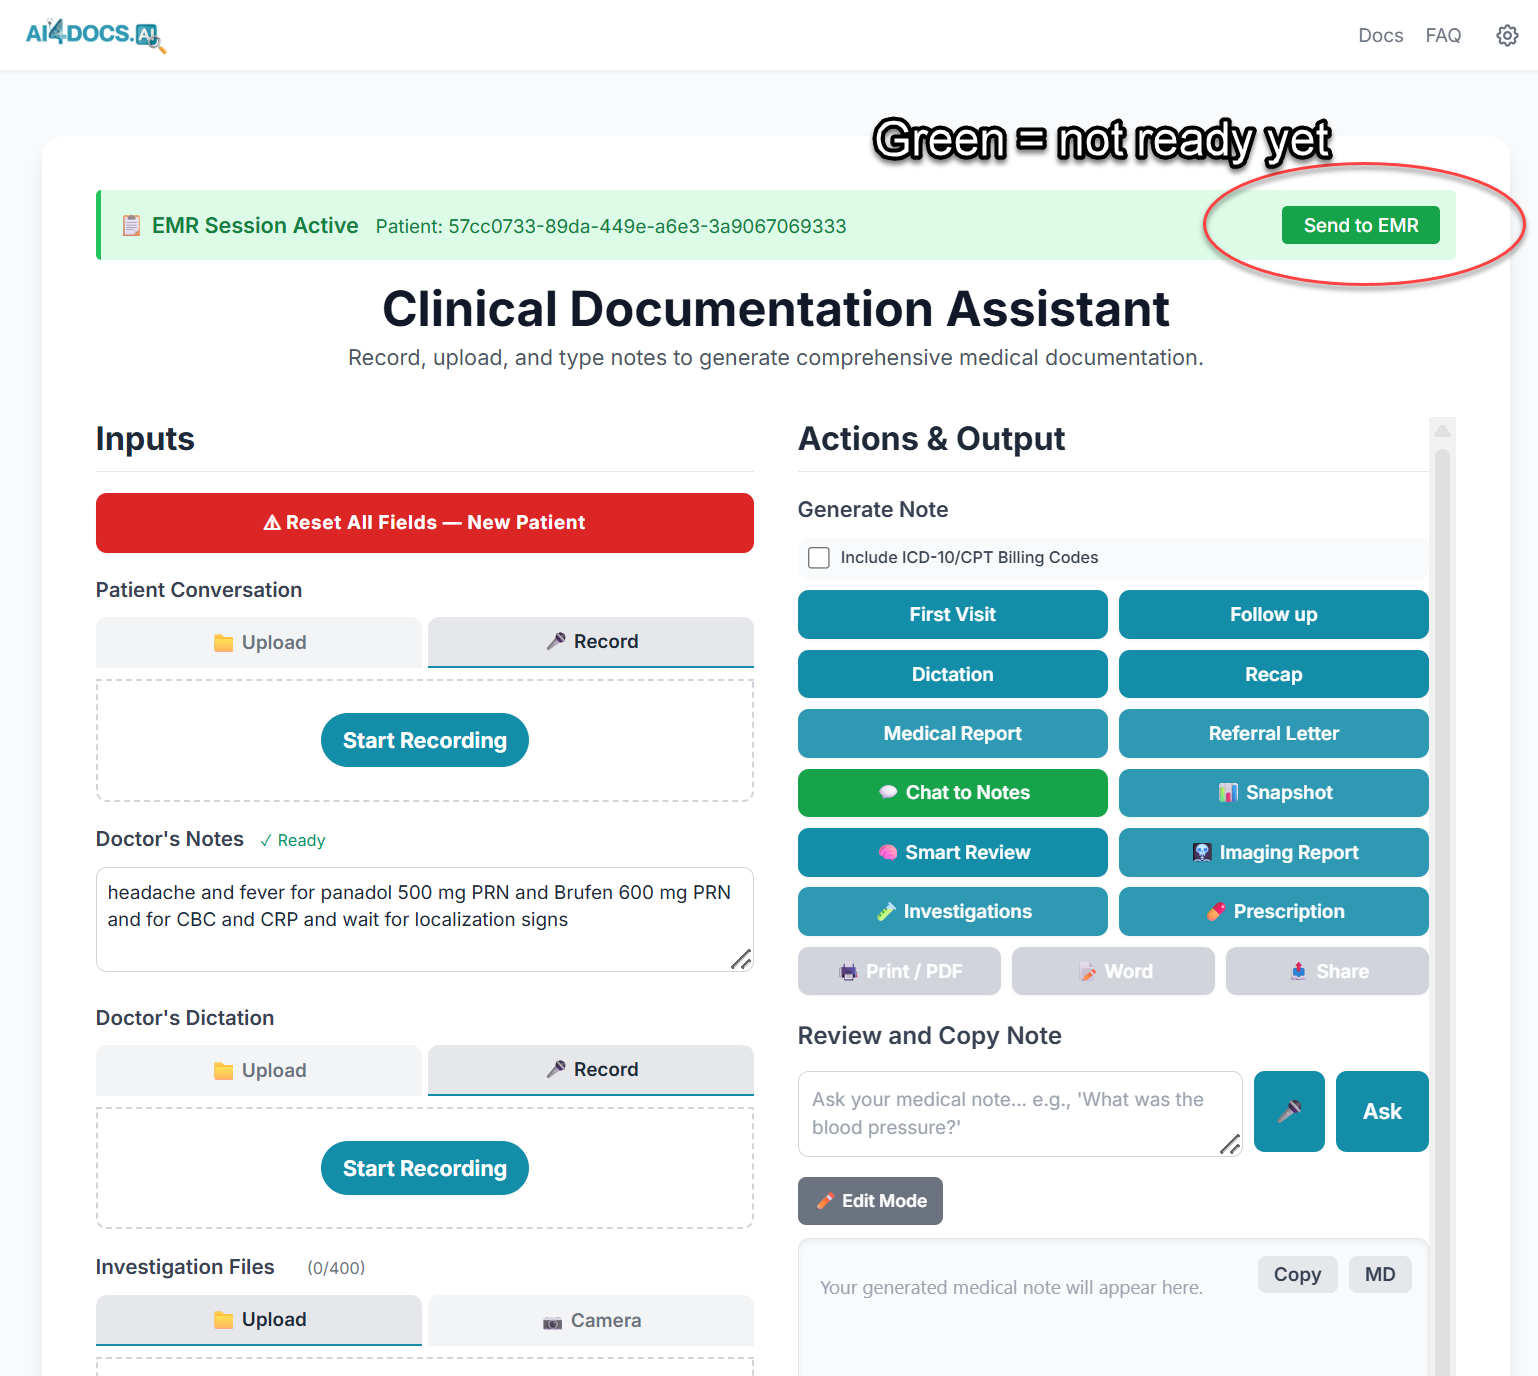
Green notification = session still active, note NOT ready yet — wait before switching
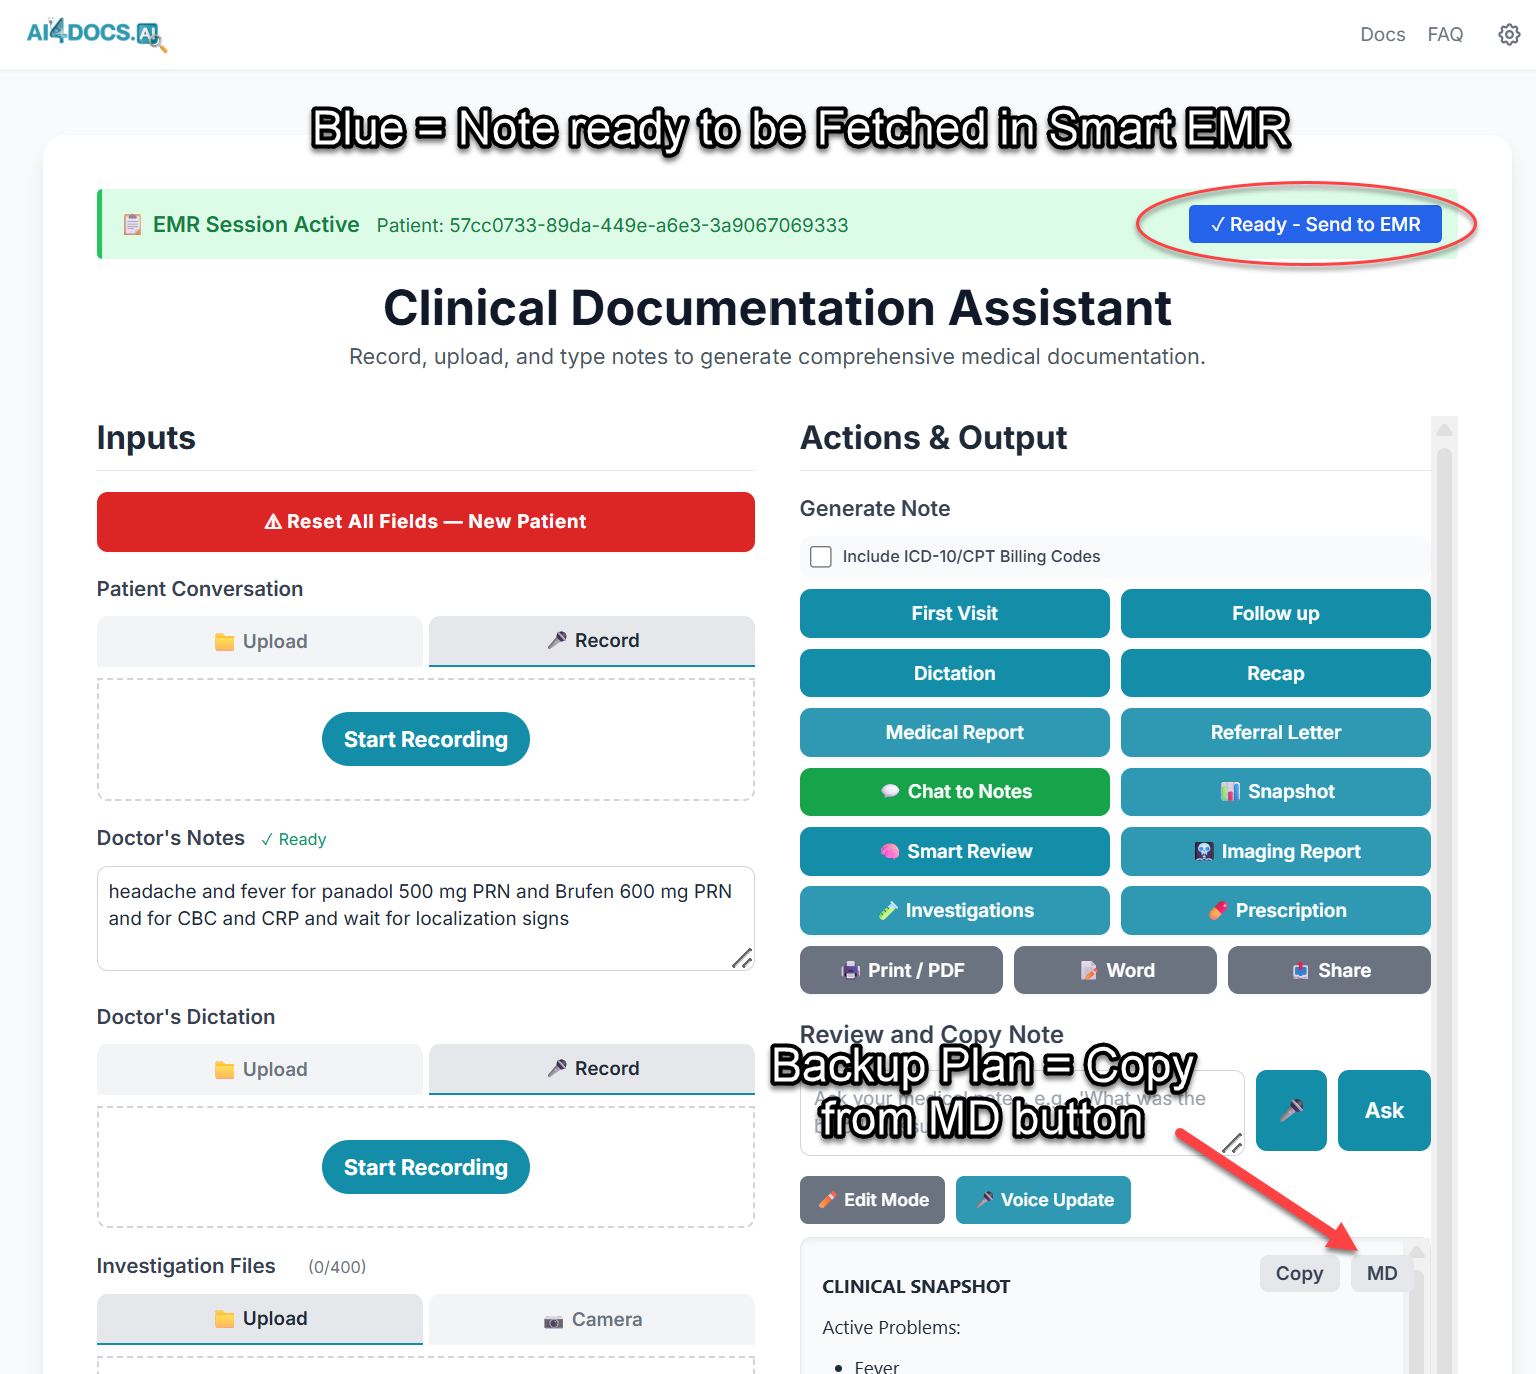
Blue notification = note is READY — you can now go back to Smart EMR and fetch
Fetching the Note Back into Smart EMR
- Once you see the blue notification, switch back to Smart EMR
- Open the visit record and look for the "Fetch Note" button
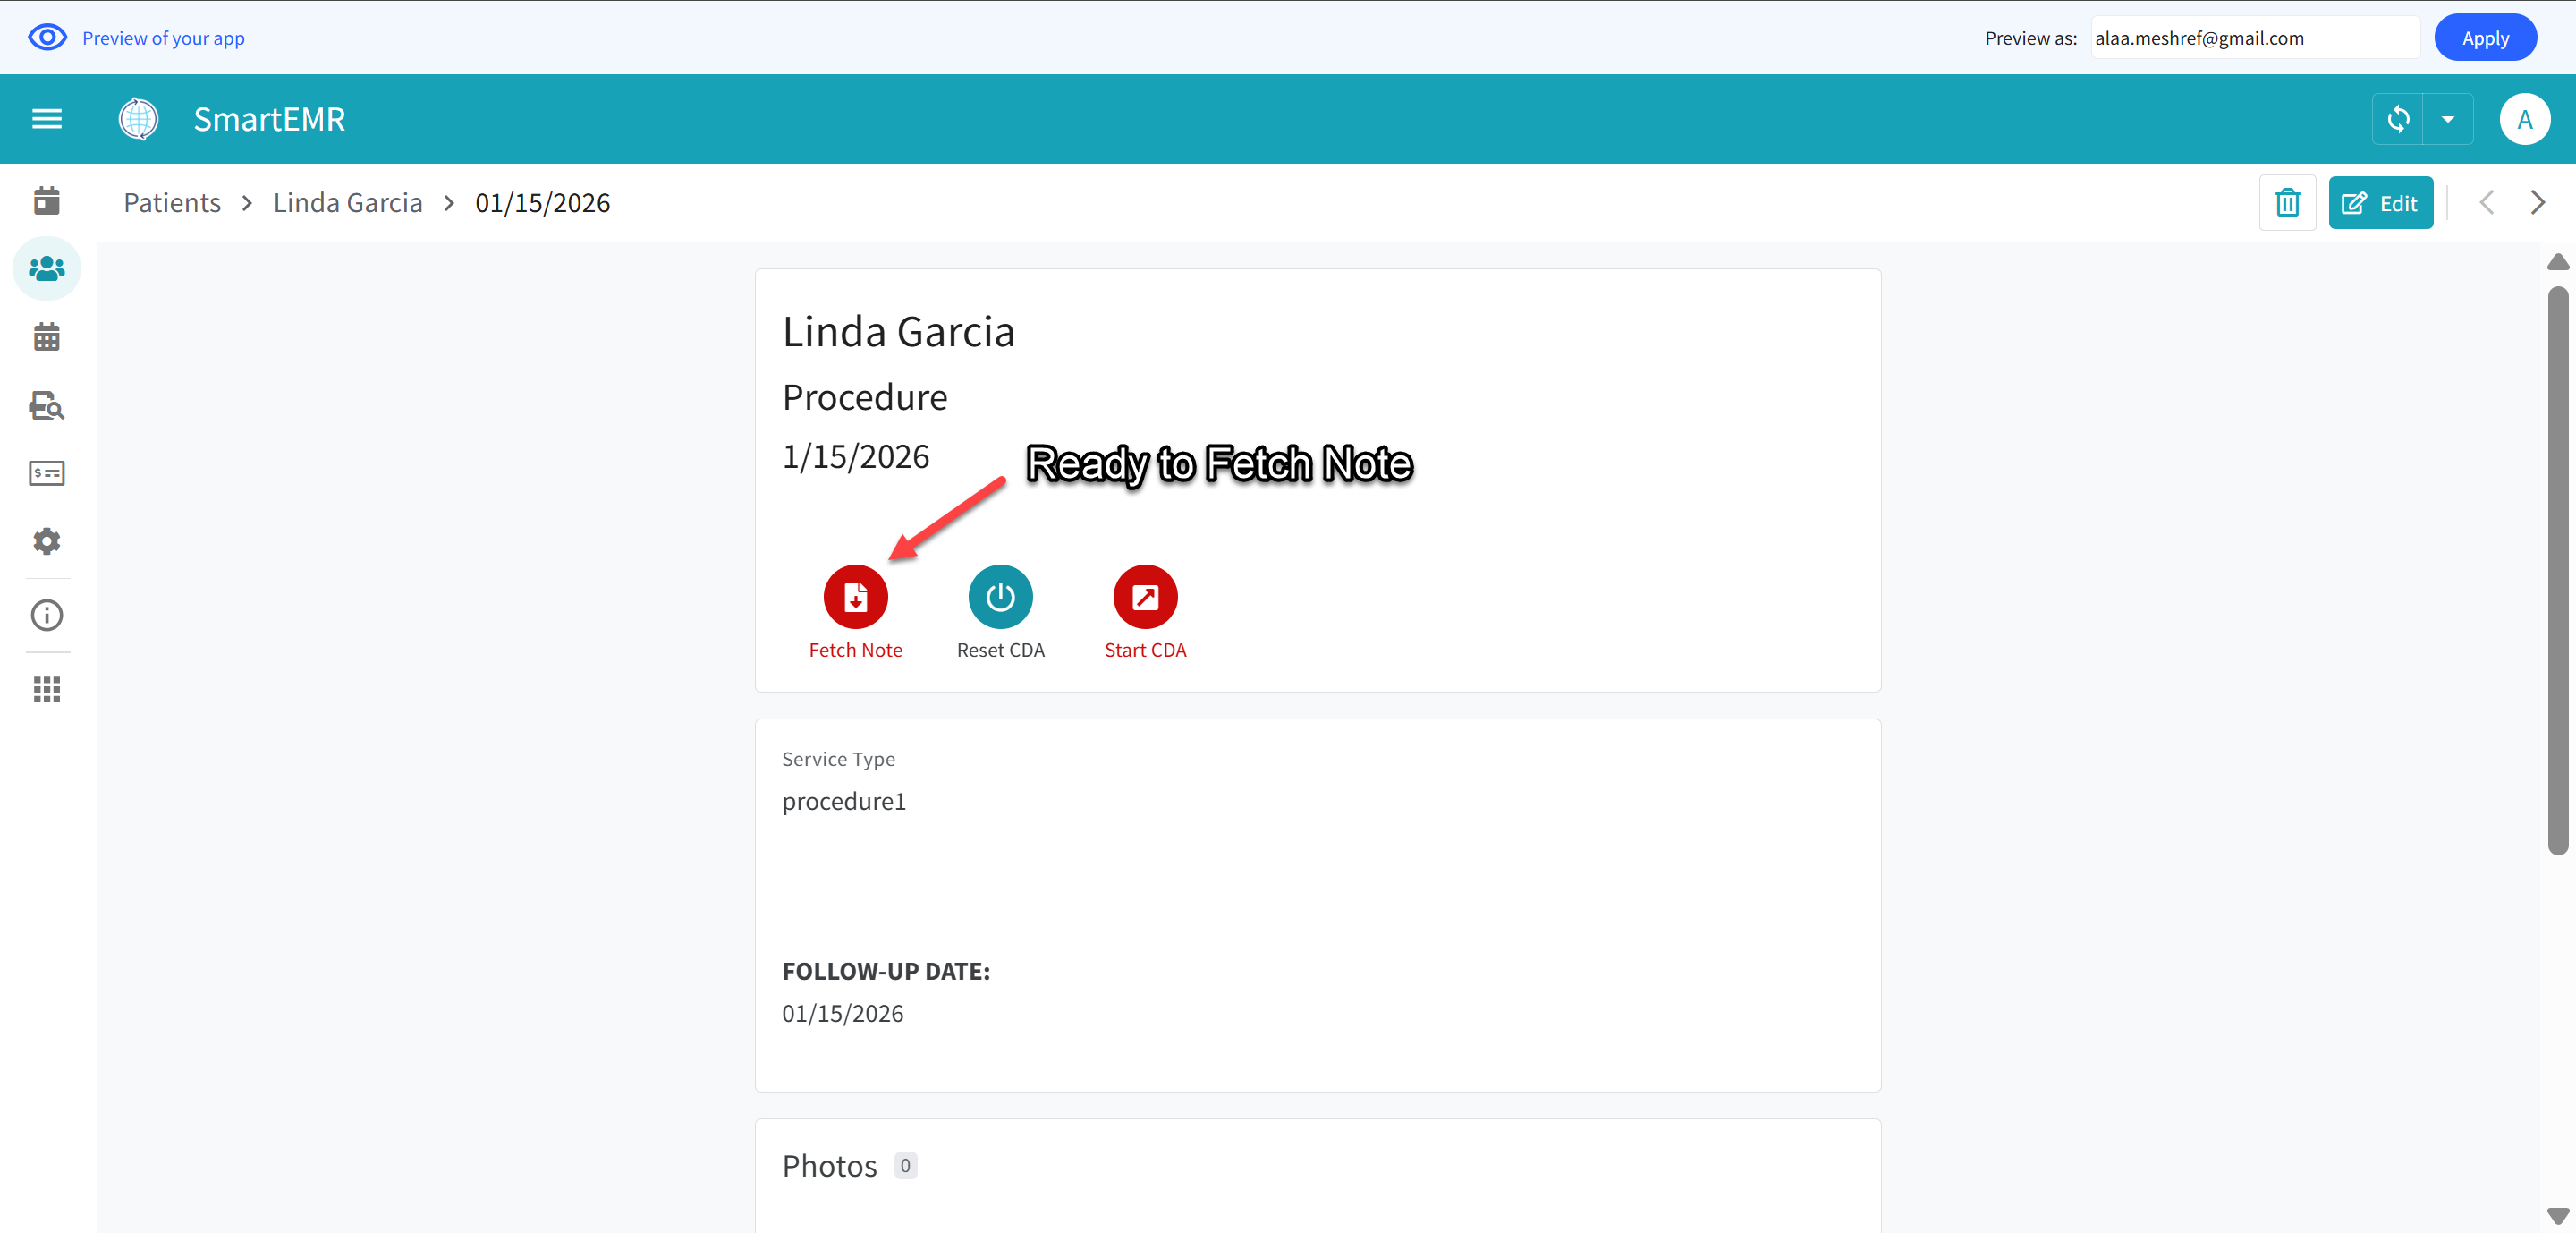
The "Fetch Note" button is ready — tap it to pull the AI note into Smart EMR
- Tap "Fetch Note"
- Wait about 5-10 seconds
- Sync the app (pull down or tap refresh). This is critical — the note does not appear until you sync
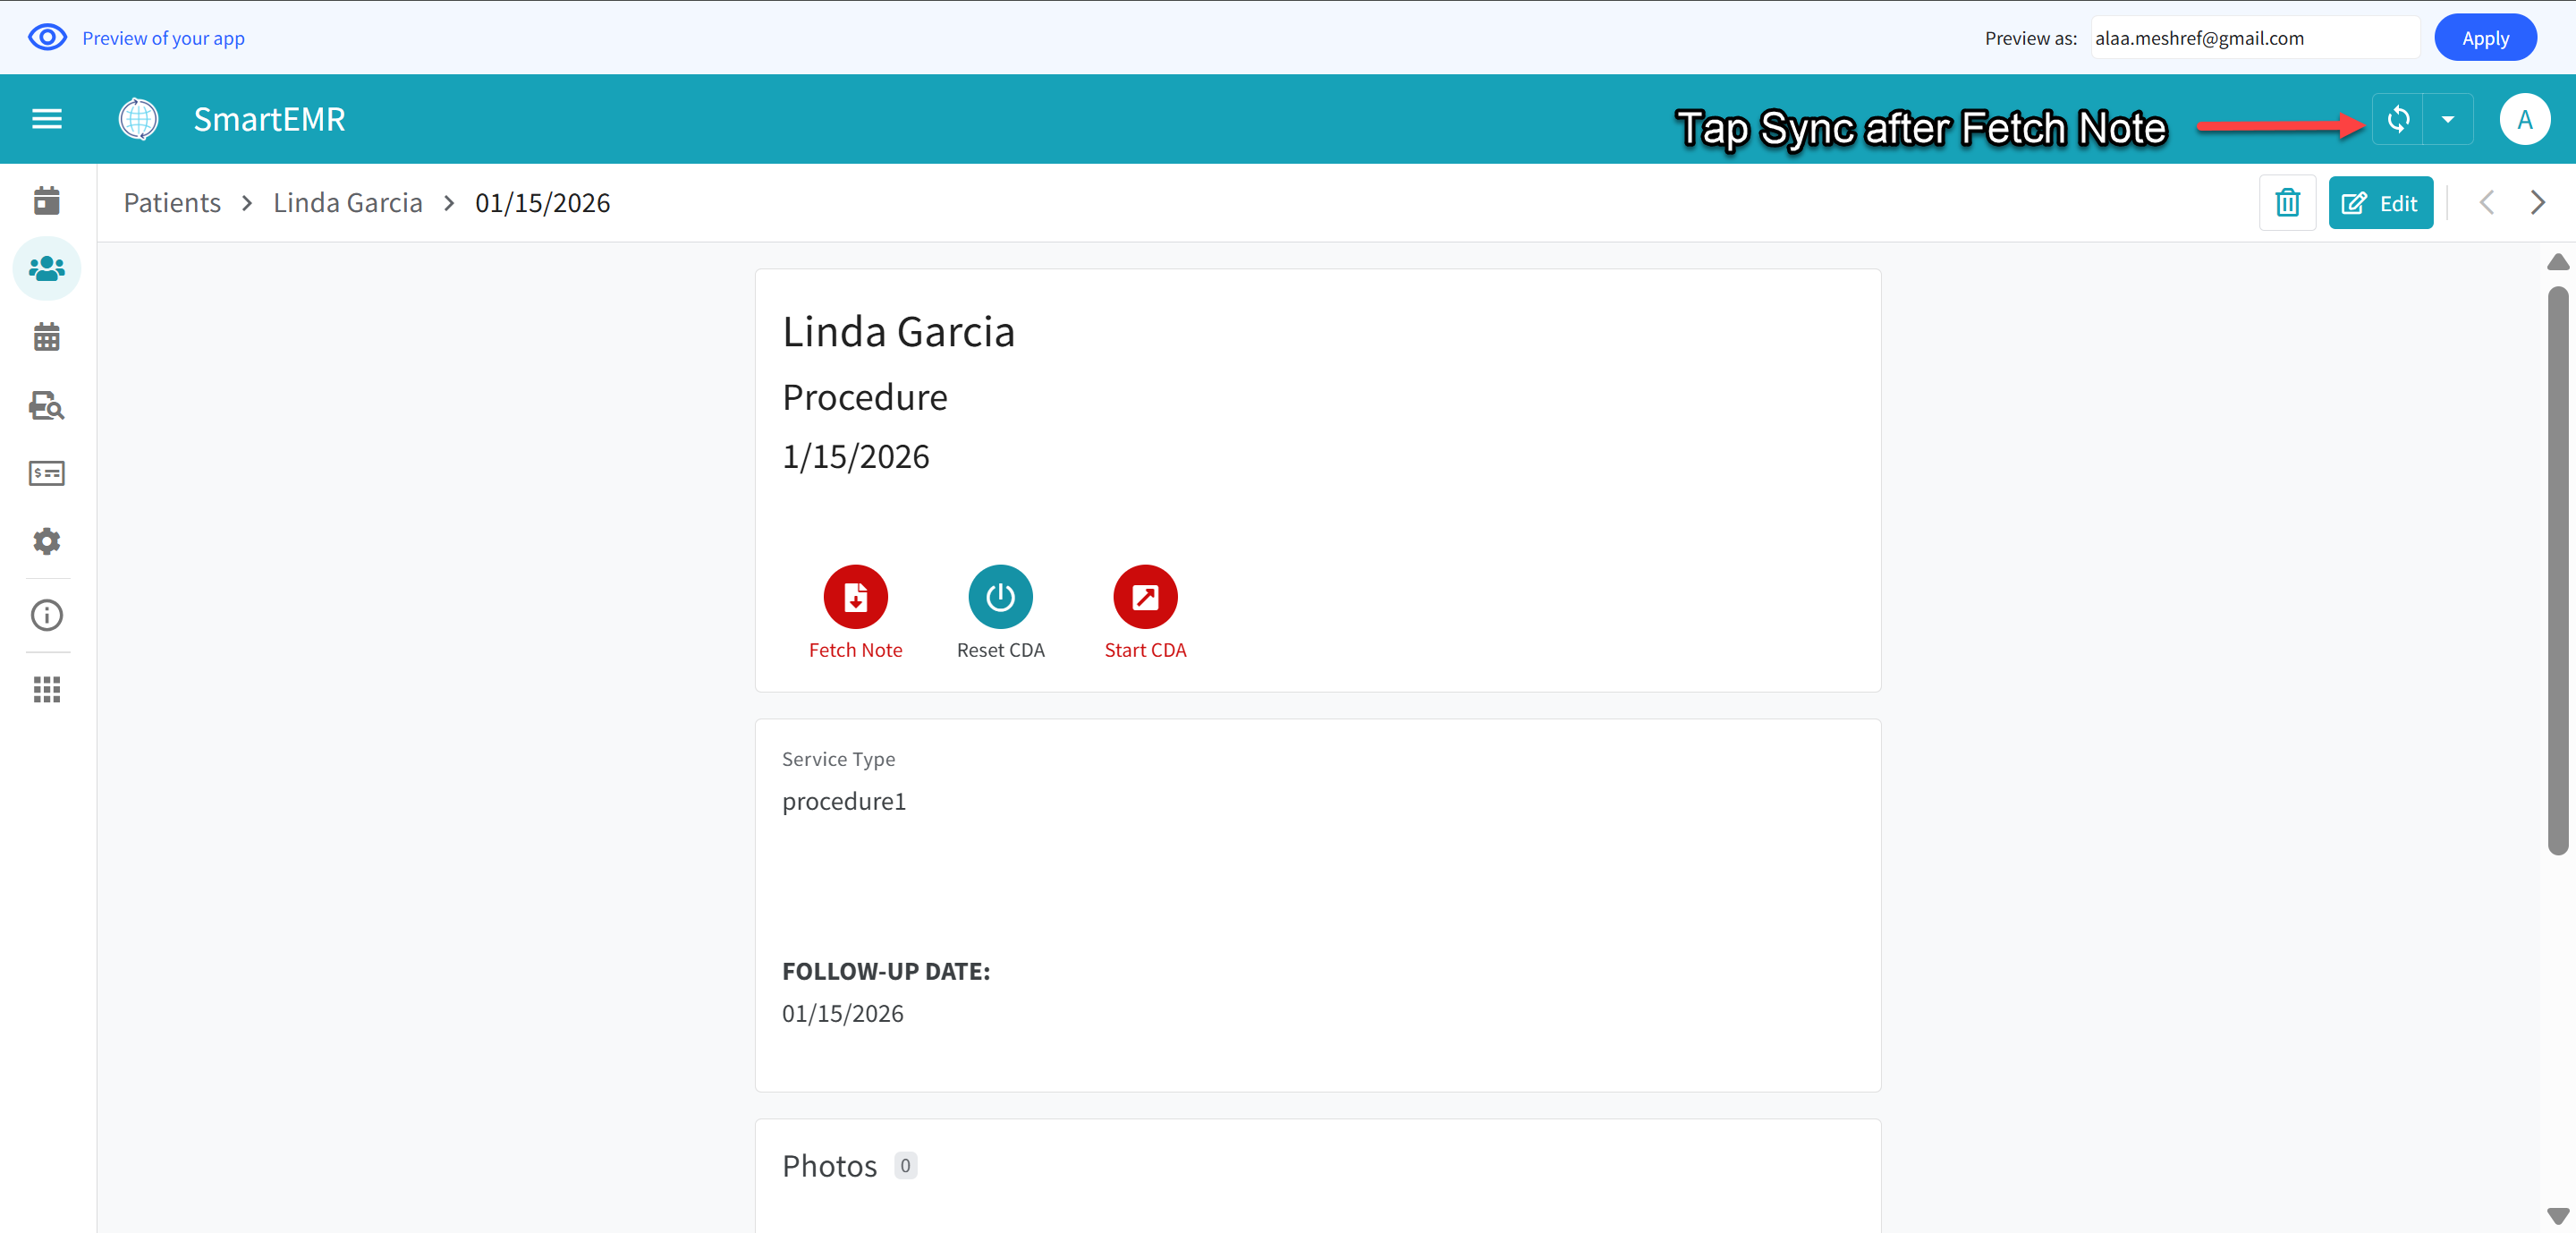
After tapping Fetch Note, sync the app by tapping the refresh icon (top right)
- Your clinical note is now populated! You will see a green checkmark with red text saying "Note saved successfully!"
- Print buttons appear based on what the clinical note contains:
- Print Prescription appears only if the note includes medications (controlled by "Include Prescription" in CDA Settings)
- Print Orders appears only if the note includes lab tests or imaging orders (controlled by "Include Orders/Investigations" in CDA Settings)
- Print Medical Report and Print Referral Letter appear whenever clinical notes exist
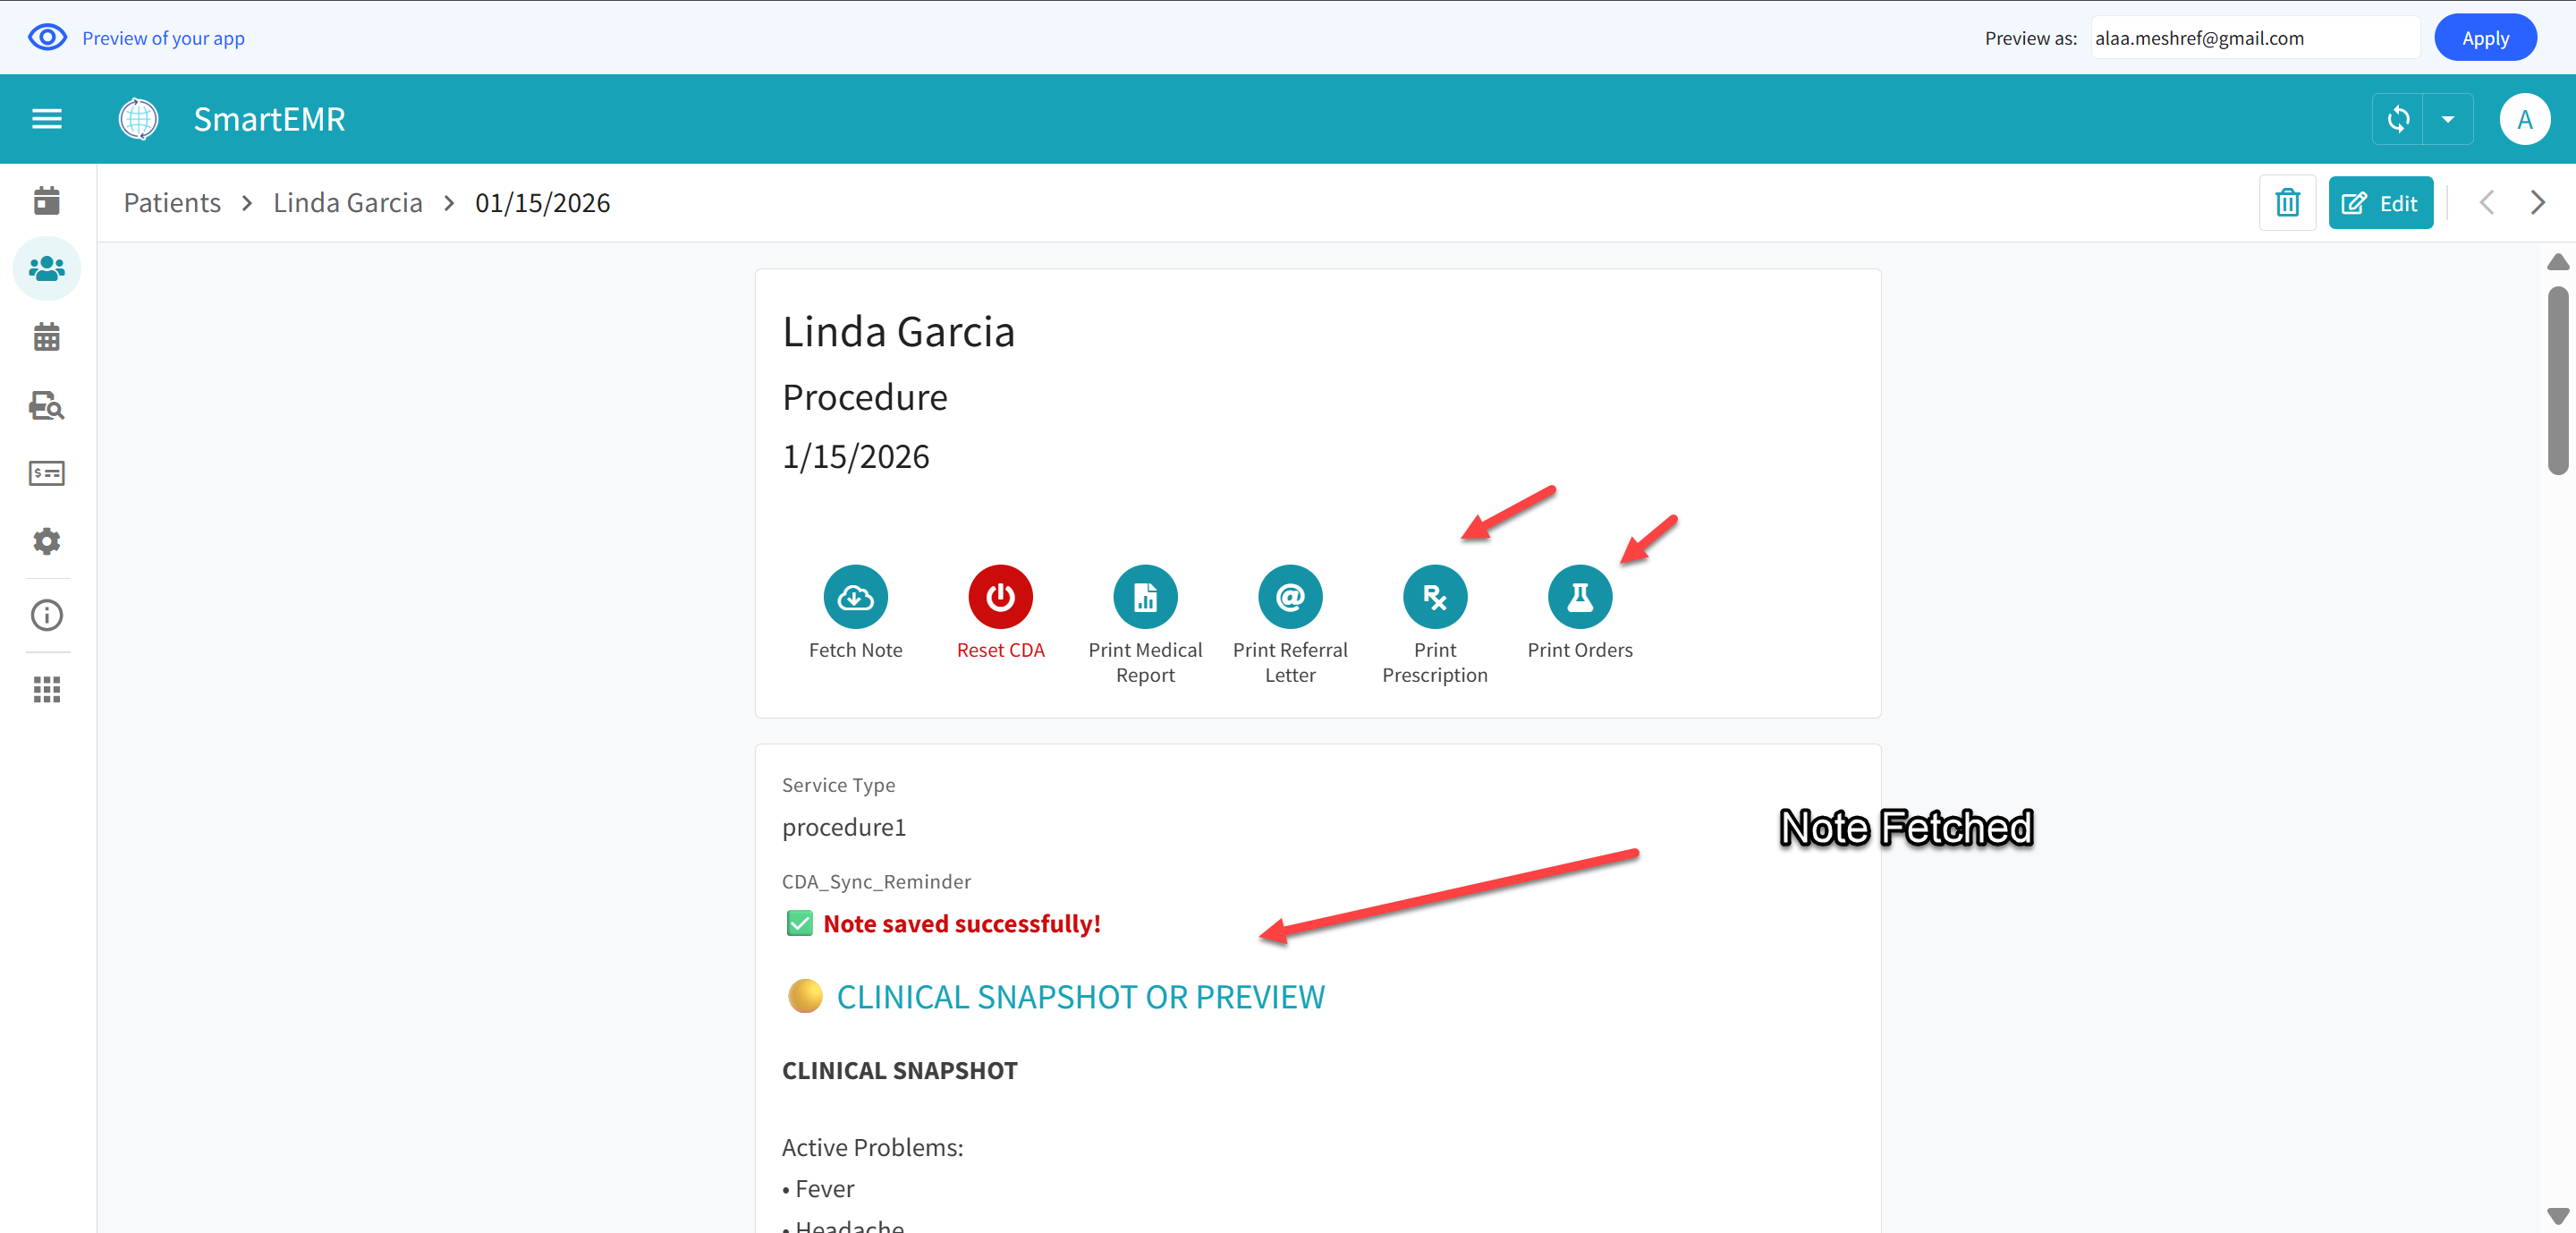
Note fetched successfully — green checkmark with "Note saved successfully!" and print buttons available
Always Reset After Fetching
- After the note is fetched, tap "Reset CDA". This clears the session and prepares for your next patient. Always do this after every visit.
Alternative Method: Copy from MD Button
If the Fetch Note process does not work, you can manually copy the note:
- In the CDA app, when the notification turns blue, tap the "MD" button (copies the note in a format Smart EMR can read)
- Go back to Smart EMR > open the visit > tap Edit > Clinical Notes tab > paste into the ClinicalNotes field > Save
Printing Documents
After a visit has clinical notes, you can print professional documents directly from your browser.
Available Documents
| Document | Paper Size | When Available? | Who Can Print? |
|---|---|---|---|
| Prescription | A5 | When note includes medications (requires "Include Prescription" in CDA) | Admin, Assistant, Pharmacist |
| Lab/Imaging Orders | A5 | When note includes tests/orders (requires "Include Orders" in CDA) | Admin, Assistant, Lab_Tech |
| Medical Report | A4 | When clinical notes exist | Admin, Assistant |
| Referral Letter | A4 | When clinical notes exist | Admin, Assistant |
How to Print
- Open the visit record
- Tap the print button you need (e.g., "Print Prescription")
- A new browser tab opens showing your document with the correct layout
- The browser's print dialog appears automatically
- Select your printer or choose "Save as PDF" and click Print
- Close the print tab when done
Print Output Examples
Full Letterhead Prescription (A5): Logo, doctor info, patient info, diagnosis, prescription with Arabic instructions, signing line, clinic addresses in footer.
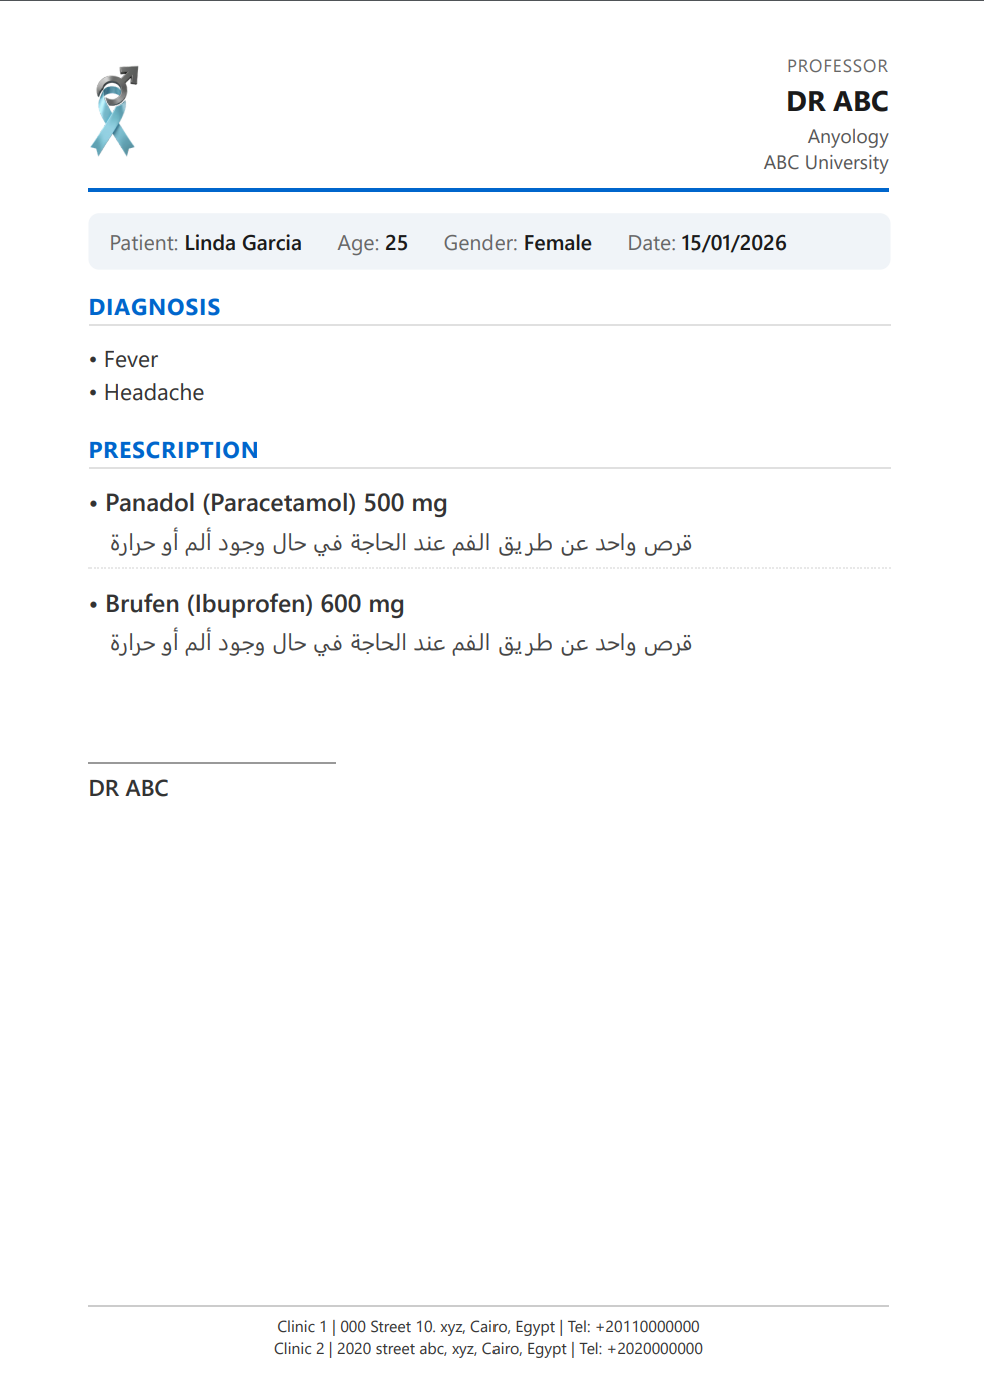
Printed prescription with full letterhead — logo, doctor info, Arabic instructions, and clinic footer on A5 paper
Content Only Prescription: Only patient info and medications, with top margin space for your pre-printed prescription pad header.
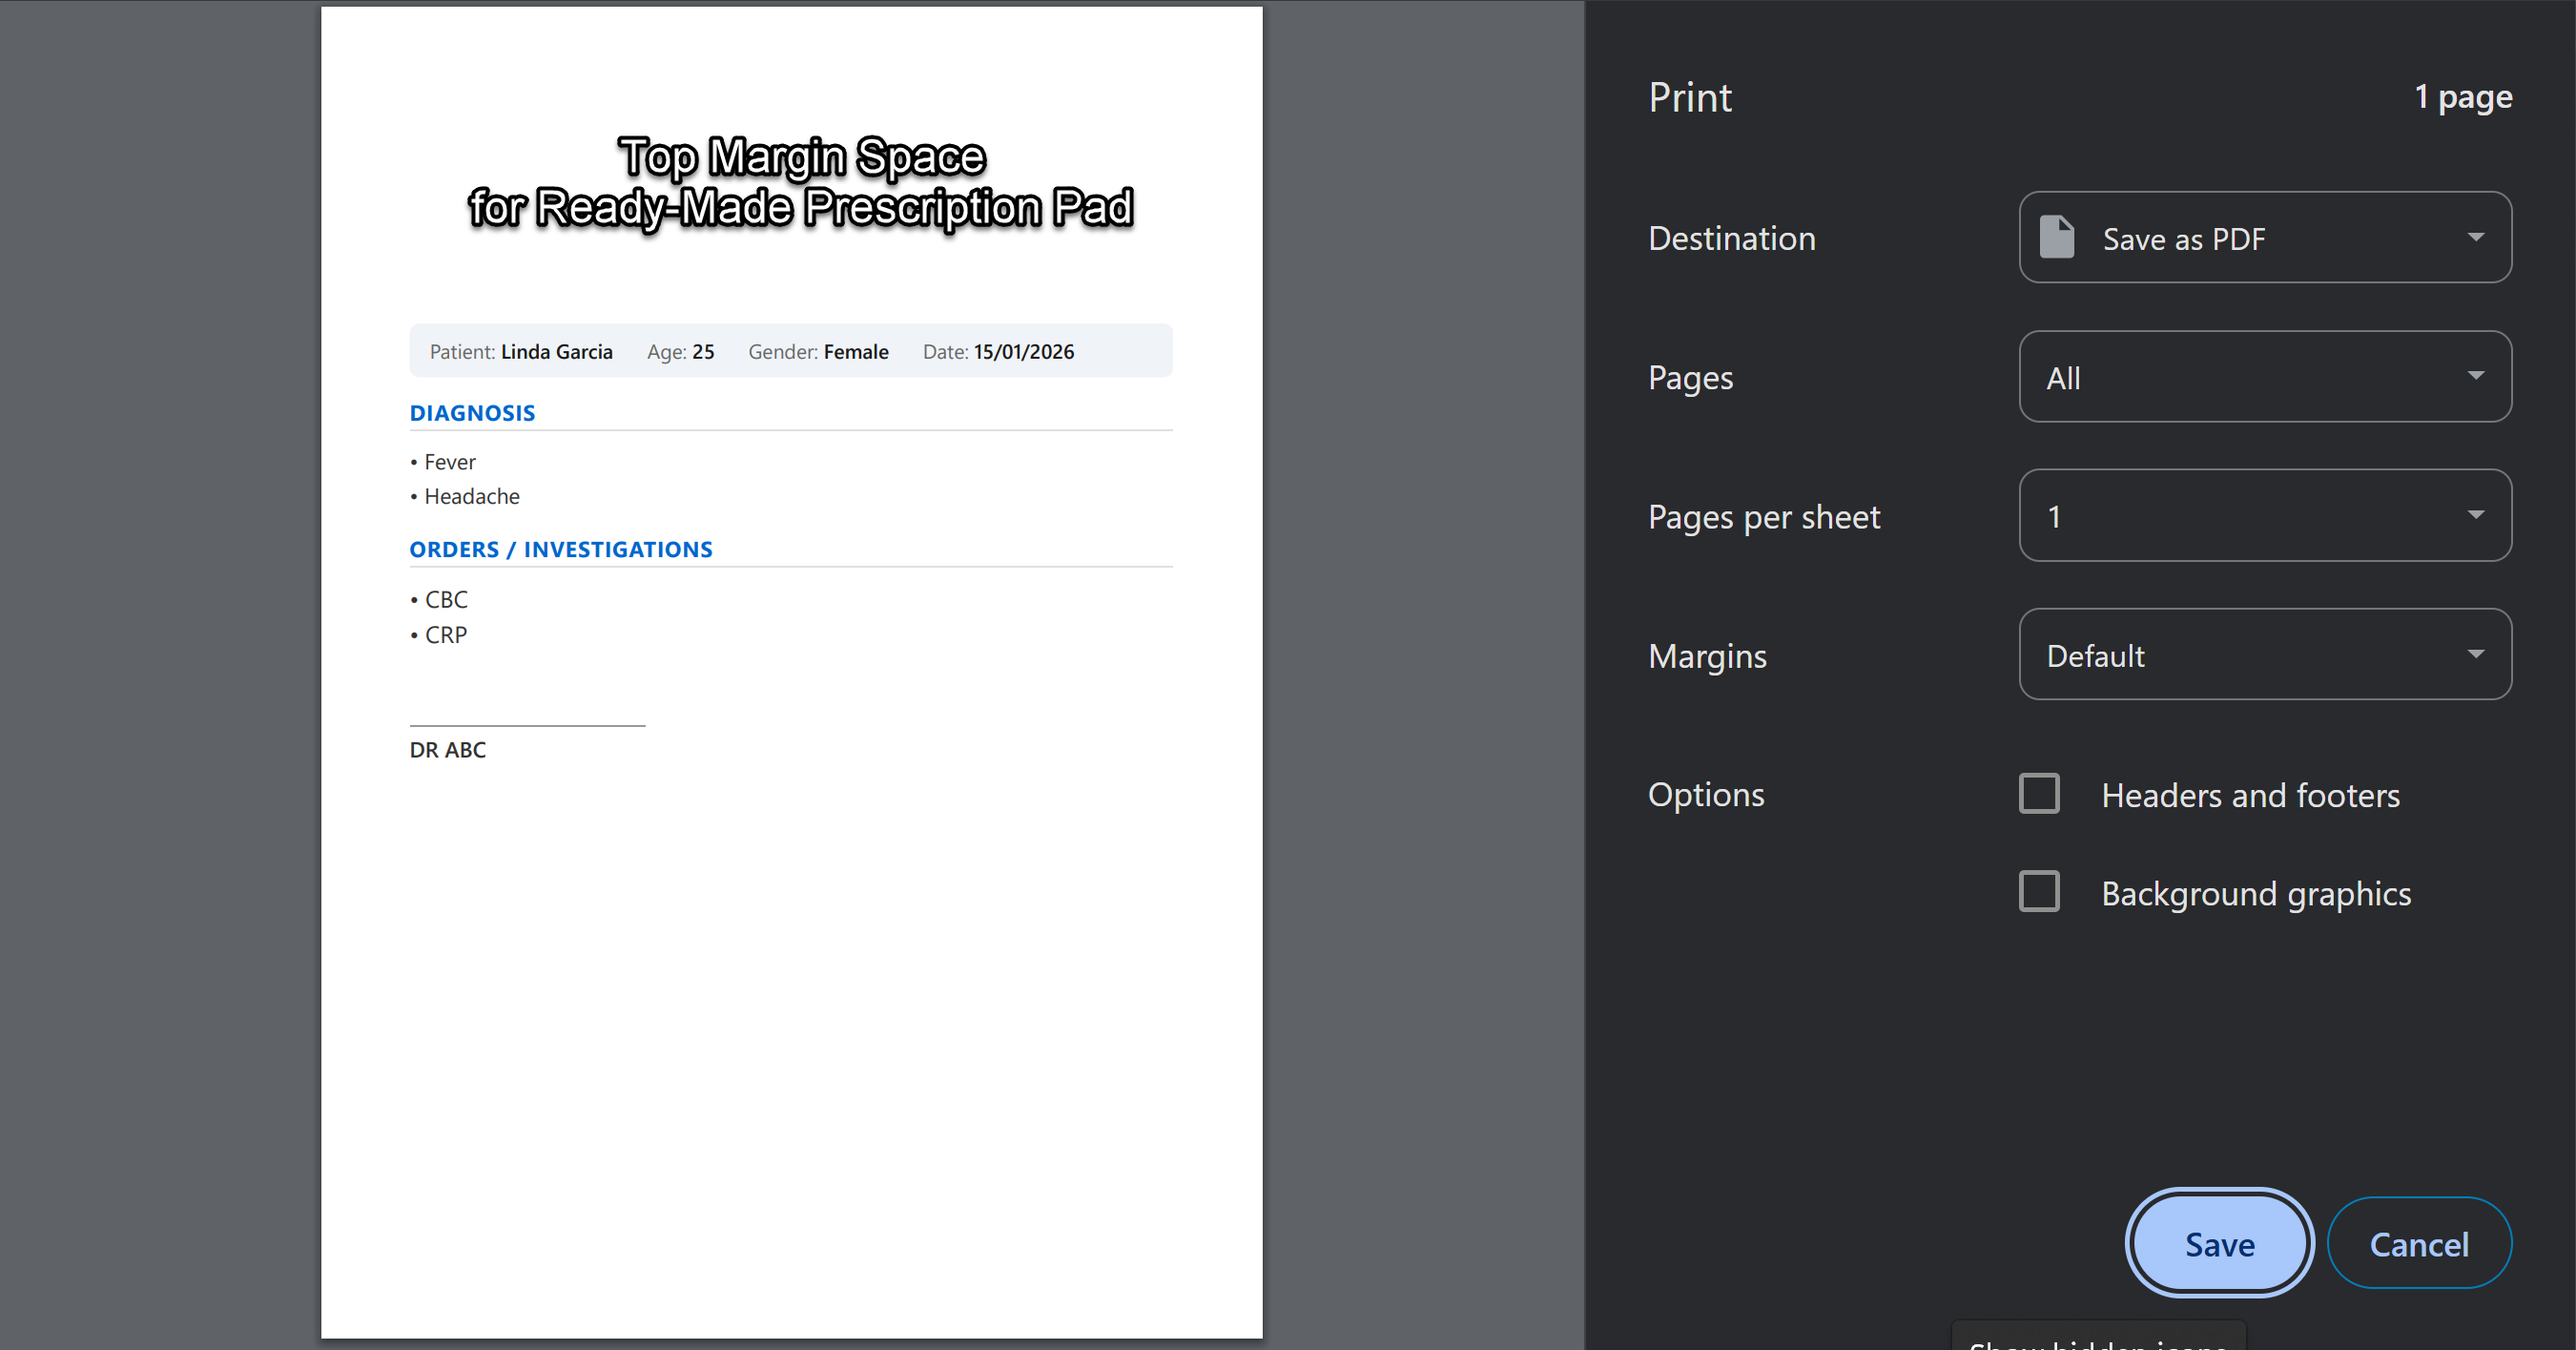
Content Only mode — prints only content with top margin space for pre-printed prescription paper
Medical Report (A4): Full report with all clinical details, on A4 paper.
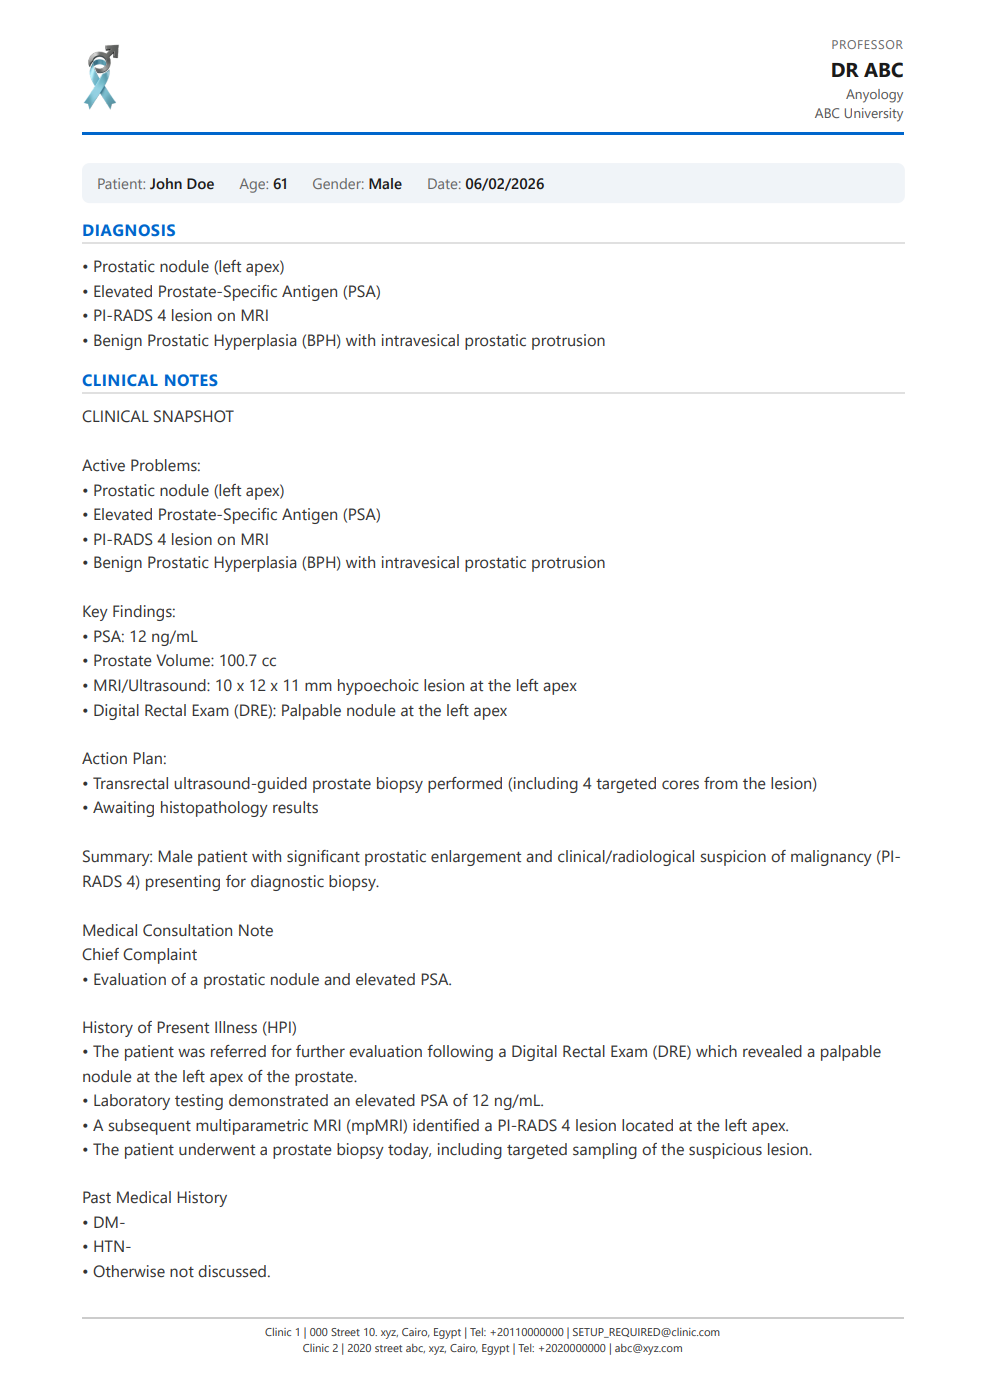
Printed Medical Report on A4 paper — complete clinical documentation
Reminder About Print Modes
- "Full Letterhead" — prints everything (logo, header, content, footer). Use with blank white paper.
- "Content Only" — prints only patient info and content. Use with pre-printed paper.
To change: hamburger menu > Setup > Profile > Edit > scroll to PrintMode_Rx and PrintMode_Orders.
Managing Payments
- Open any visit record
- The VisitFee field auto-fills from your Price List (or type manually)
- After the patient pays, tap "Mark Paid"
- To record payment method: edit the visit and set Payment Type (Cash, Credit Card, or Bank Transfer)
Clinical Search — Search Through Your Notes
The Clinical Search feature lets you search through all your past clinical notes using keywords and date ranges. This is extremely useful for finding specific cases, tracking treatment patterns, or recalling past diagnoses.
- Tap Clinical Search in the bottom menu (magnifying glass icon)
- Type a keyword in the search field — for example: a drug name ("Panadol"), a diagnosis ("diabetes"), a symptom ("chest pain"), or a procedure name
- Set a date range (Start Date and End Date) to narrow down the results
- Tap Search
- The app shows all visits that contain your keyword in any clinical note field (Chief Complaint, History, Examination, Diagnosis, Prescription, Orders, etc.)
- Tap on any result to open that visit record
- Search "metformin" to find all patients you prescribed metformin to
- Search "hypertension" to find all visits with a hypertension diagnosis
- Search "ultrasound" to find all visits where you ordered an ultrasound
- Search a patient's name to quickly find their recent visits
Financial Reports
- Tap Finance in the bottom menu (Admin and Accountant only)
- Set your filters: Start/End Date, Group By (Category, Visit Site, Payment Status, etc.), and additional filters (Category, Workplace Type, Payment Type, etc.)
- Each group shows its subtotal. Total Revenue updates automatically
- To export: scroll to Report Results > tap Export to download a CSV file for Excel
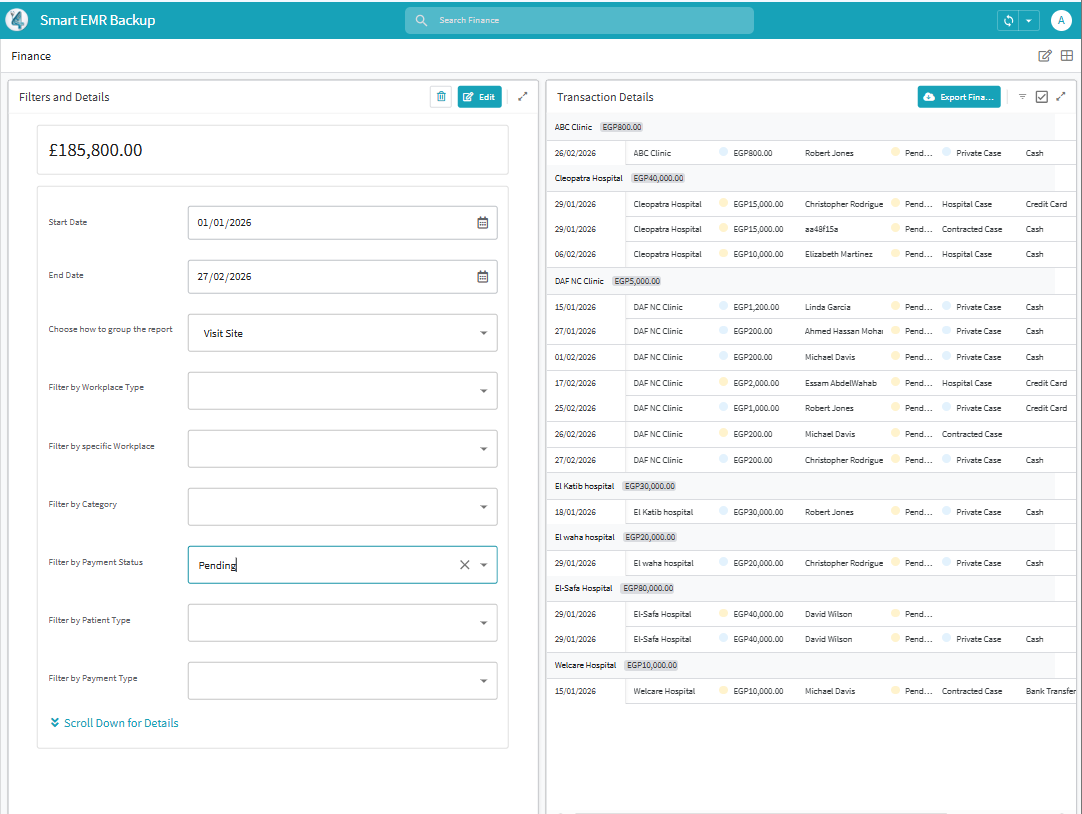
Finance dashboard — filter and group your revenue data by date, category, workplace, and more
Frequently Asked Questions
We have a dedicated FAQ page with answers to common questions about setup, AI notes, syncing, printing, finance reports, and more.
➔ Visit the Smart EMR FAQQuick Reference
| I want to... | Where do I go? |
|---|---|
| Clone the app | clinic.ai4docs.ai > Settings > Clone Smart EMR |
| Add myself as Admin | Hamburger menu > Setup > Users > Add |
| Set API Key, Email, Sheet ID | Hamburger menu > Setup > SETTINGS > Edit |
| Share spreadsheet with backend | Google Drive > AppSheet > data > SmartEMR > Visits > Share |
| Edit my doctor profile | Hamburger menu > Setup > Profile > Edit |
| Upload my logo | clinic.ai4docs.ai > Settings > Profile > Clinic Logo |
| Add a clinic location | Hamburger menu > Setup > Manage Workplaces > Add |
| Add a new patient | Patients (bottom menu) > tap + |
| Book an appointment | Open patient file > Book Appointment |
| Start AI documentation | Visit record > Start CDA (CDA opens immediately) |
| Fetch the AI note | Visit record > sync > Fetch Note > wait > sync again |
| Print a prescription | Visit record > Print Prescription |
| Print a medical report | Visit record > Print Medical Report |
| Print lab/imaging orders | Visit record > Print Orders |
| Print a referral letter | Visit record > Print Referral Letter |
| Record a payment | Open visit > Mark Paid |
| See my revenue | Finance (bottom menu) > set date range and filters |
| Export revenue to Excel | Finance > Report Results > Export |
| Search past notes by keyword | Clinical Search (bottom menu) > type keyword > set date range > Search |
| Add a staff member | Setup > Users > Add + AppSheet Editor > Share |
| Change print settings | Setup > Profile > Edit > PrintMode_Rx / PrintMode_Orders |
| Enable CDA prescriptions | clinic.ai4docs.ai > Settings > General > EMR Export Options |
Getting Help
Self-Service Resources (Available 24/7):
- Clone & Setup Guide: ai4docs.ai/smart-emr/setup
- This Help Guide: ai4docs.ai/smart-emr/docs
- Smart EMR FAQ: ai4docs.ai/smart-emr/faq
- AI Chat Assistant: Look for the chat widget on any AI4Docs.AI webpage
Community Support:
Join the AI4Docs.AI Doctors WhatsApp Group for tips, questions, and peer support.
💬 Join WhatsApp GroupSmart EMR by AI4Docs.AI — Your data, your control, your clinic.
AI4Docs.AI Ltd. (UK Company #16893518) | ai4docs.ai
Version 5.0 | March 2026